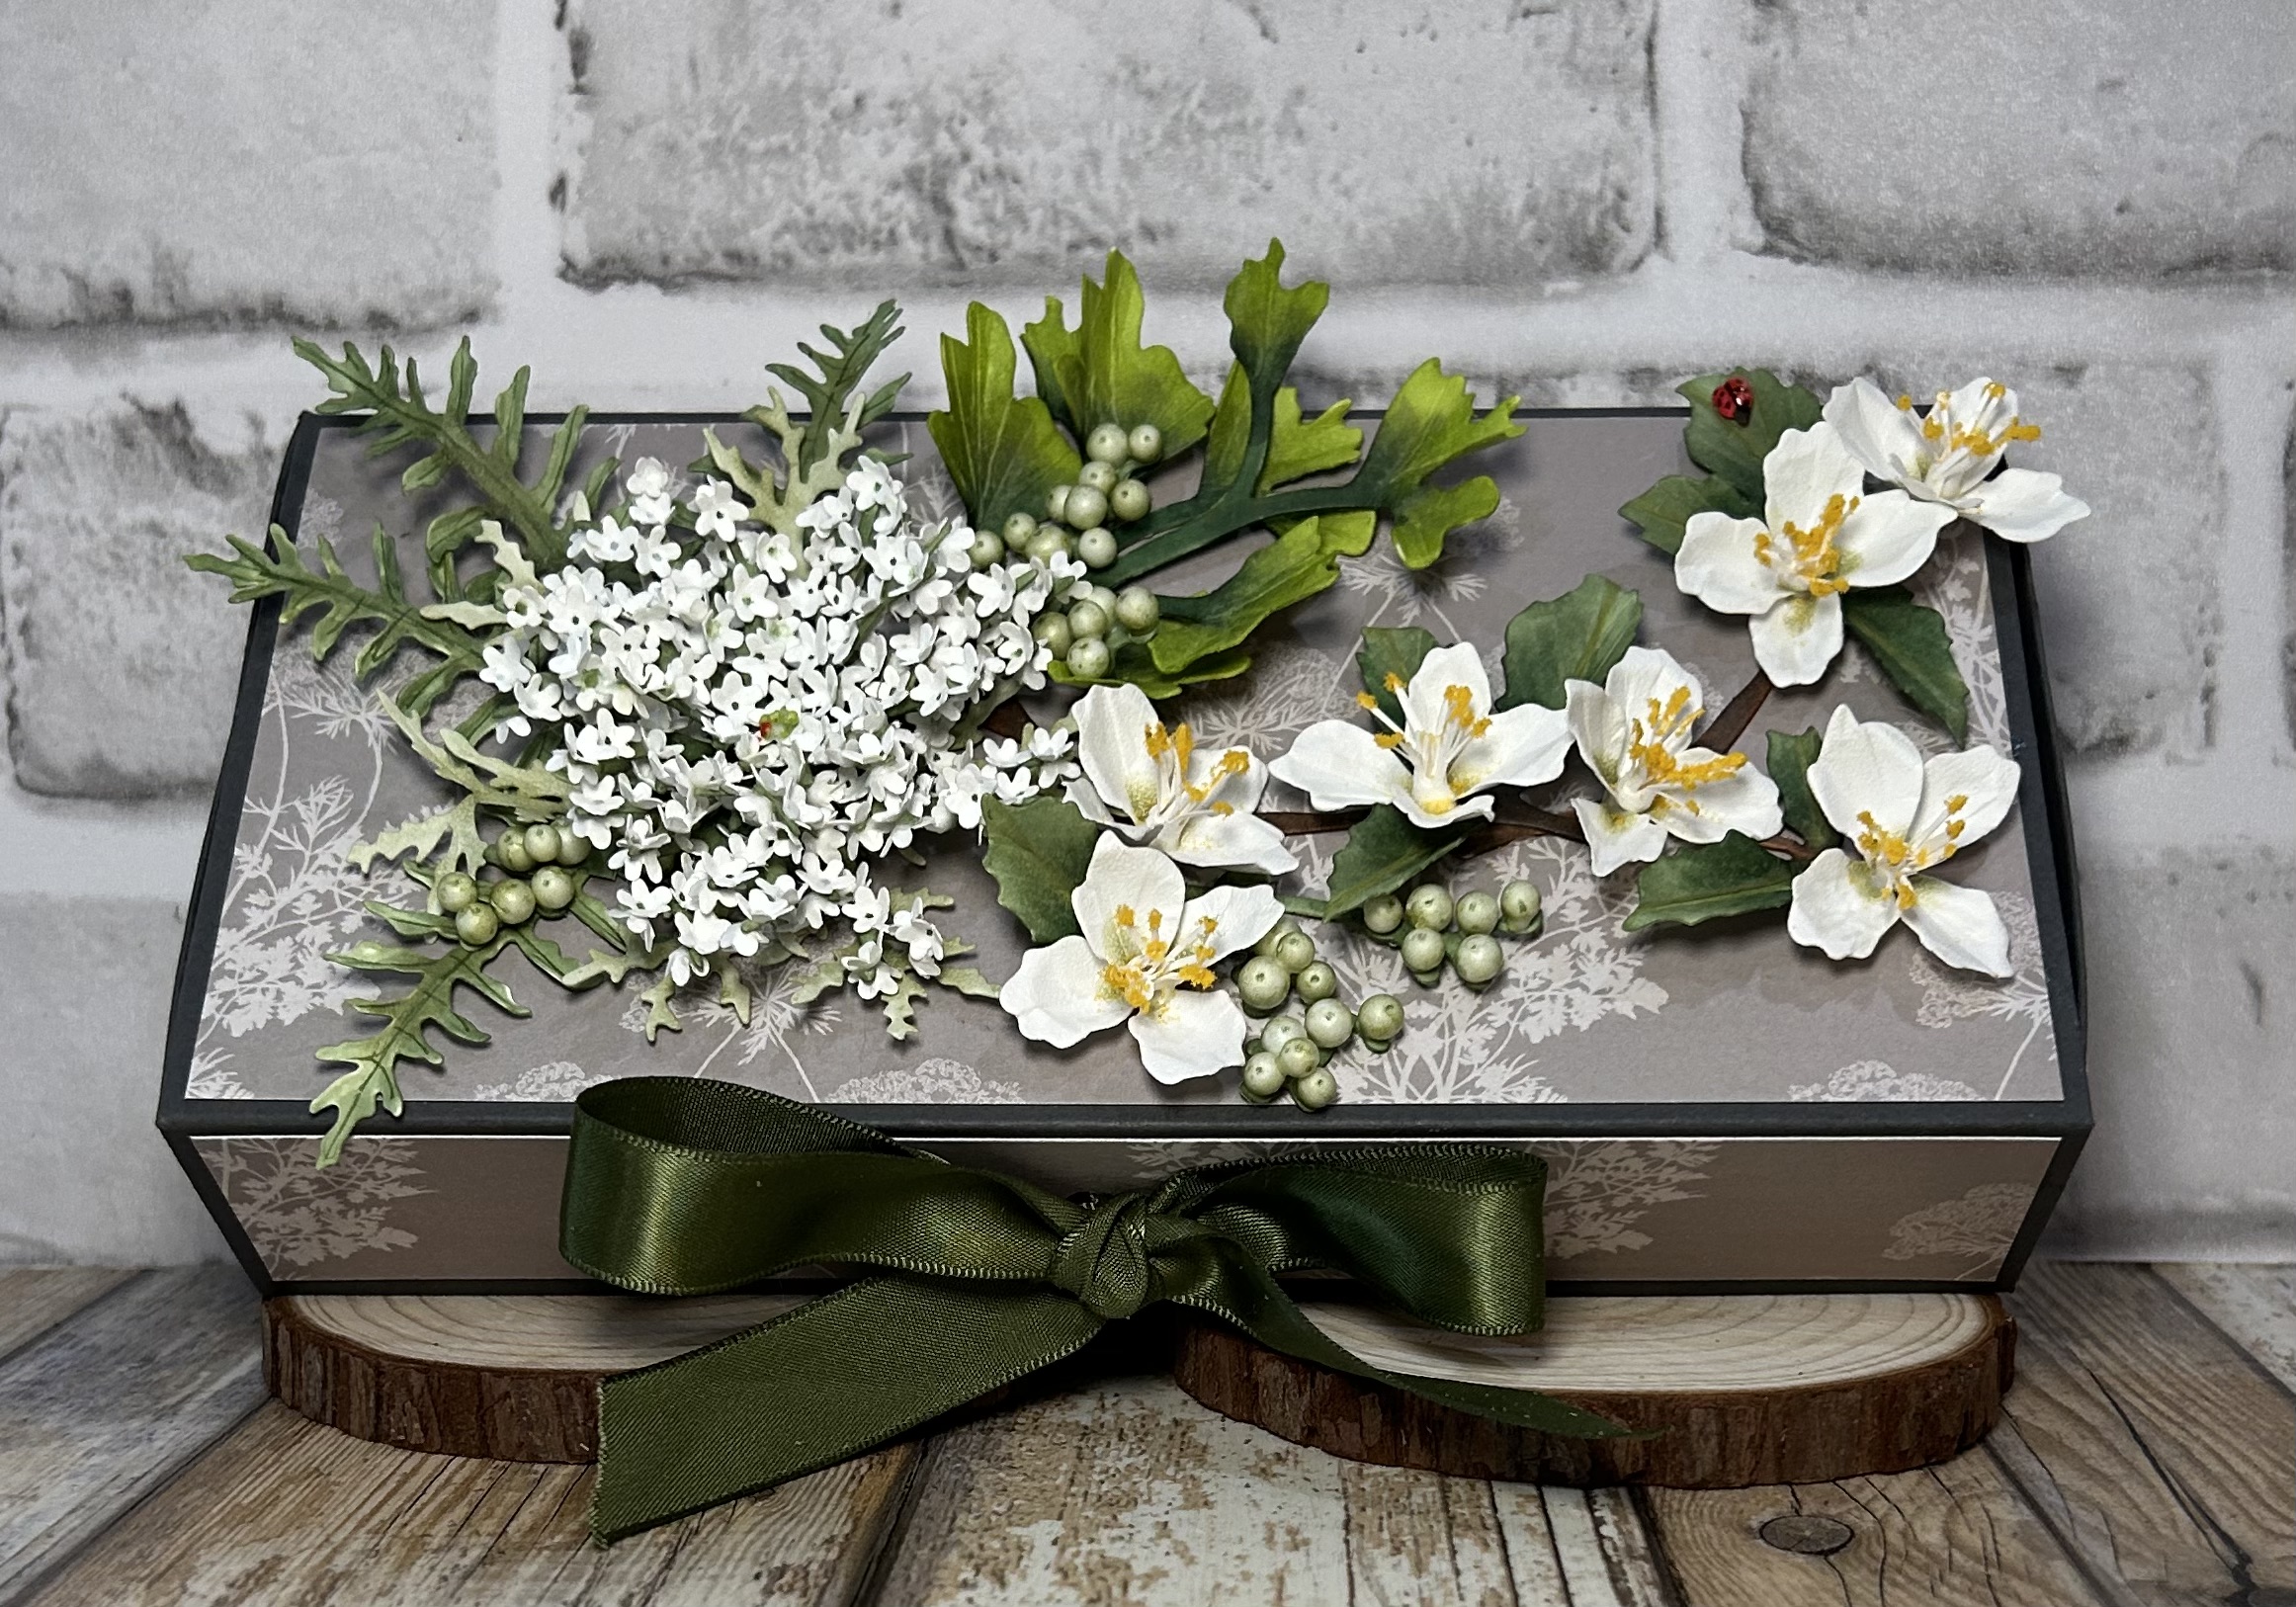
There’s nothing like seeing the first signs of green for Spring that bring hope! I created a simple box with a tone-on-tone gray cardstock to show off my two-color bouquet of white Queen Anne’s Lace and Mock Orange.
Flap Box
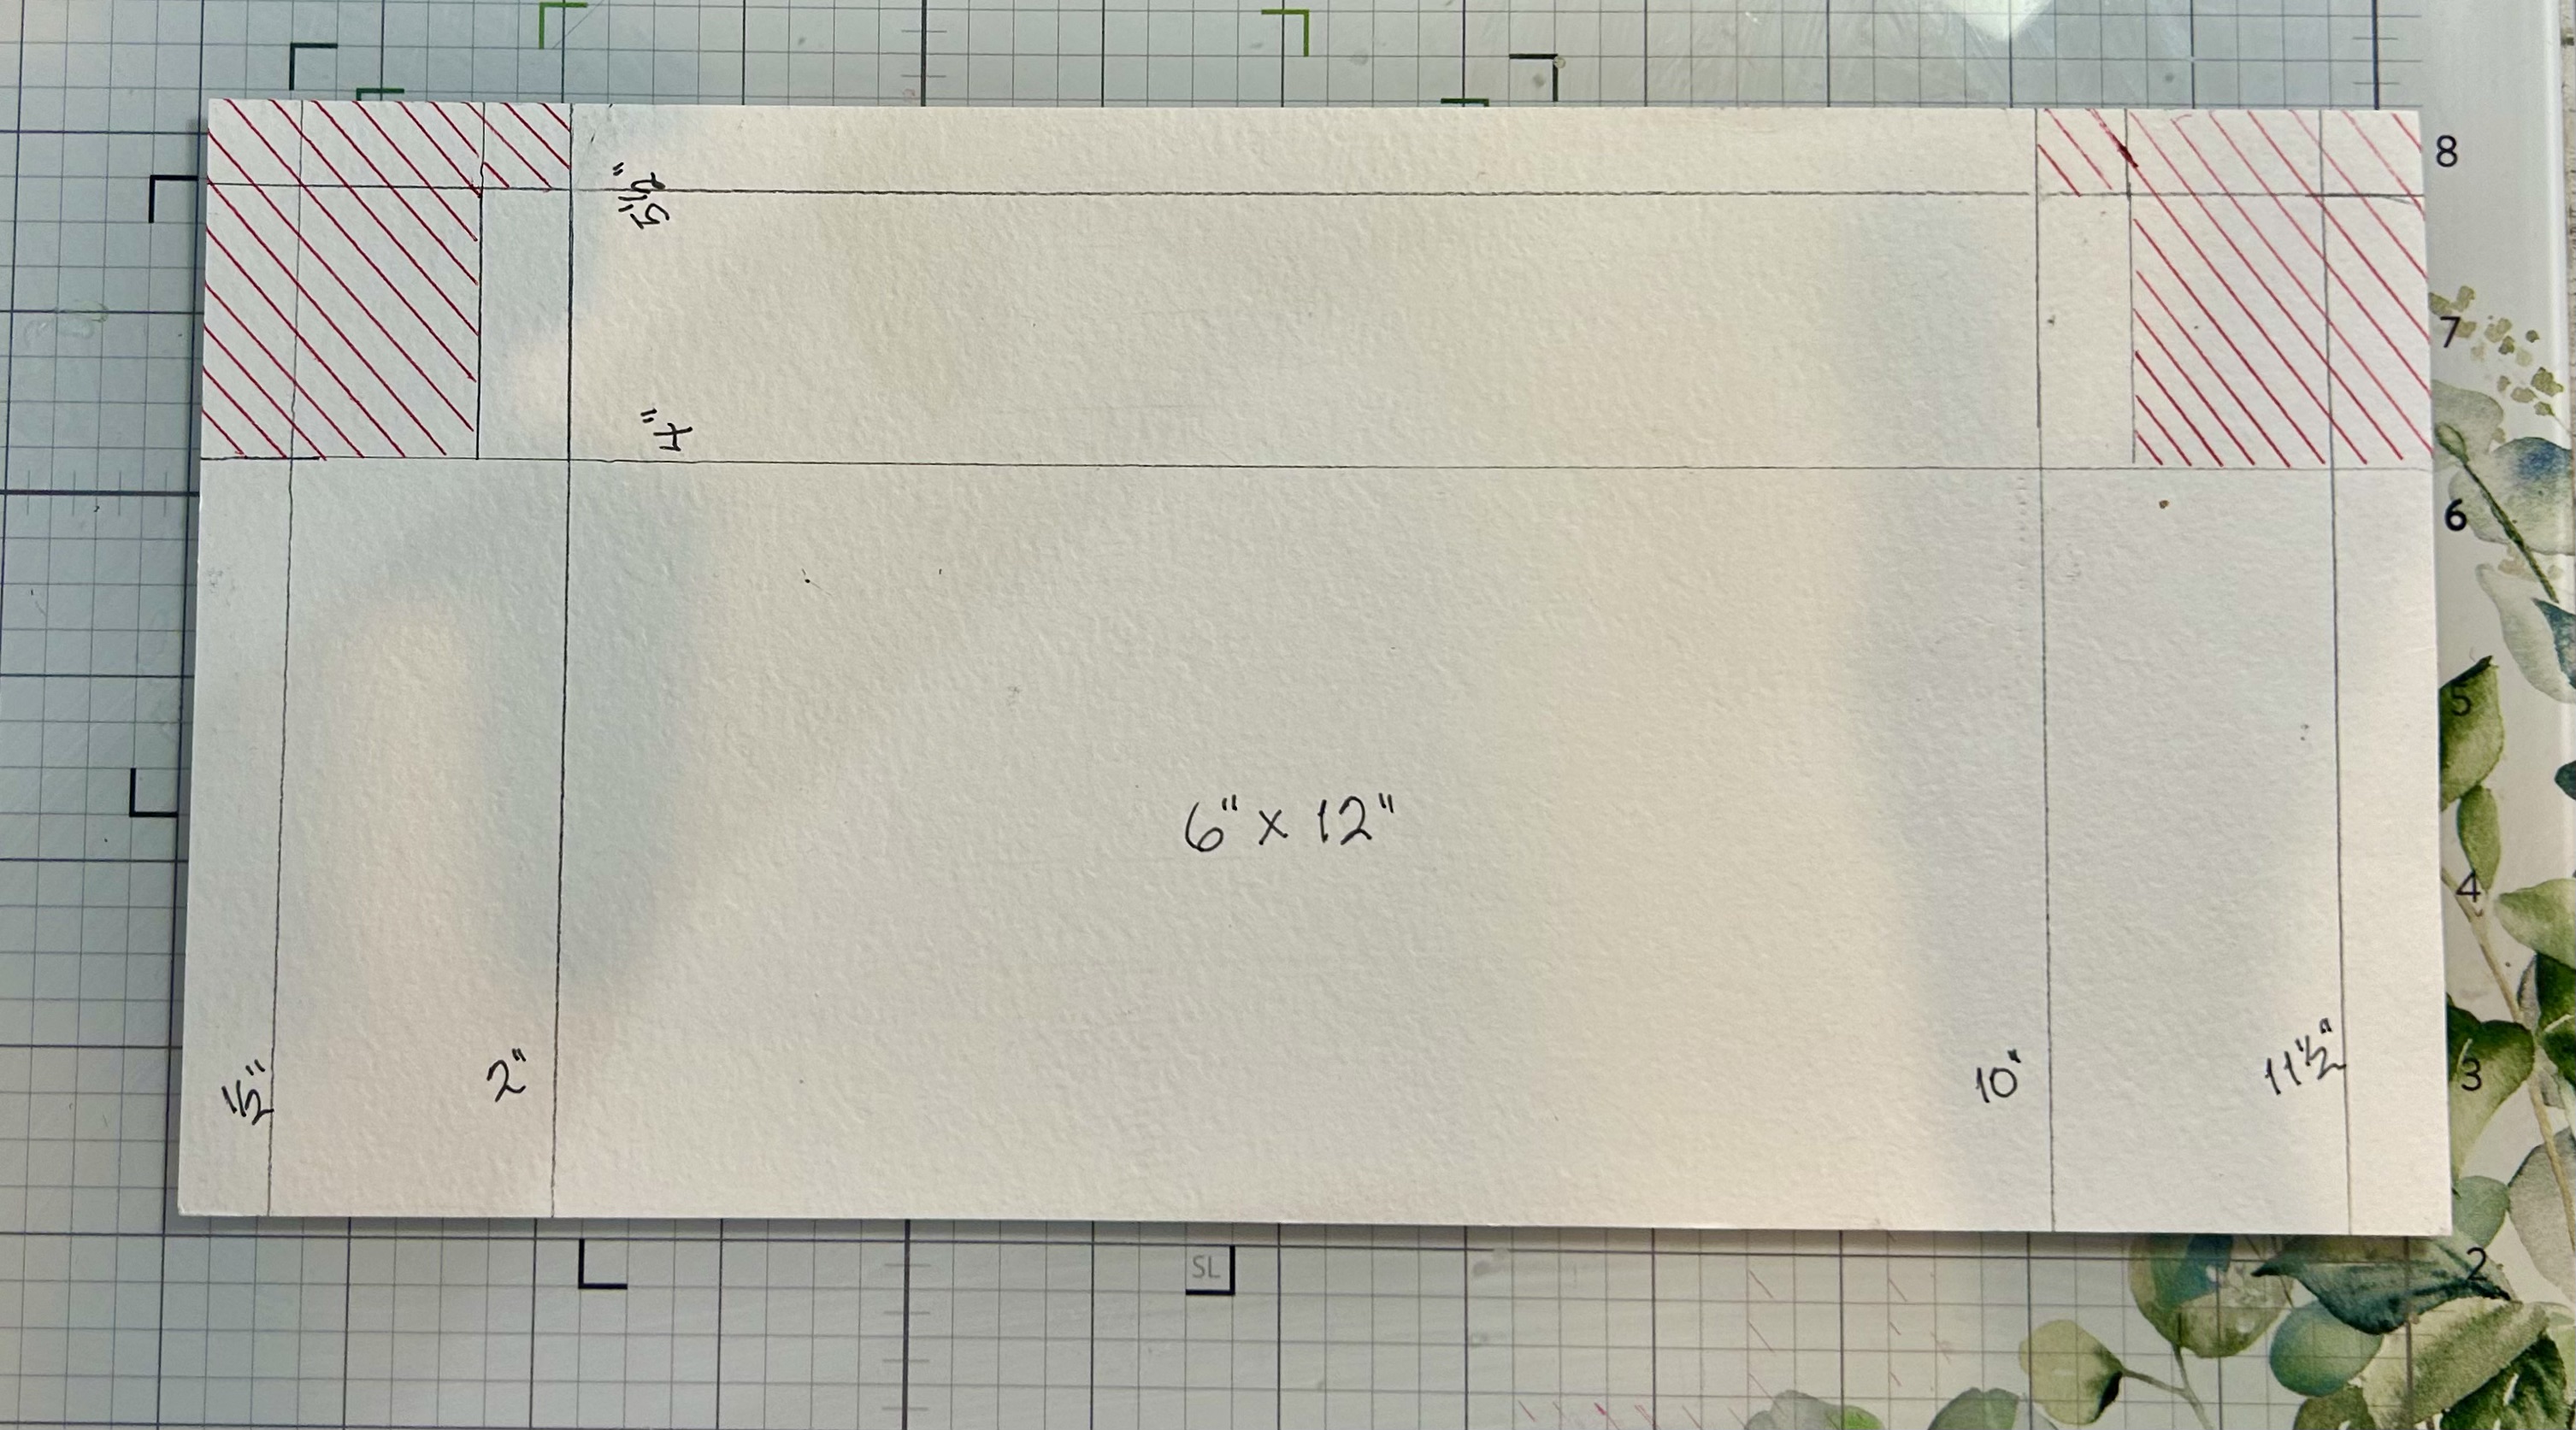
I prefer to use 100 lb./300 gsm cardstock for my box and I chose a graphite gray and a gray/white DSP to use as the background. You’ll need two 12″ x 12″ sheets to cut the box.
The base is cut 12″ x 6″ and scored, with the 12″ side up at, 1/2″ – 2″ – 10″ – 11 1/2″
Turn this section with the 6″ side up and score at, 4″ – 5 1/2″
You will trim away the sections shown in Red.
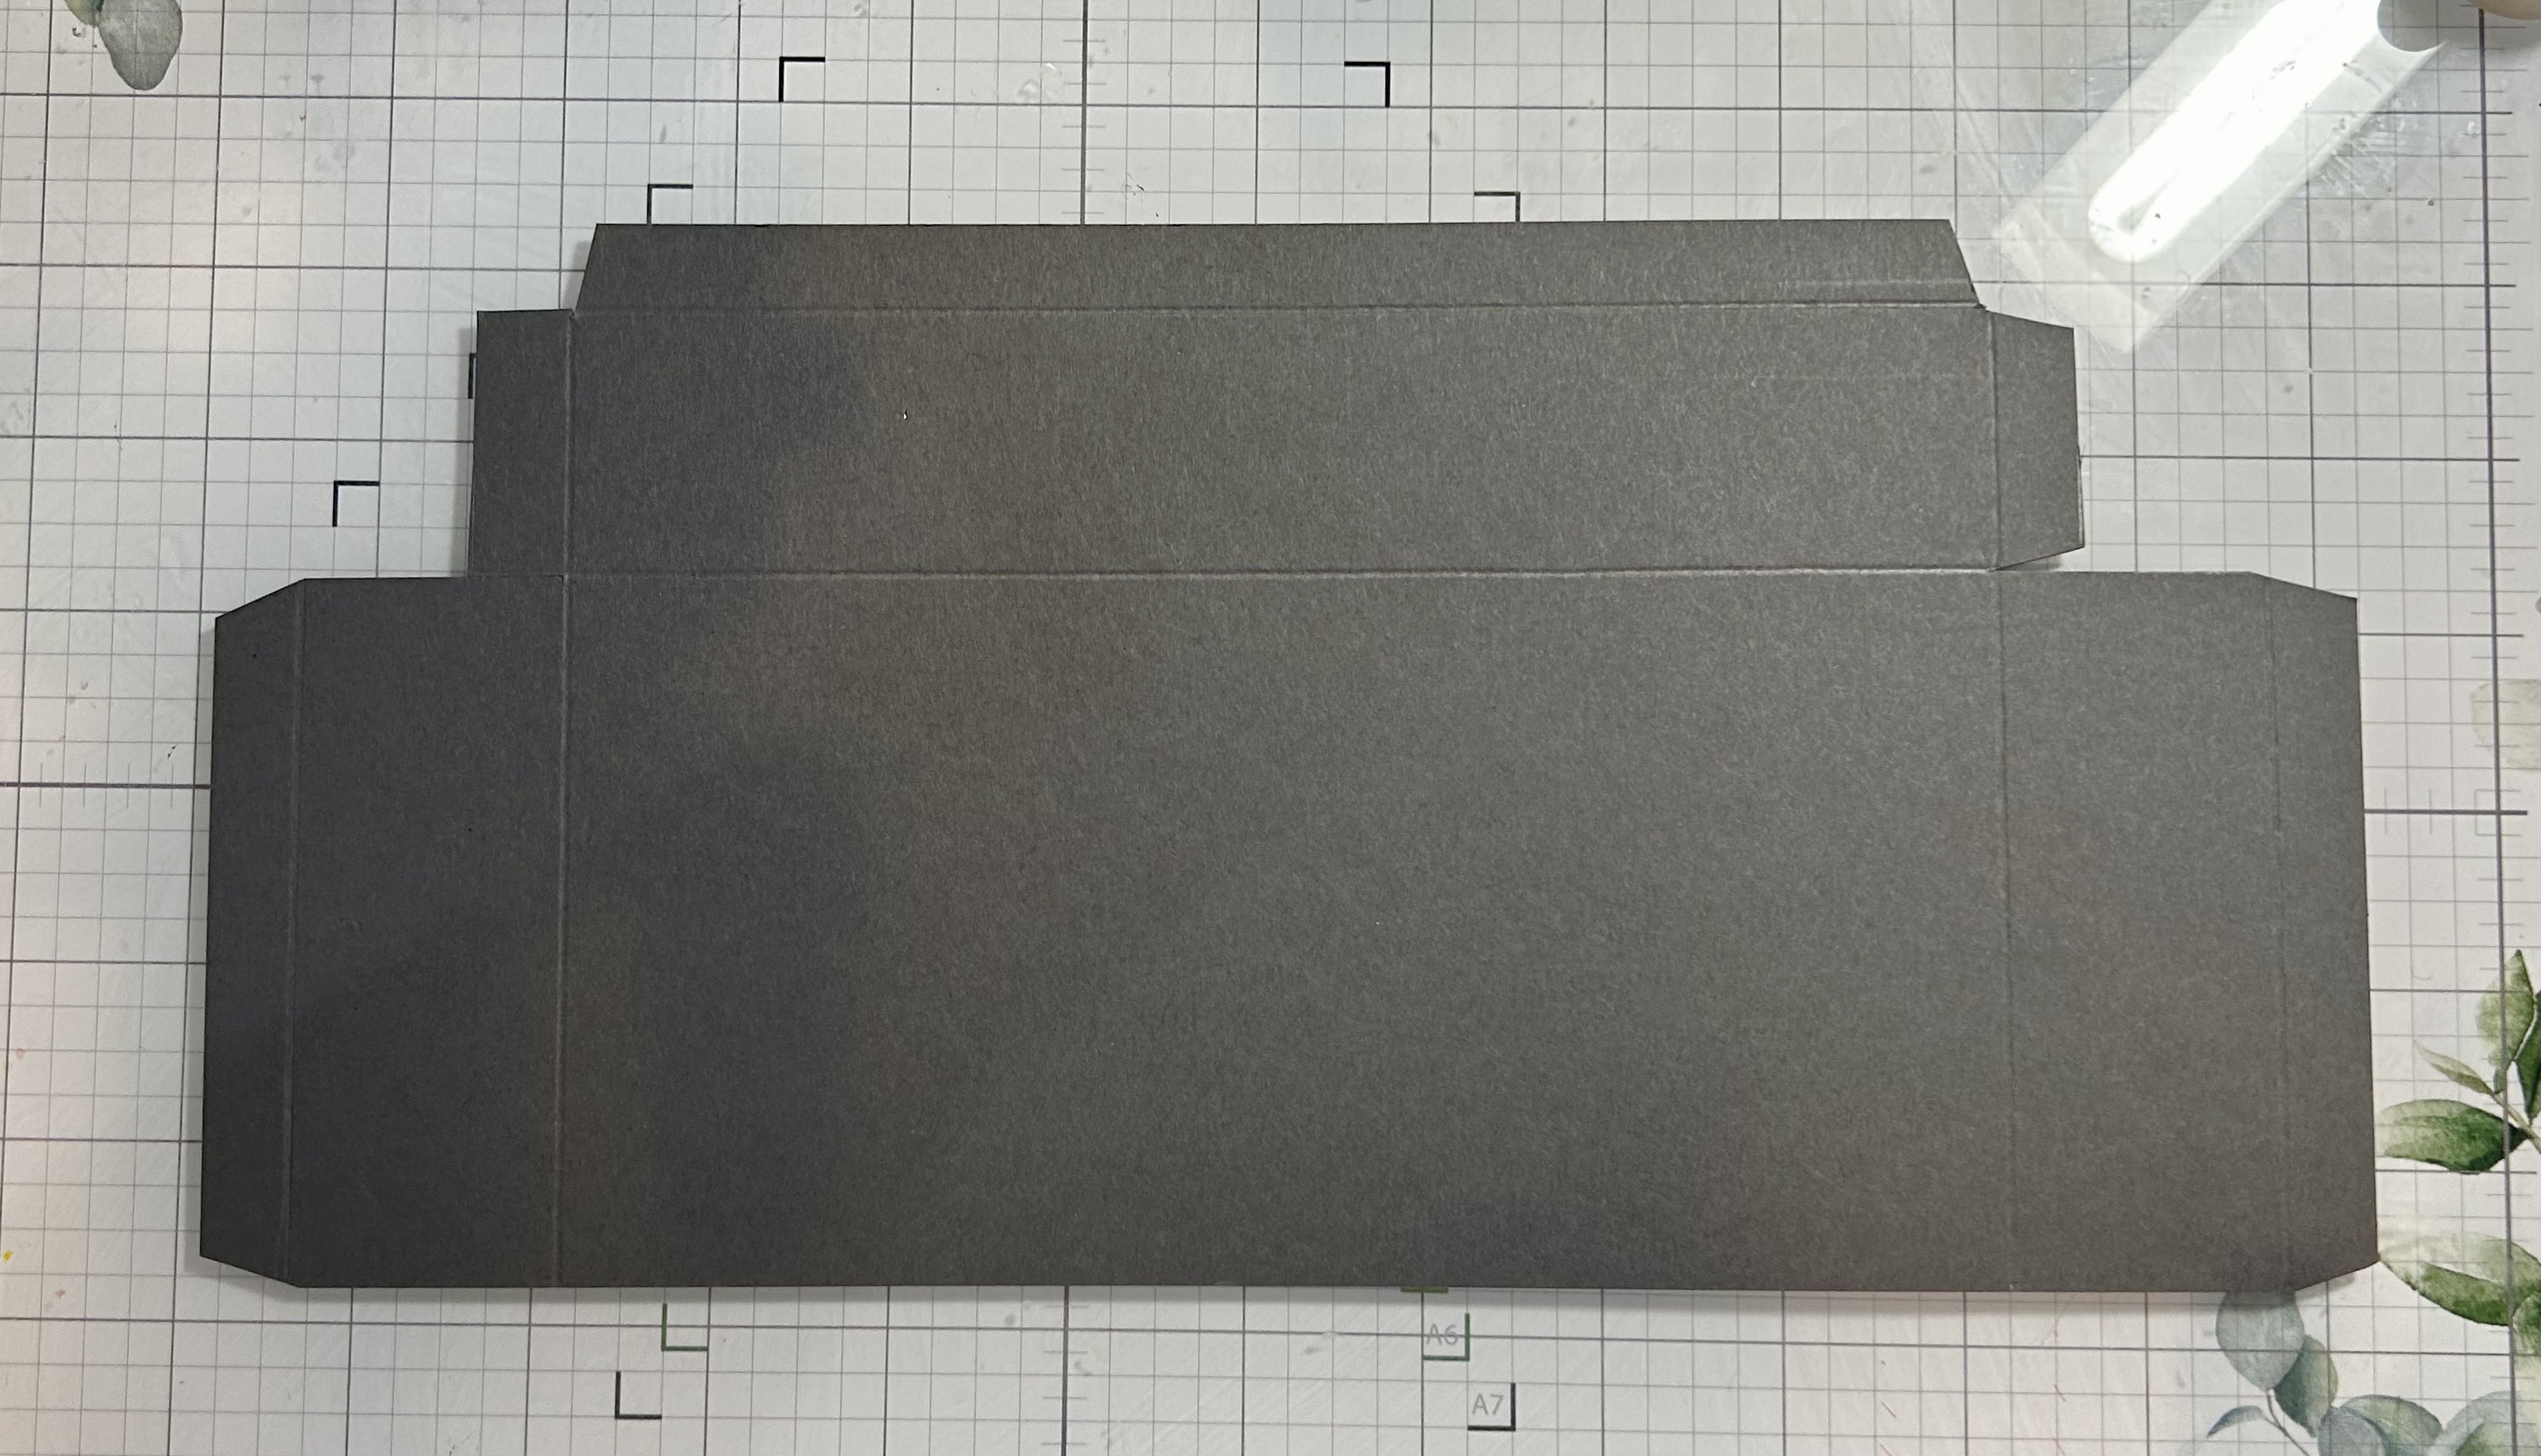
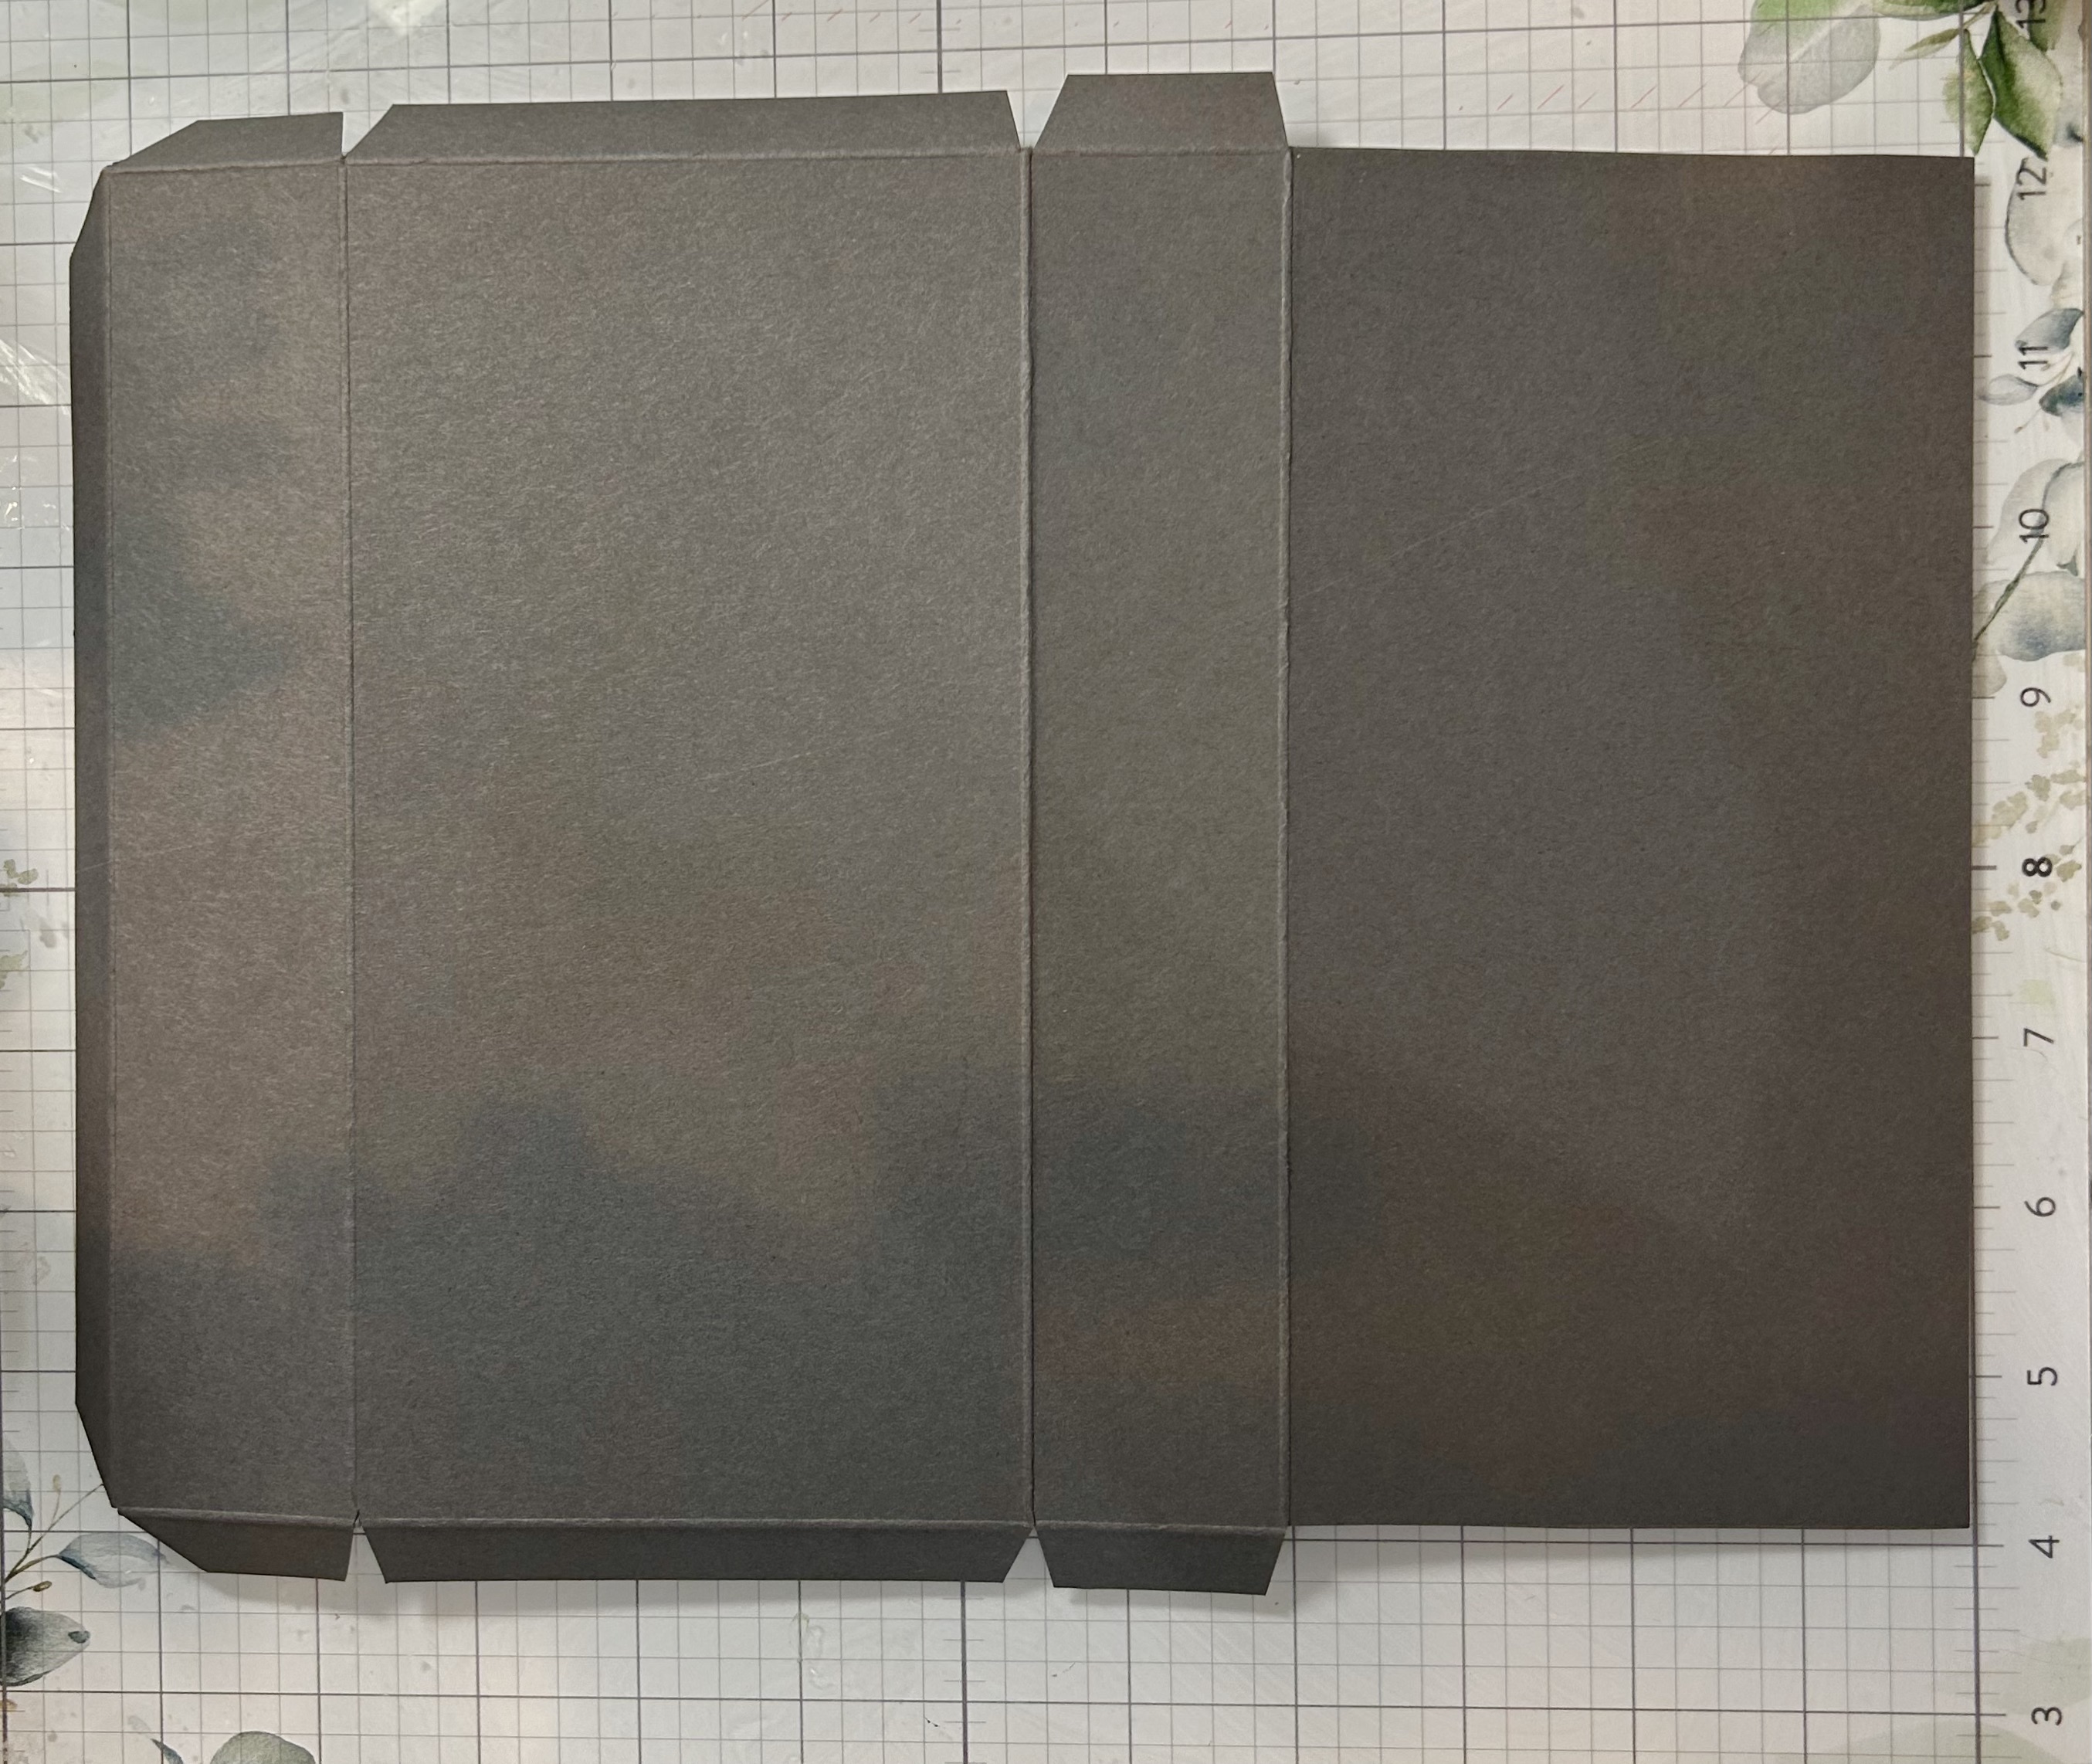
5. The flapped section is cut at 9″ x 11 1/2″, and scored, with the 11 1/2″ side up at, 1/2″ – 2″ – 6″ – 7 1/2″
6. Turn this section with the 9″ side up and score at, 1/2″ – 8 1/2″ and trim away the sections in Red!
For the DSP:
(2) 3 3/4″ x 7 3/4″
(1) 1 1/4″ x 7 3/4″
(2) 1 1/4″ x 3 3/4″
Tune in to my Facebook page–Susan’s Garden Club 2–and I will show how to put this box together and decorate the top!
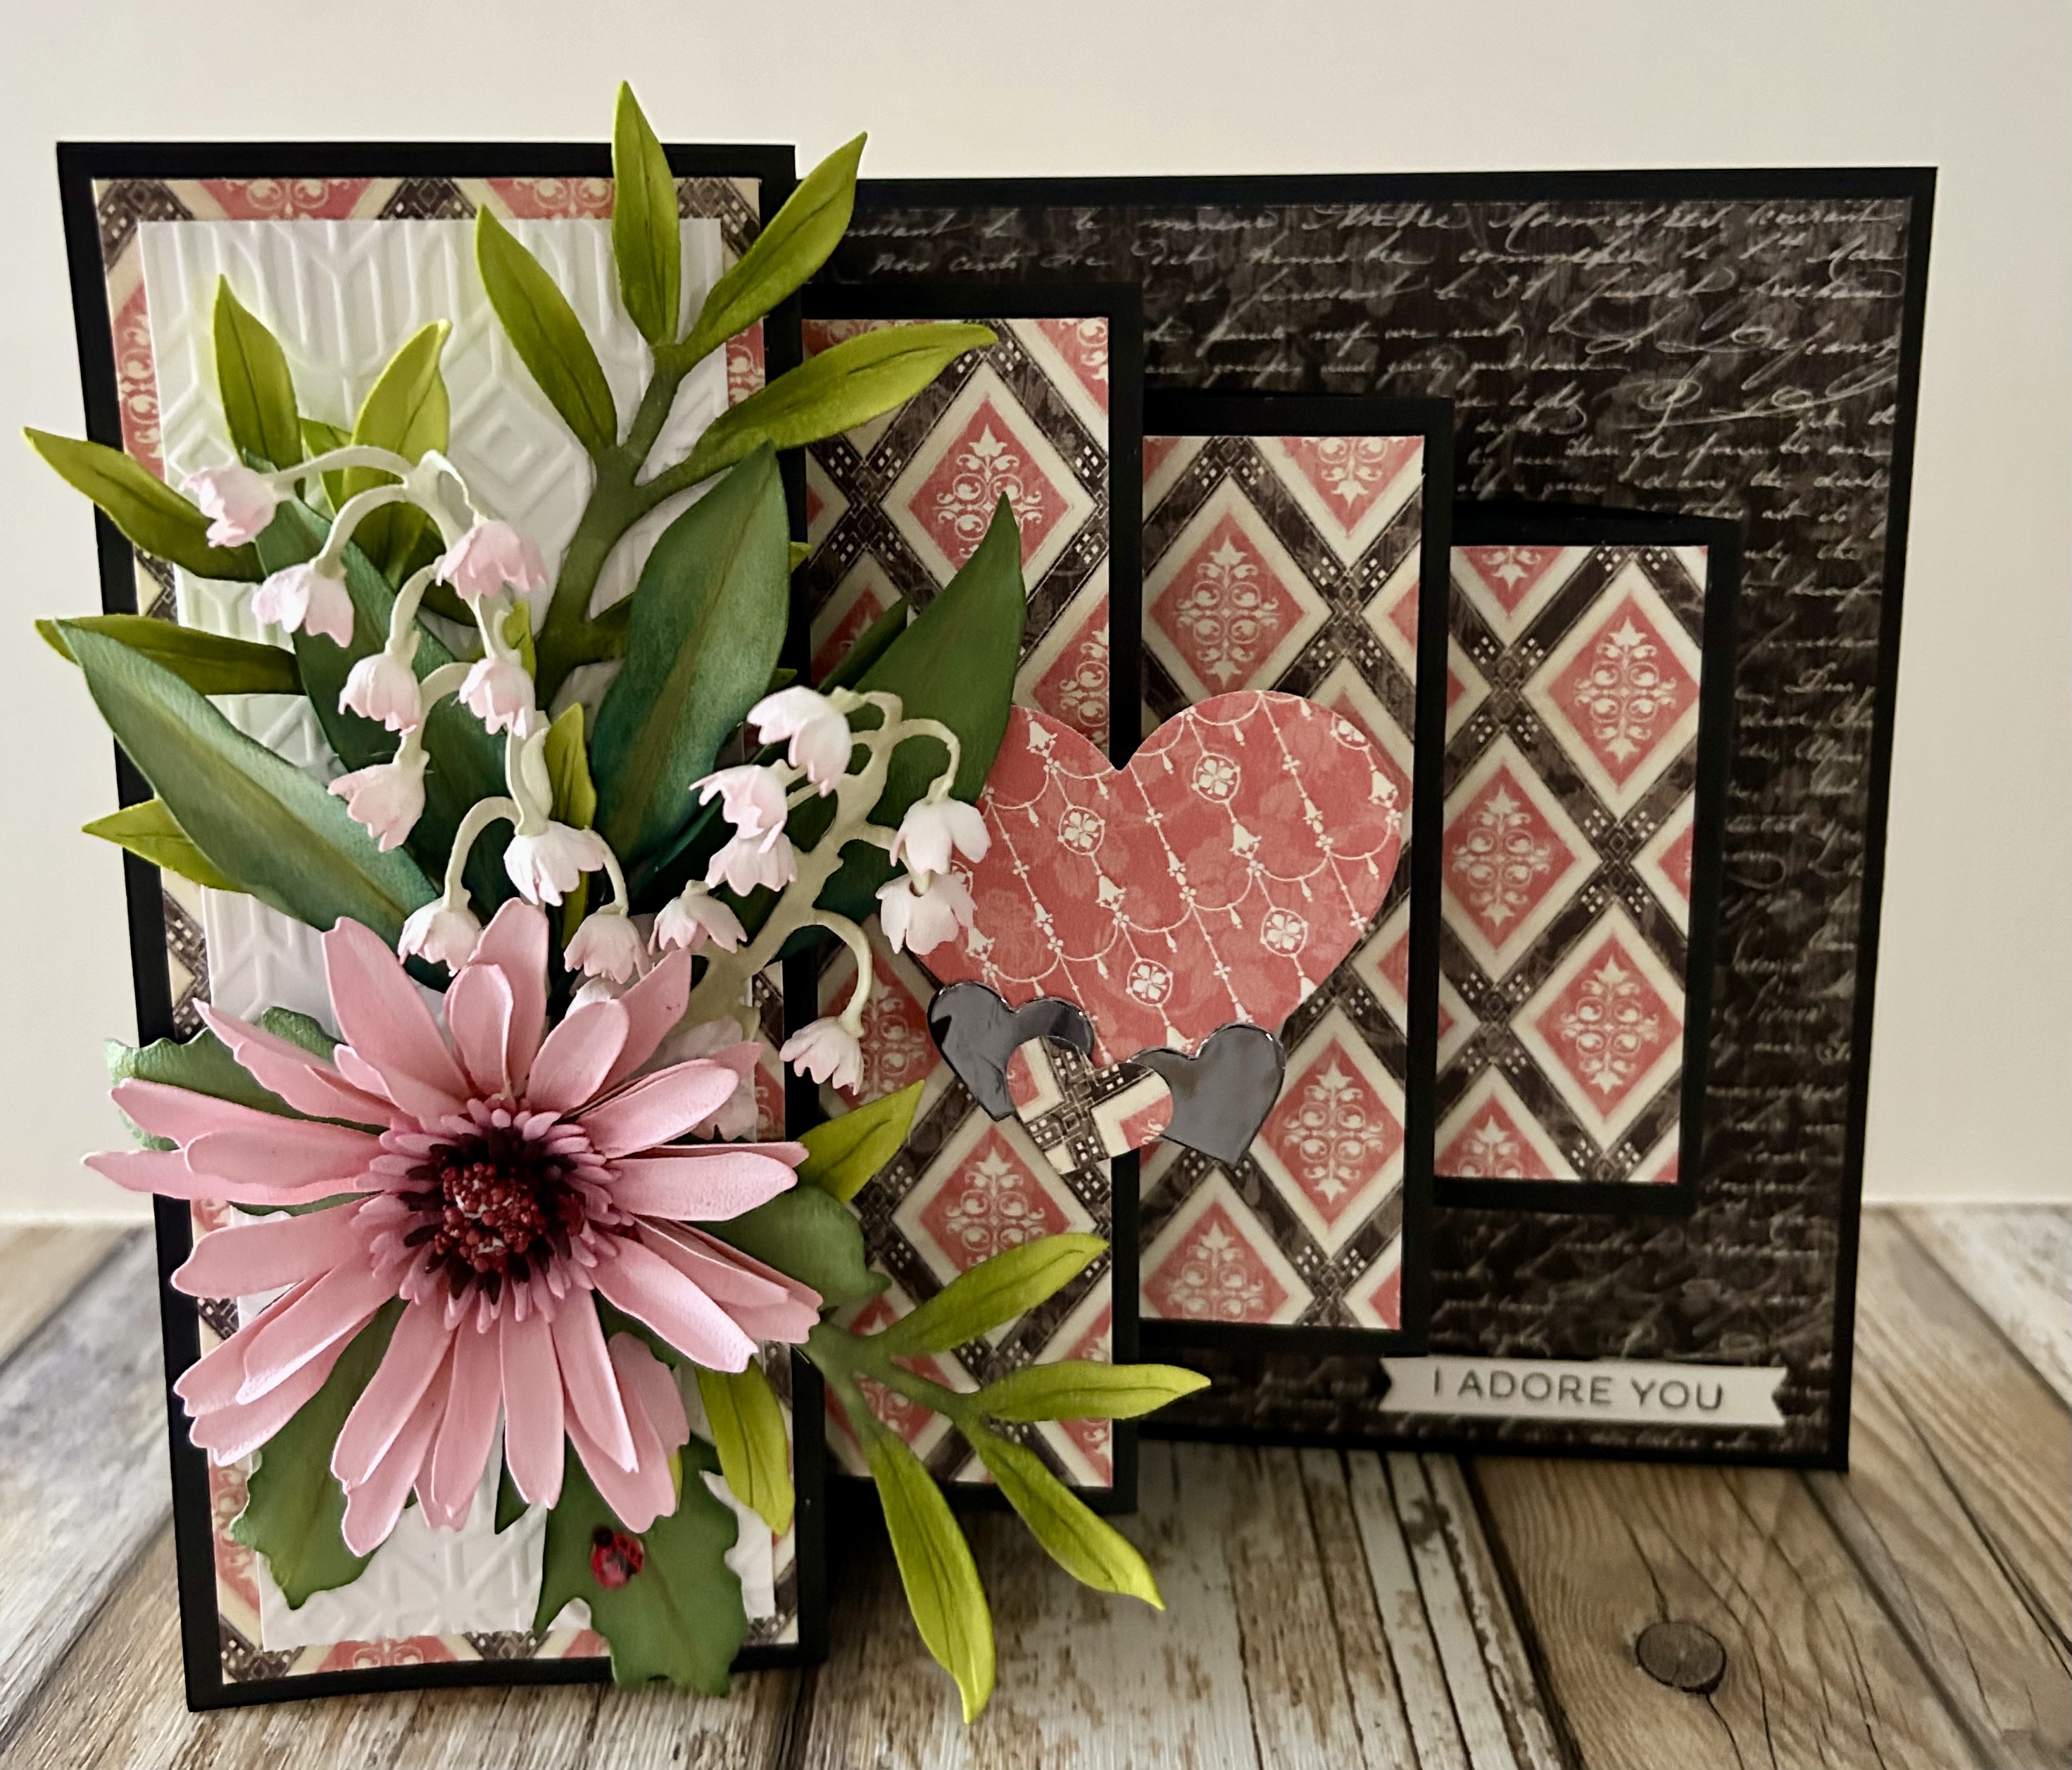
On Susan’s Garden Club 2 today, I showed how to do this simple, but clever card style that will surely impress your recipient. I added a Gerber Daisy, Lily of Valley and Lemon Grass for a simple, but breathtaking bouquet!
Let’s Get Started
I used 100 lb/300 gsm cardstock for my Z-Fold Base and the three Blocks. You will also need some double-sided cardstock and some white cardstock.
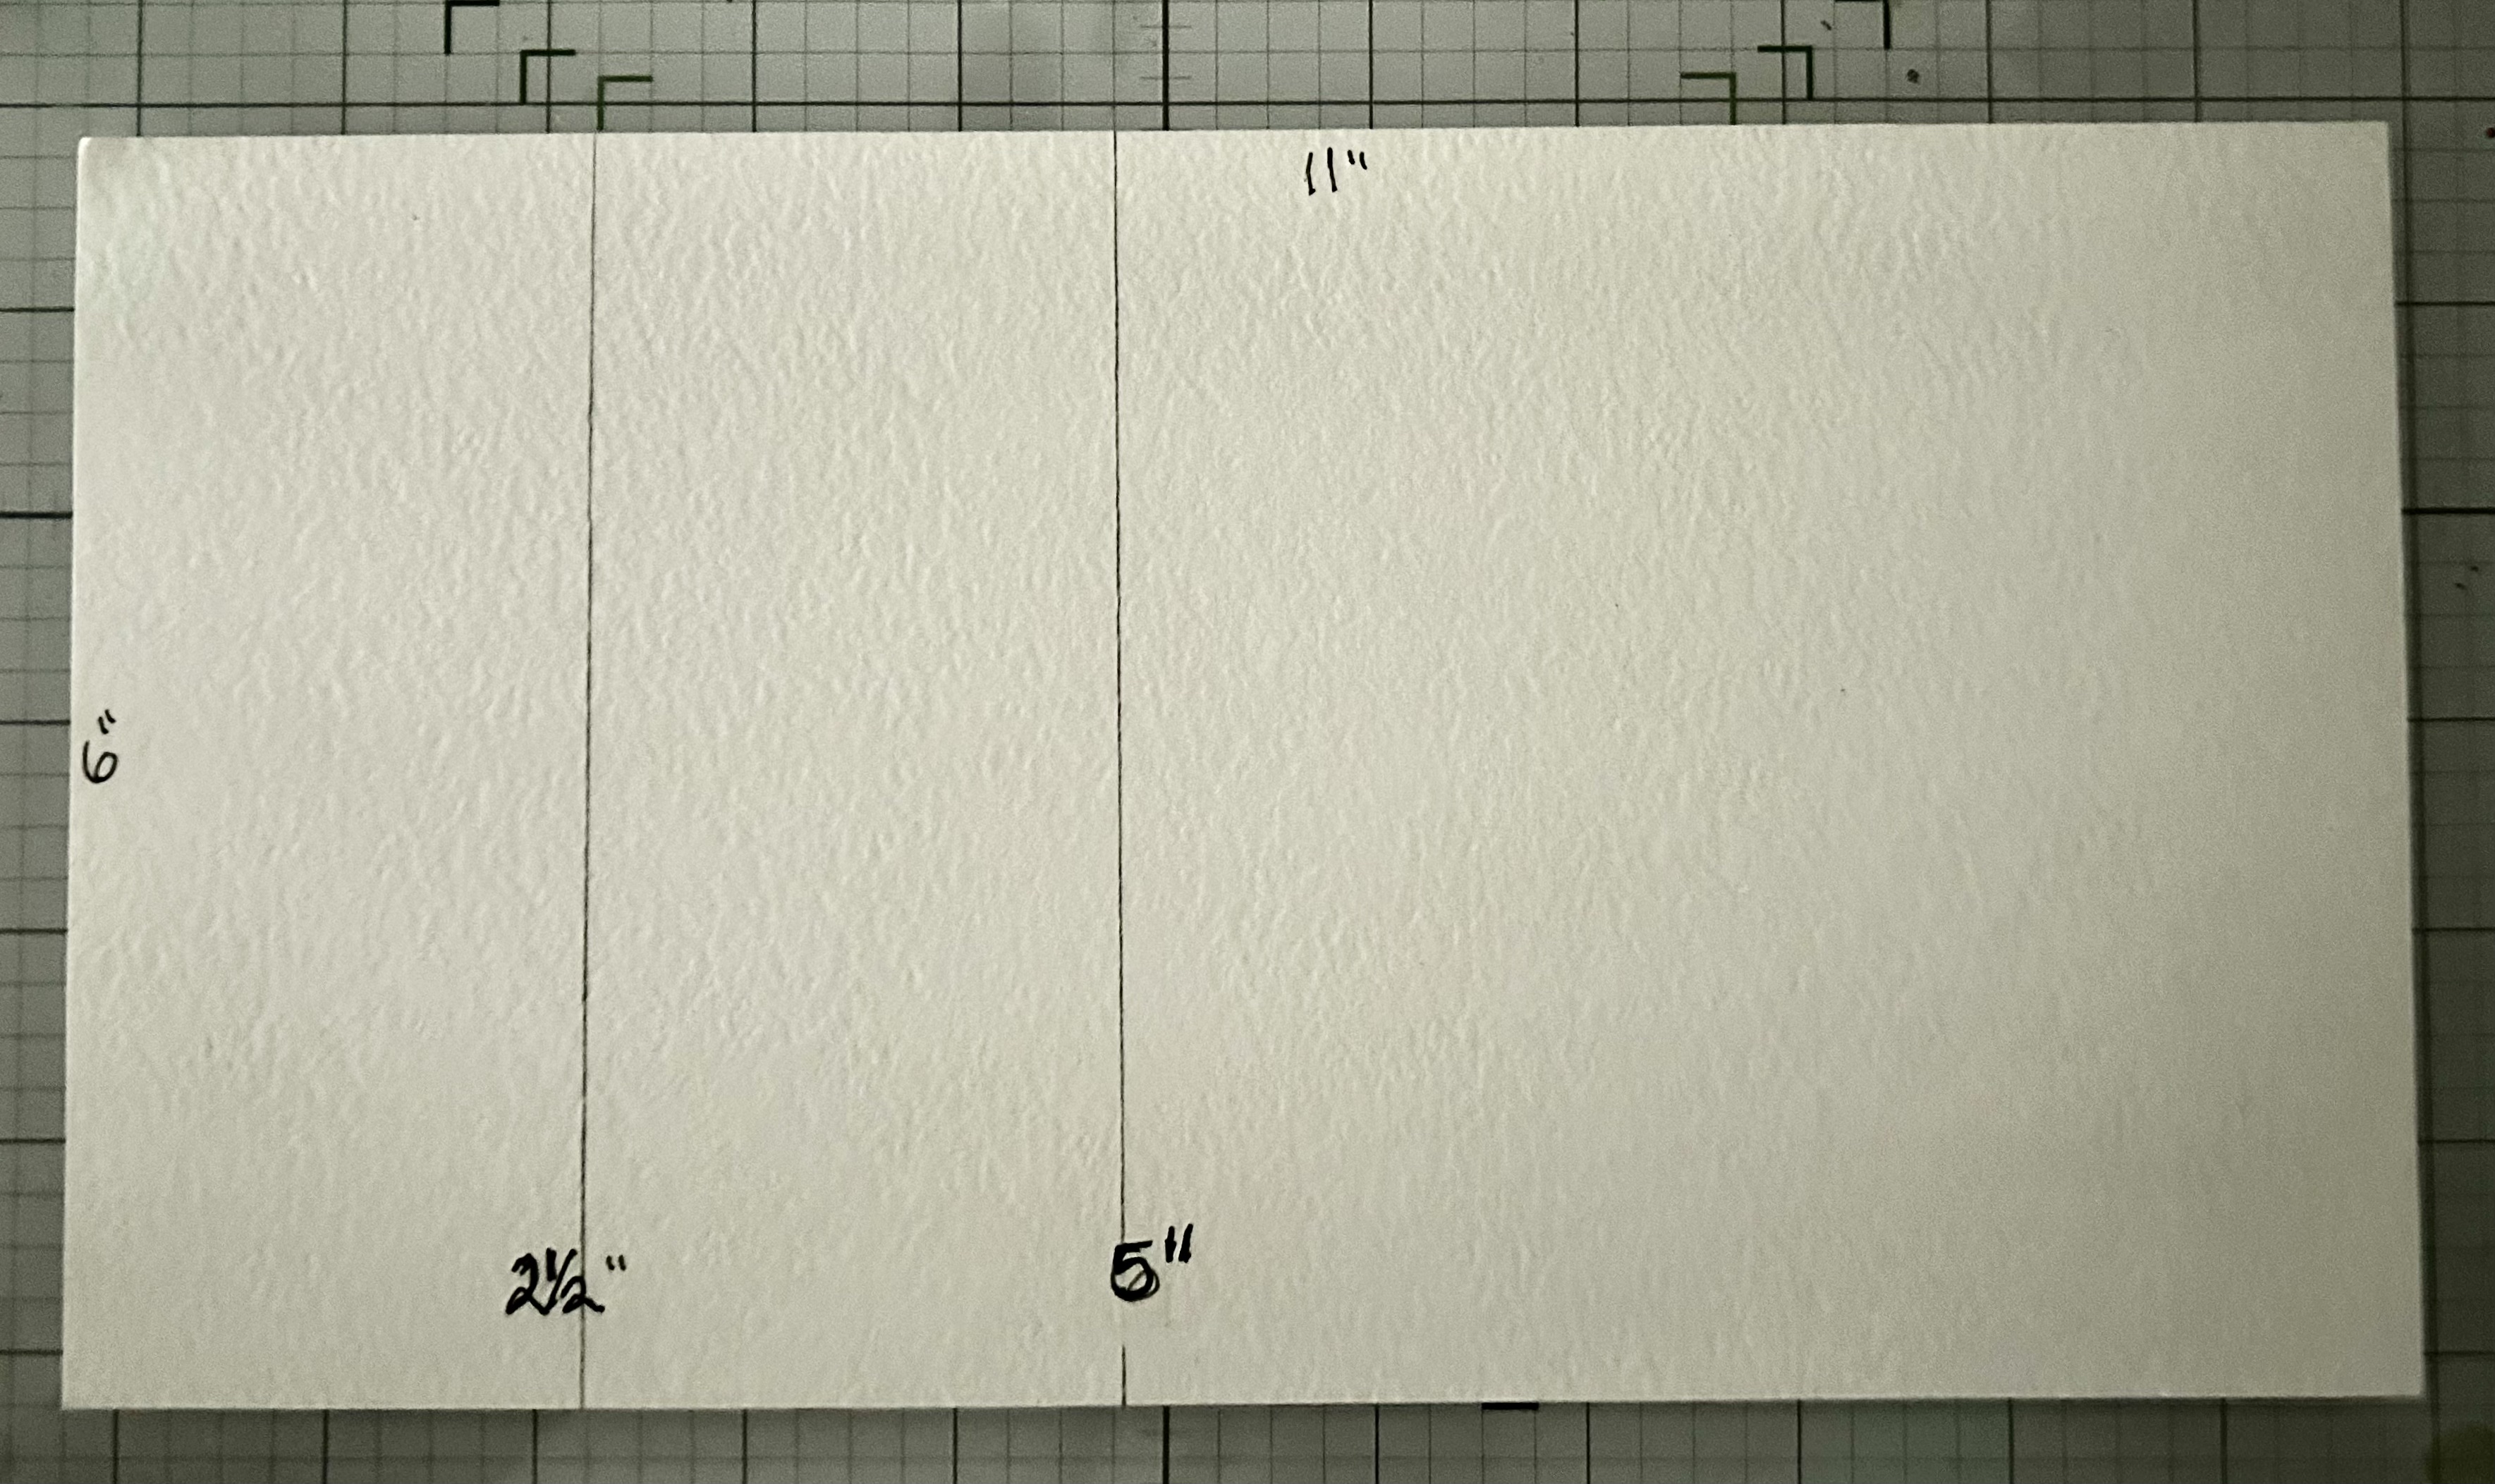
Z-Fold Base – Trim the cardstock to 6″ x 11″ and score at 2 1/2″ and 5″
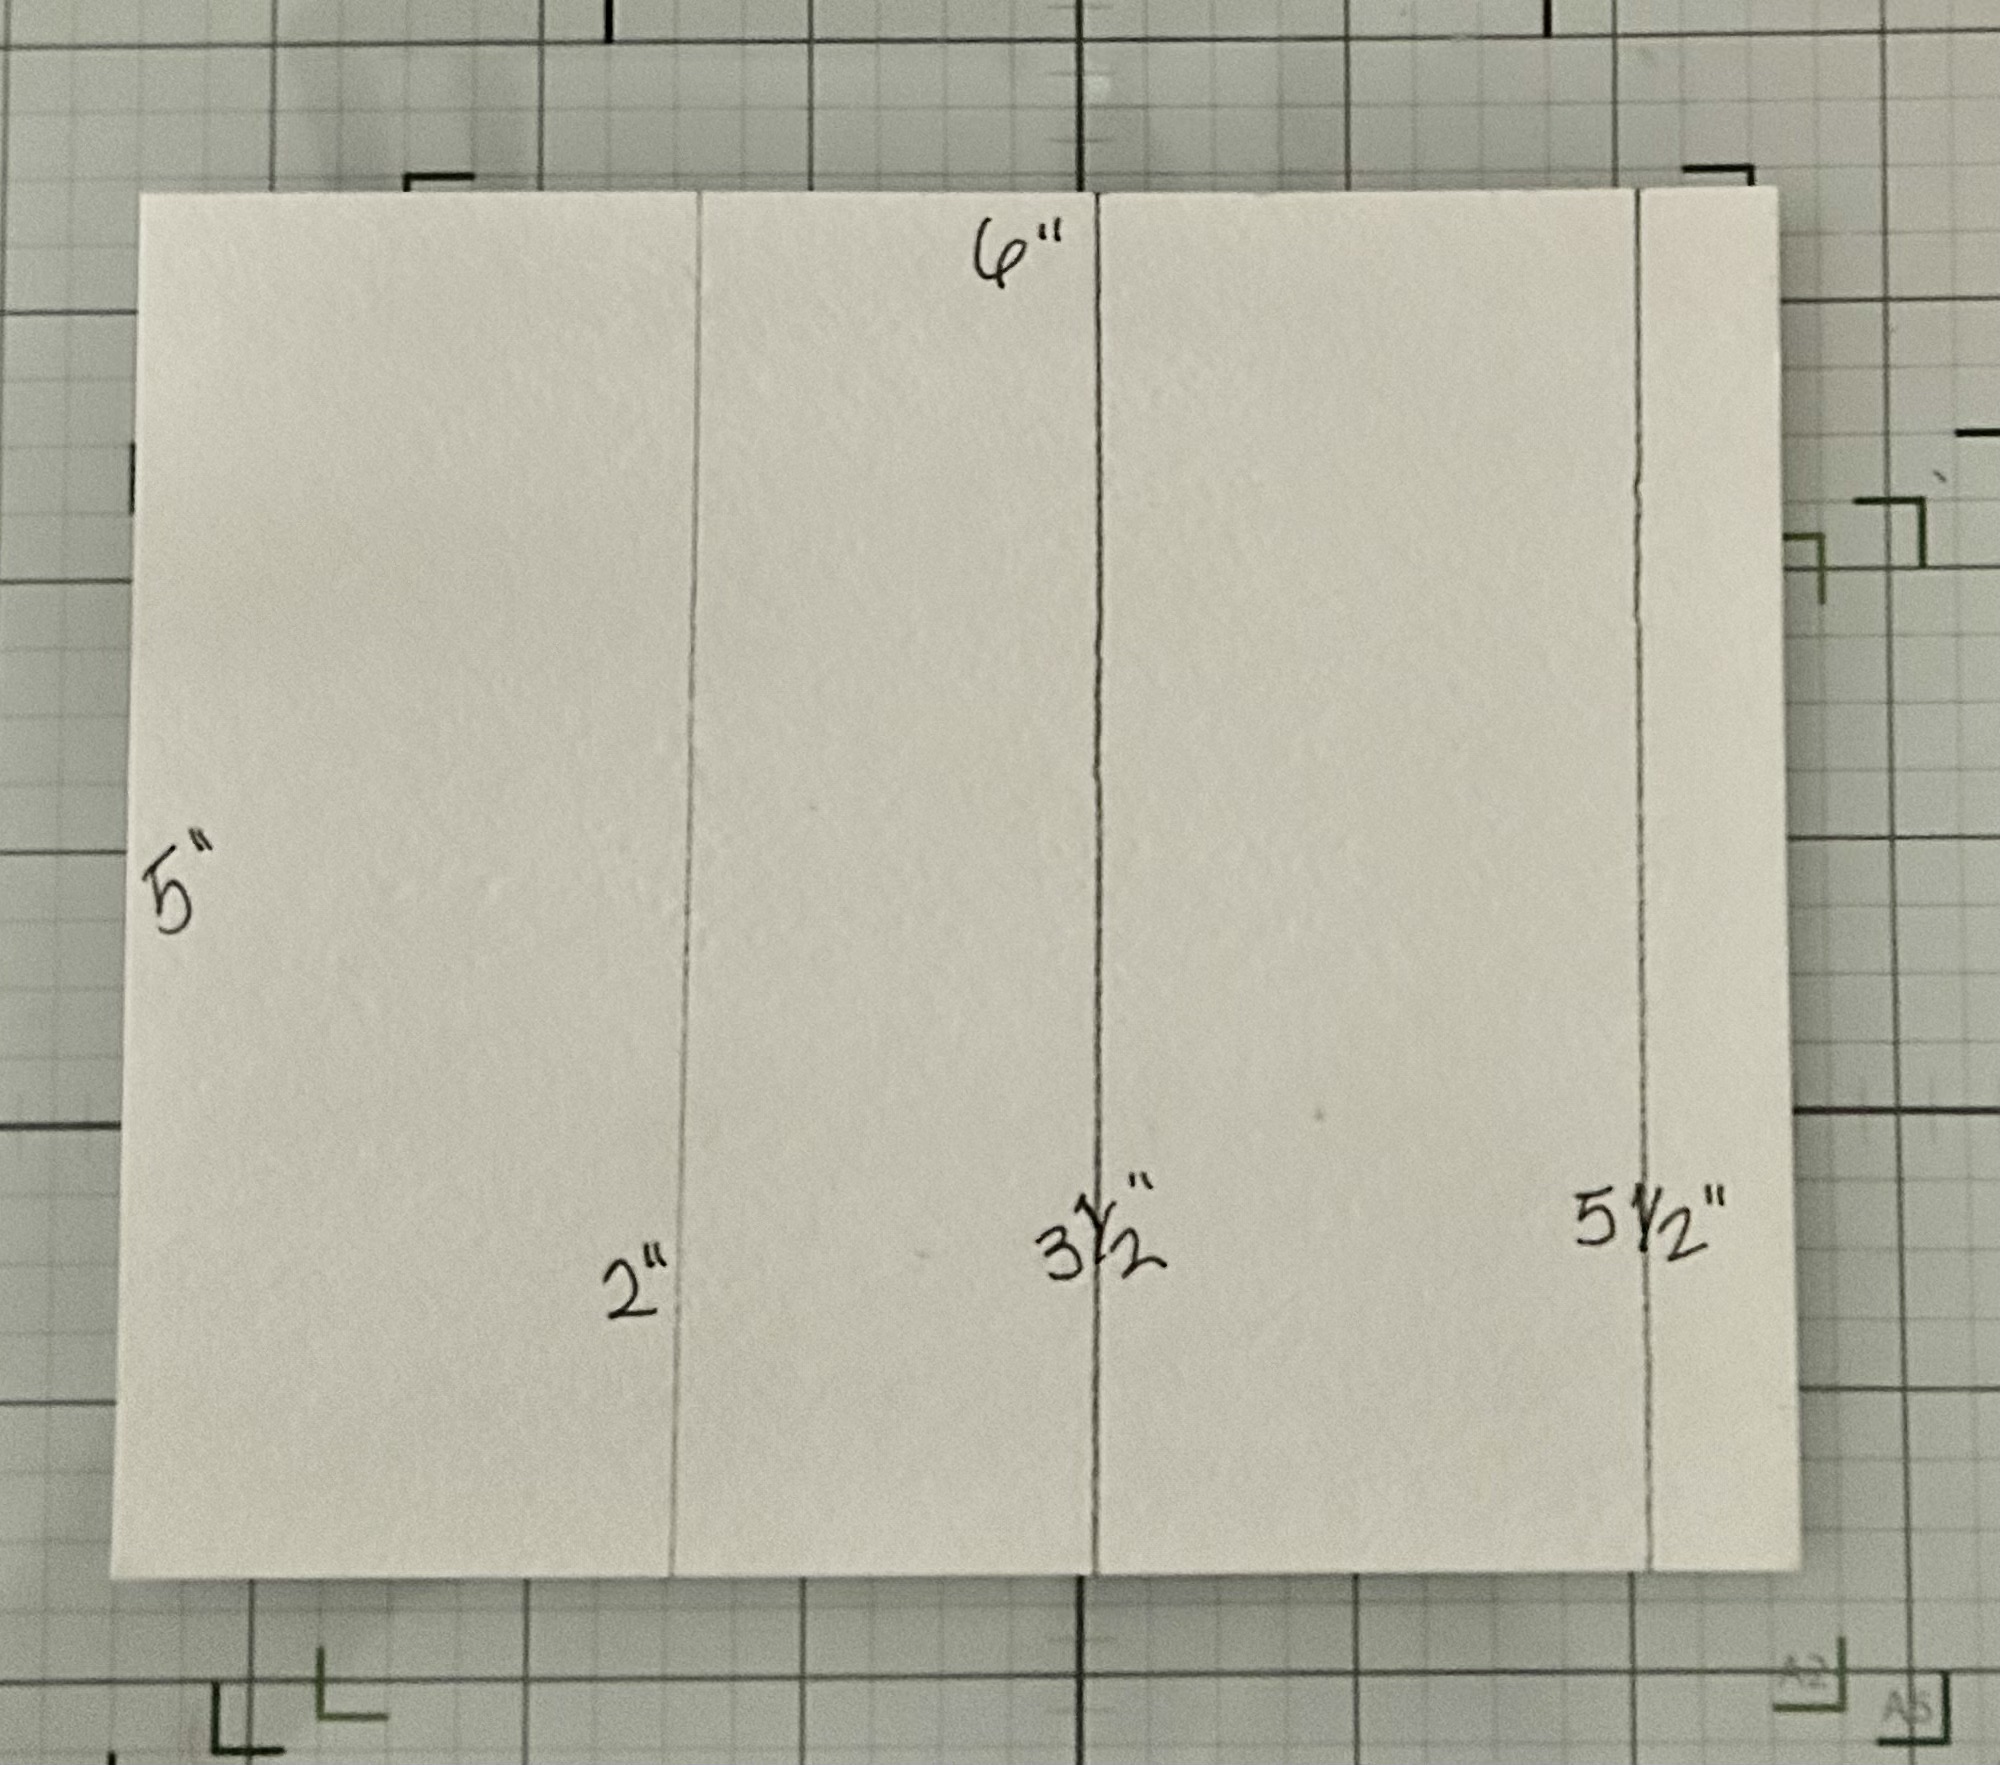
Block #1 – Trim the cardstock to 6″ x 5″ and score at 2″ - 3 1/2″ and 5 1/2″
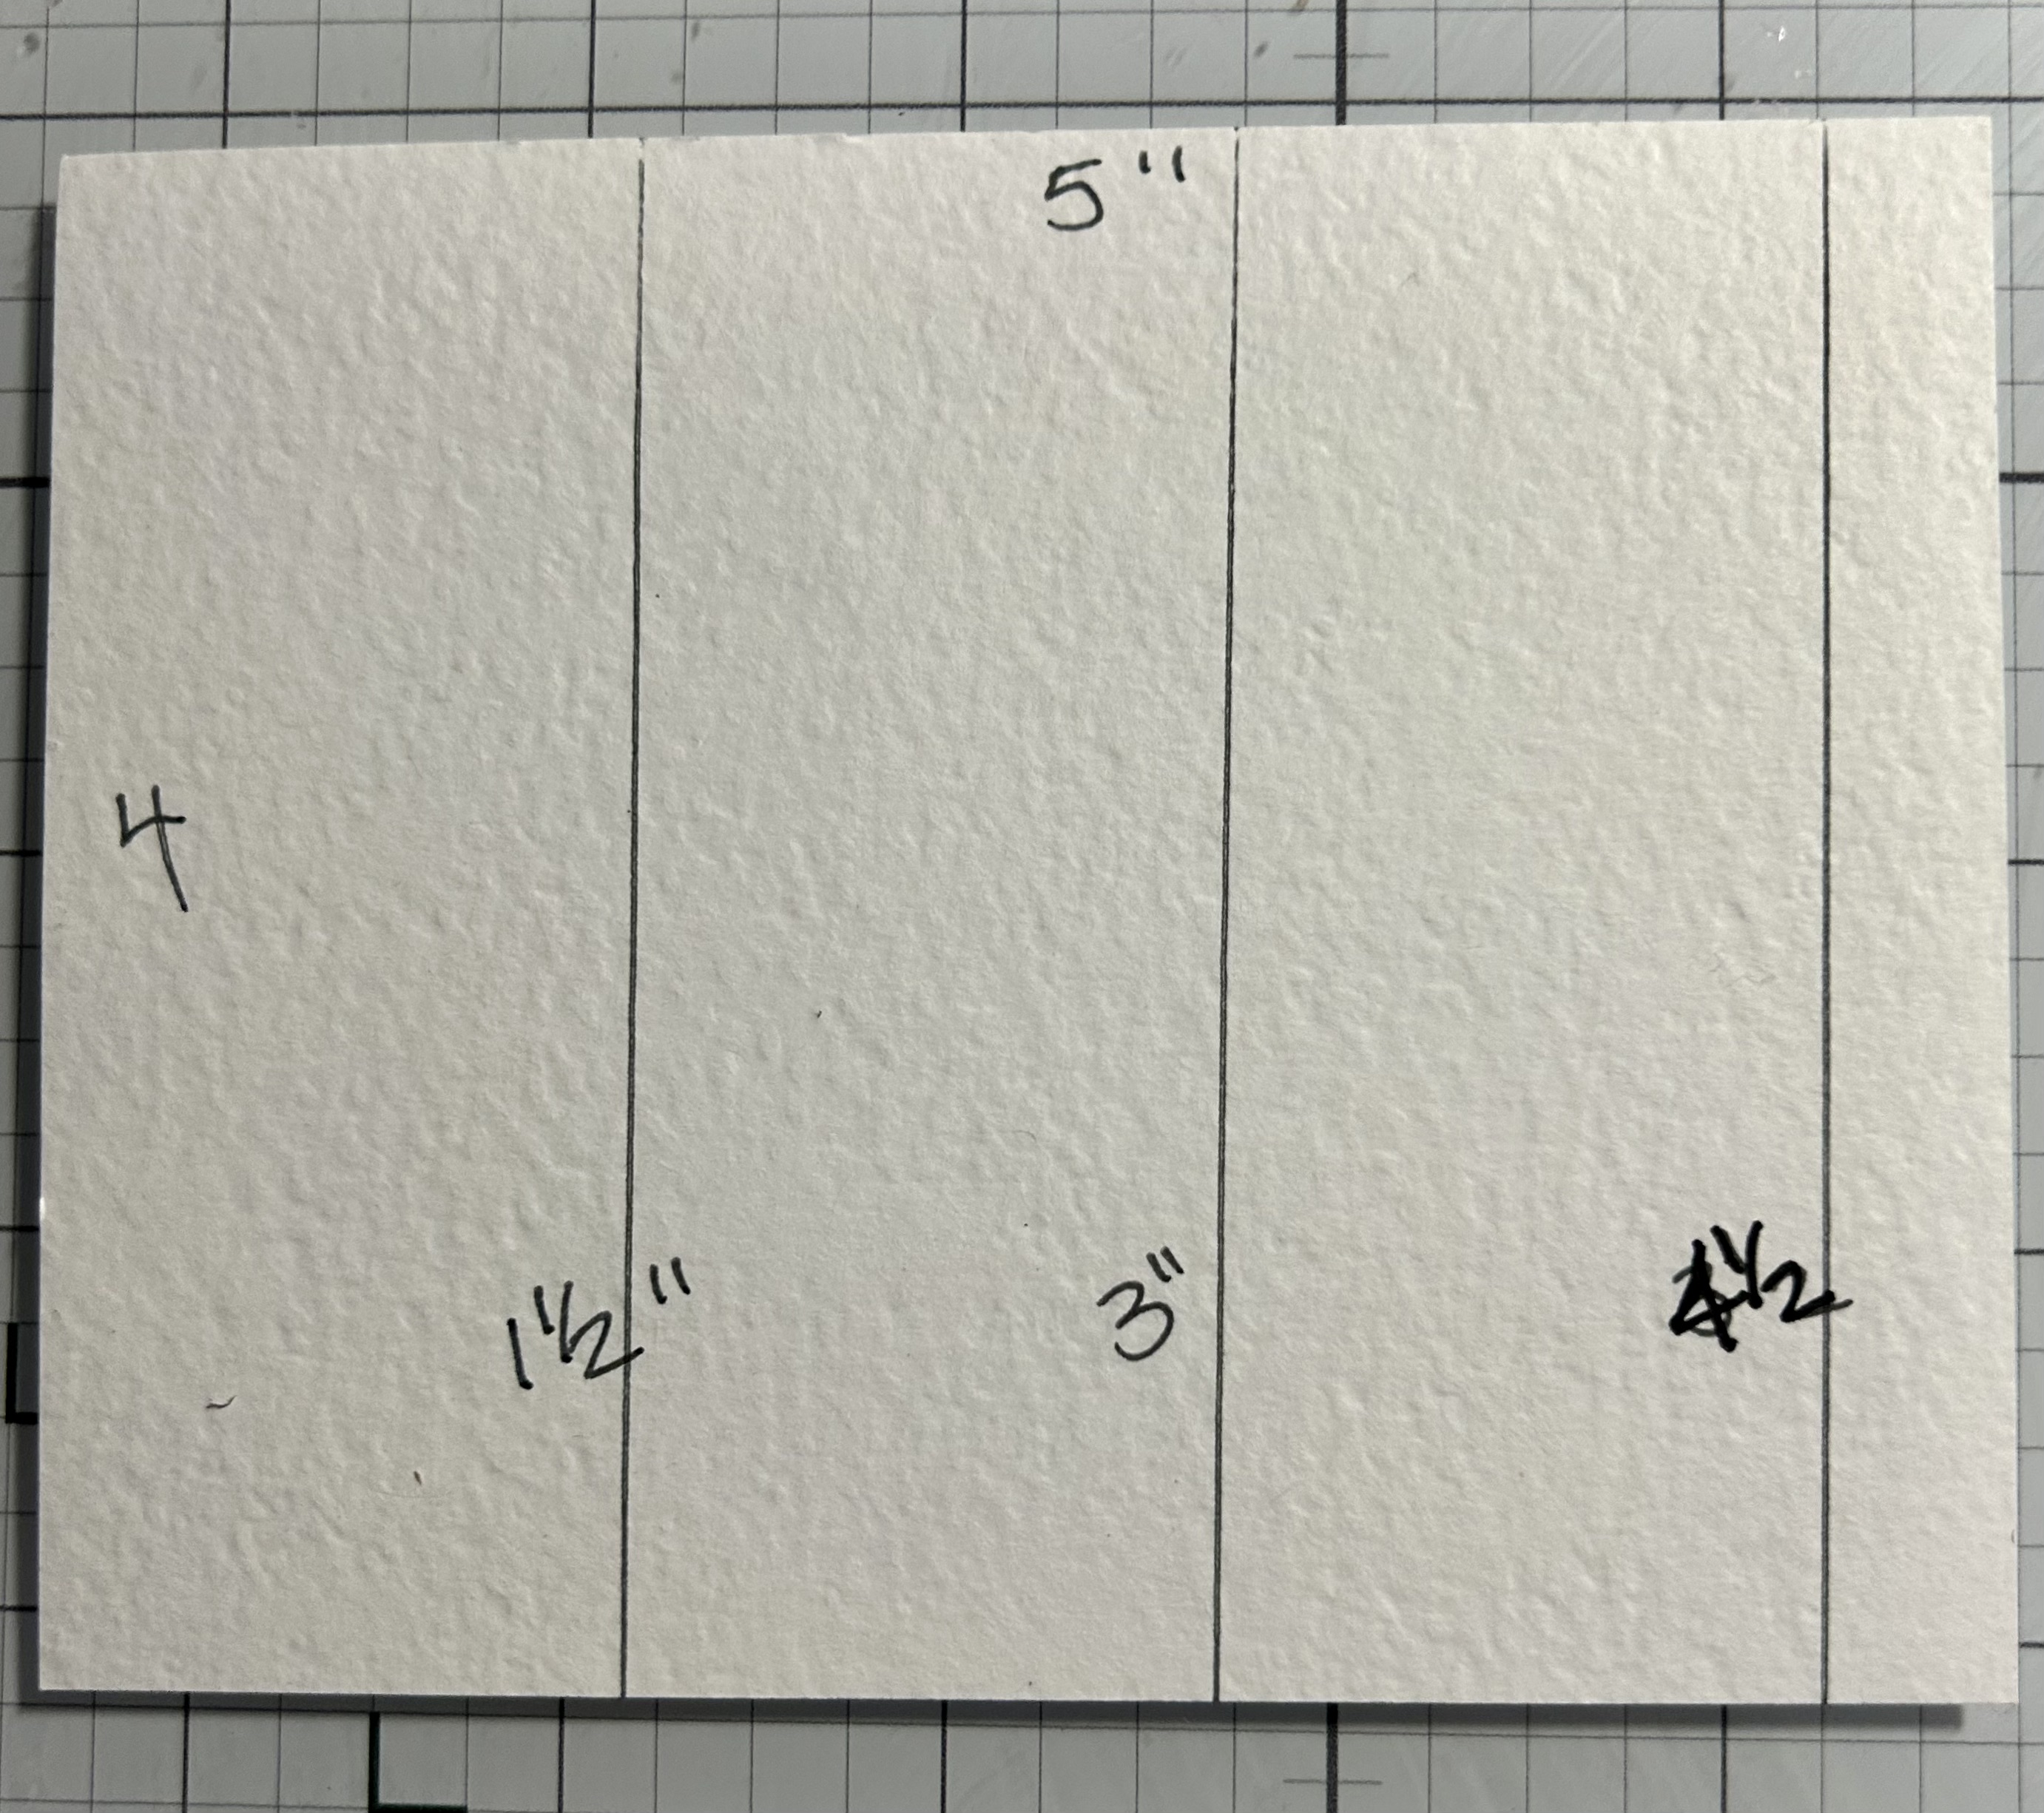
Block #2 – Trim the cardstock to 5″ x 4″ and score at 1 1/2″ - 3″ and 4 1/2″
Block #3 – Trim the cardstock to 4″ x 3″ and score at 1″ - 2 1/2″ and 3 1/2″
For the Layers:
(1) 5 3/4″ x 5 3/4″ DSP
(1) 5 3/4 x 5 3/4″ white
(1) 2 1/4″ x 5 3/4″ DSP (1) 2″ x 5 1/2″ in white (embossed or plain)
(1) 1 1/4″ x 4 3/4″ DSP
(1) 1 1/4″ x 3 3/4″ DSP
(1) 1 1/4 x 2 3/4″ DSP
*There were two mistakes on the prototype today on LIVE, I have rectified the measurements here!
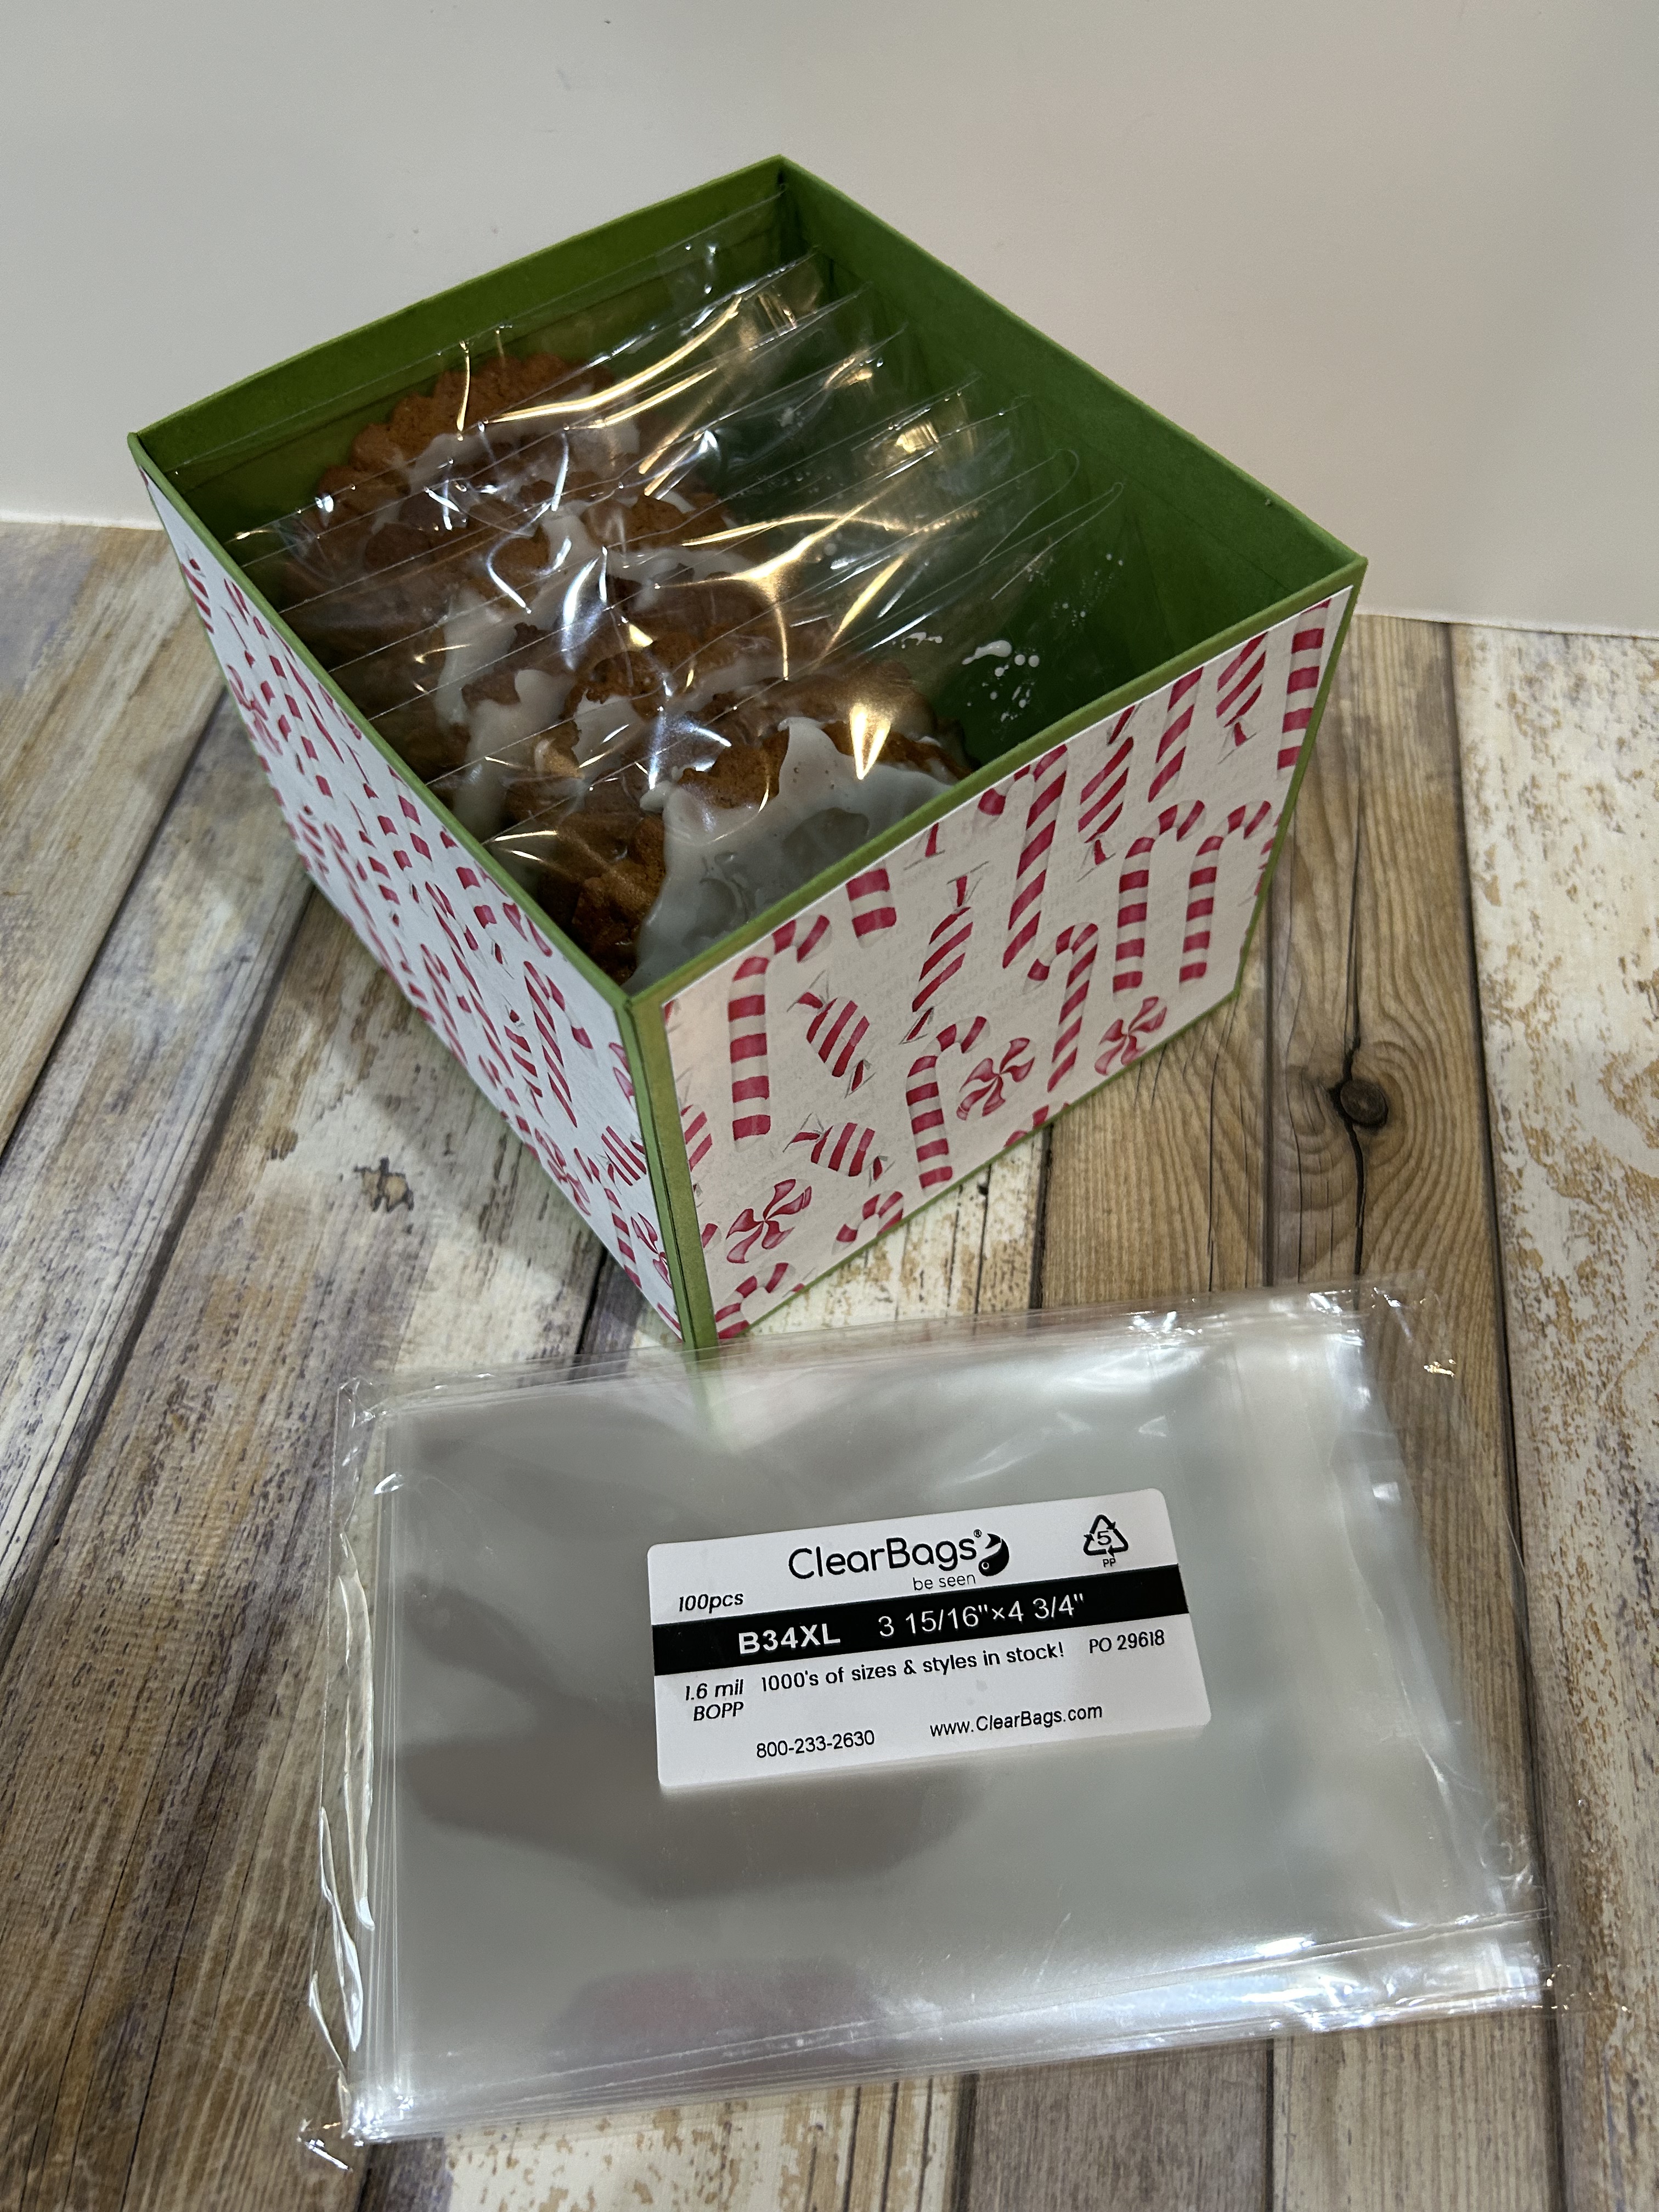
For as long as I can remember, I have made up “cookie boxes” to give at Christmas. This is something my mother started and I just loved seeing the faces of the people she shared her baking with when they received them. This box isn’t as big as the ones I send to family and friends, but perfect to give to our postmistress, neighbors, and anyone else that might need a warm smile this time of year!
LET’S GET STARTED
You will need two pieces of 12″ x 12″ 100 lb./300 gsm cardstock and one piece 8 1/2″ x 11″. Trim the two 12″ x 12″ to 10″ x 10″ for the base and the 8 1/2″ x 11″ to 8 1/16″ x 8 9/16″.
For the bases, you will score as follows at: 1/2″ 5 1/2″ 9 1/2″ then turn your paper 90-degrees and score at: 1/2″ 4 1/2″. You will also score at 4″, but only to the center line (watch my video on FaceBook to see how).
3. For the top, you will score at: 1/2″ and 1″ on all four sides–just keep turning the cardstock 90-degrees.
4. Cut away all “red” lined areas on all three pieces and snip little slices to form tabs.
Double sided Paper/Mirrored Paper
Base: (2) 3 3/4″ x 4 3/4″ and (2) 5 1/4″ x 3 3/4″
Top: (1) 5 1/4″ x 4 3/4″ …if you’re doing two pieces, the second will be 5″ x 4 1/2″
Sides of the Top: (2) 3/4″ x 5 1/4″ and (2) 3/4″ x 4 3/4″
ICED GINGERBREAD COOKIES (compliments of BAKE from Scratch magazine)
1/2 cup (113g)unsalted butter, softened
1/2 cup (100 g) granulated sugar
1 large egg, room temperature
1/2 cup (170g) unsulphured molasses
1 tsp. vanilla extract
2 1/2 cups (313g) all purpose flour
3 1/2 tsp. gingerbread spice (see note) or pumpkin pie spice
1/2 tsp. Kosher salt
1/2 tsp. ground cinnamon
1/4 tsp. baking soda
Icing:
1 1/4 (150 g) confectioners’ sugar, sifted
3 T hot water
In a bowl of a stand mixer, fitted with a paddle attachment, beat butter and sugar at medium speed until creamy, 3-4 minutes. Scrape down sides of bowl and add egg, beating well. Beat in molasses and vanilla.
In a medium bowl, whisk all the dry ingredients together and then, with mixer on low speed, gradually at flour mixture to butter mixture, beating well to combine. Turn out dough and shape into a disk. Wrap in plastic wrap and refrigerate 2 hours or up to 3 days.
Preheat oven to 350F-degrees (180C). Line two baking sheets with parchment paper.
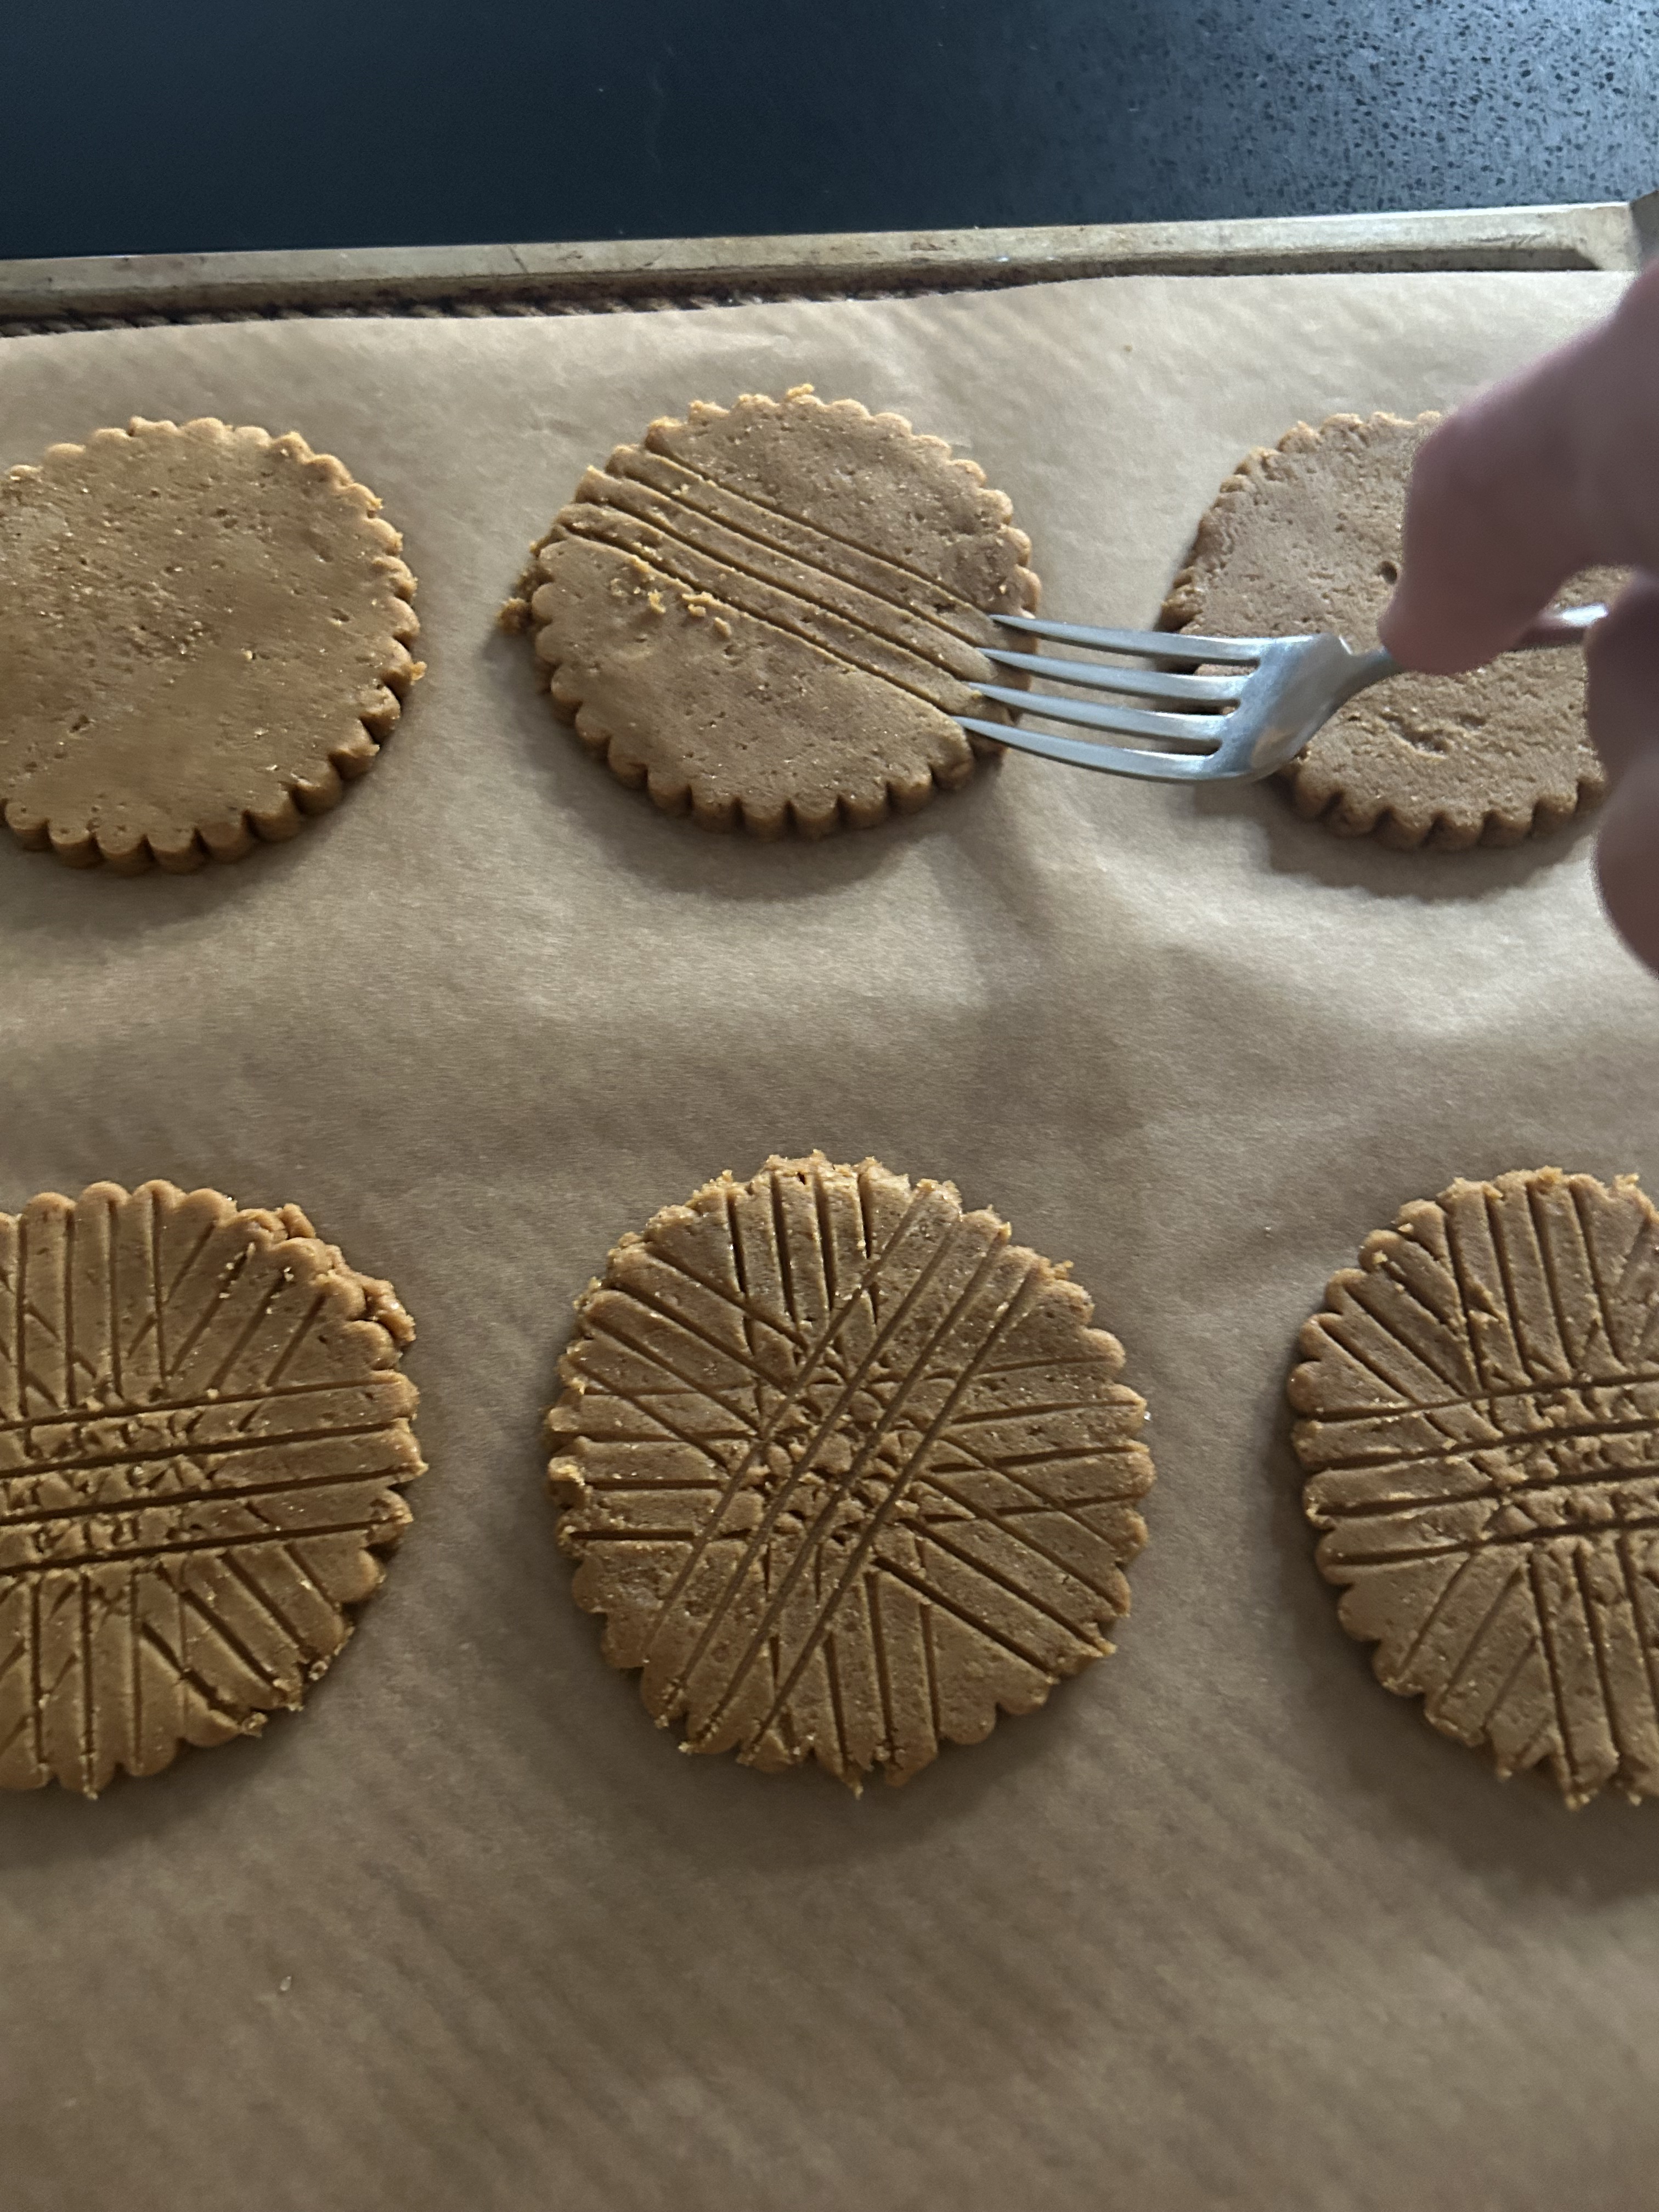
On a lightly floured surface, roll half of the dough 1/4-inch thickness, (keep remaining dough in the refrigerator until ready to use). Using a 3-inch round cutter, cut dough and place on baking sheets. Decorate cookies by pressing a floured fork tines into dough.
Bake until edges are slightly dark and cookies look dry (12 to 14 minutes) *mine took 12! Let cool on pan for 10 minutes, then remove to rack to let cool completely.
In a small bowl, mix the confectioners’ sugar with the hot water until smooth. Dip cookies into the glaze, letting the excess drip off and place on a wire rack. Let stand until dry. Store in an airtight container for up to 5 days.
*Note: to make your own Gingerbread spice, mix together: 1 T ground ginger, 2 tsp. ground cinnamon, 1 1/4″ tsp. ground nutmeg, 1/2 tsp. ground cloves, and 1/2 tsp. ground allspice.
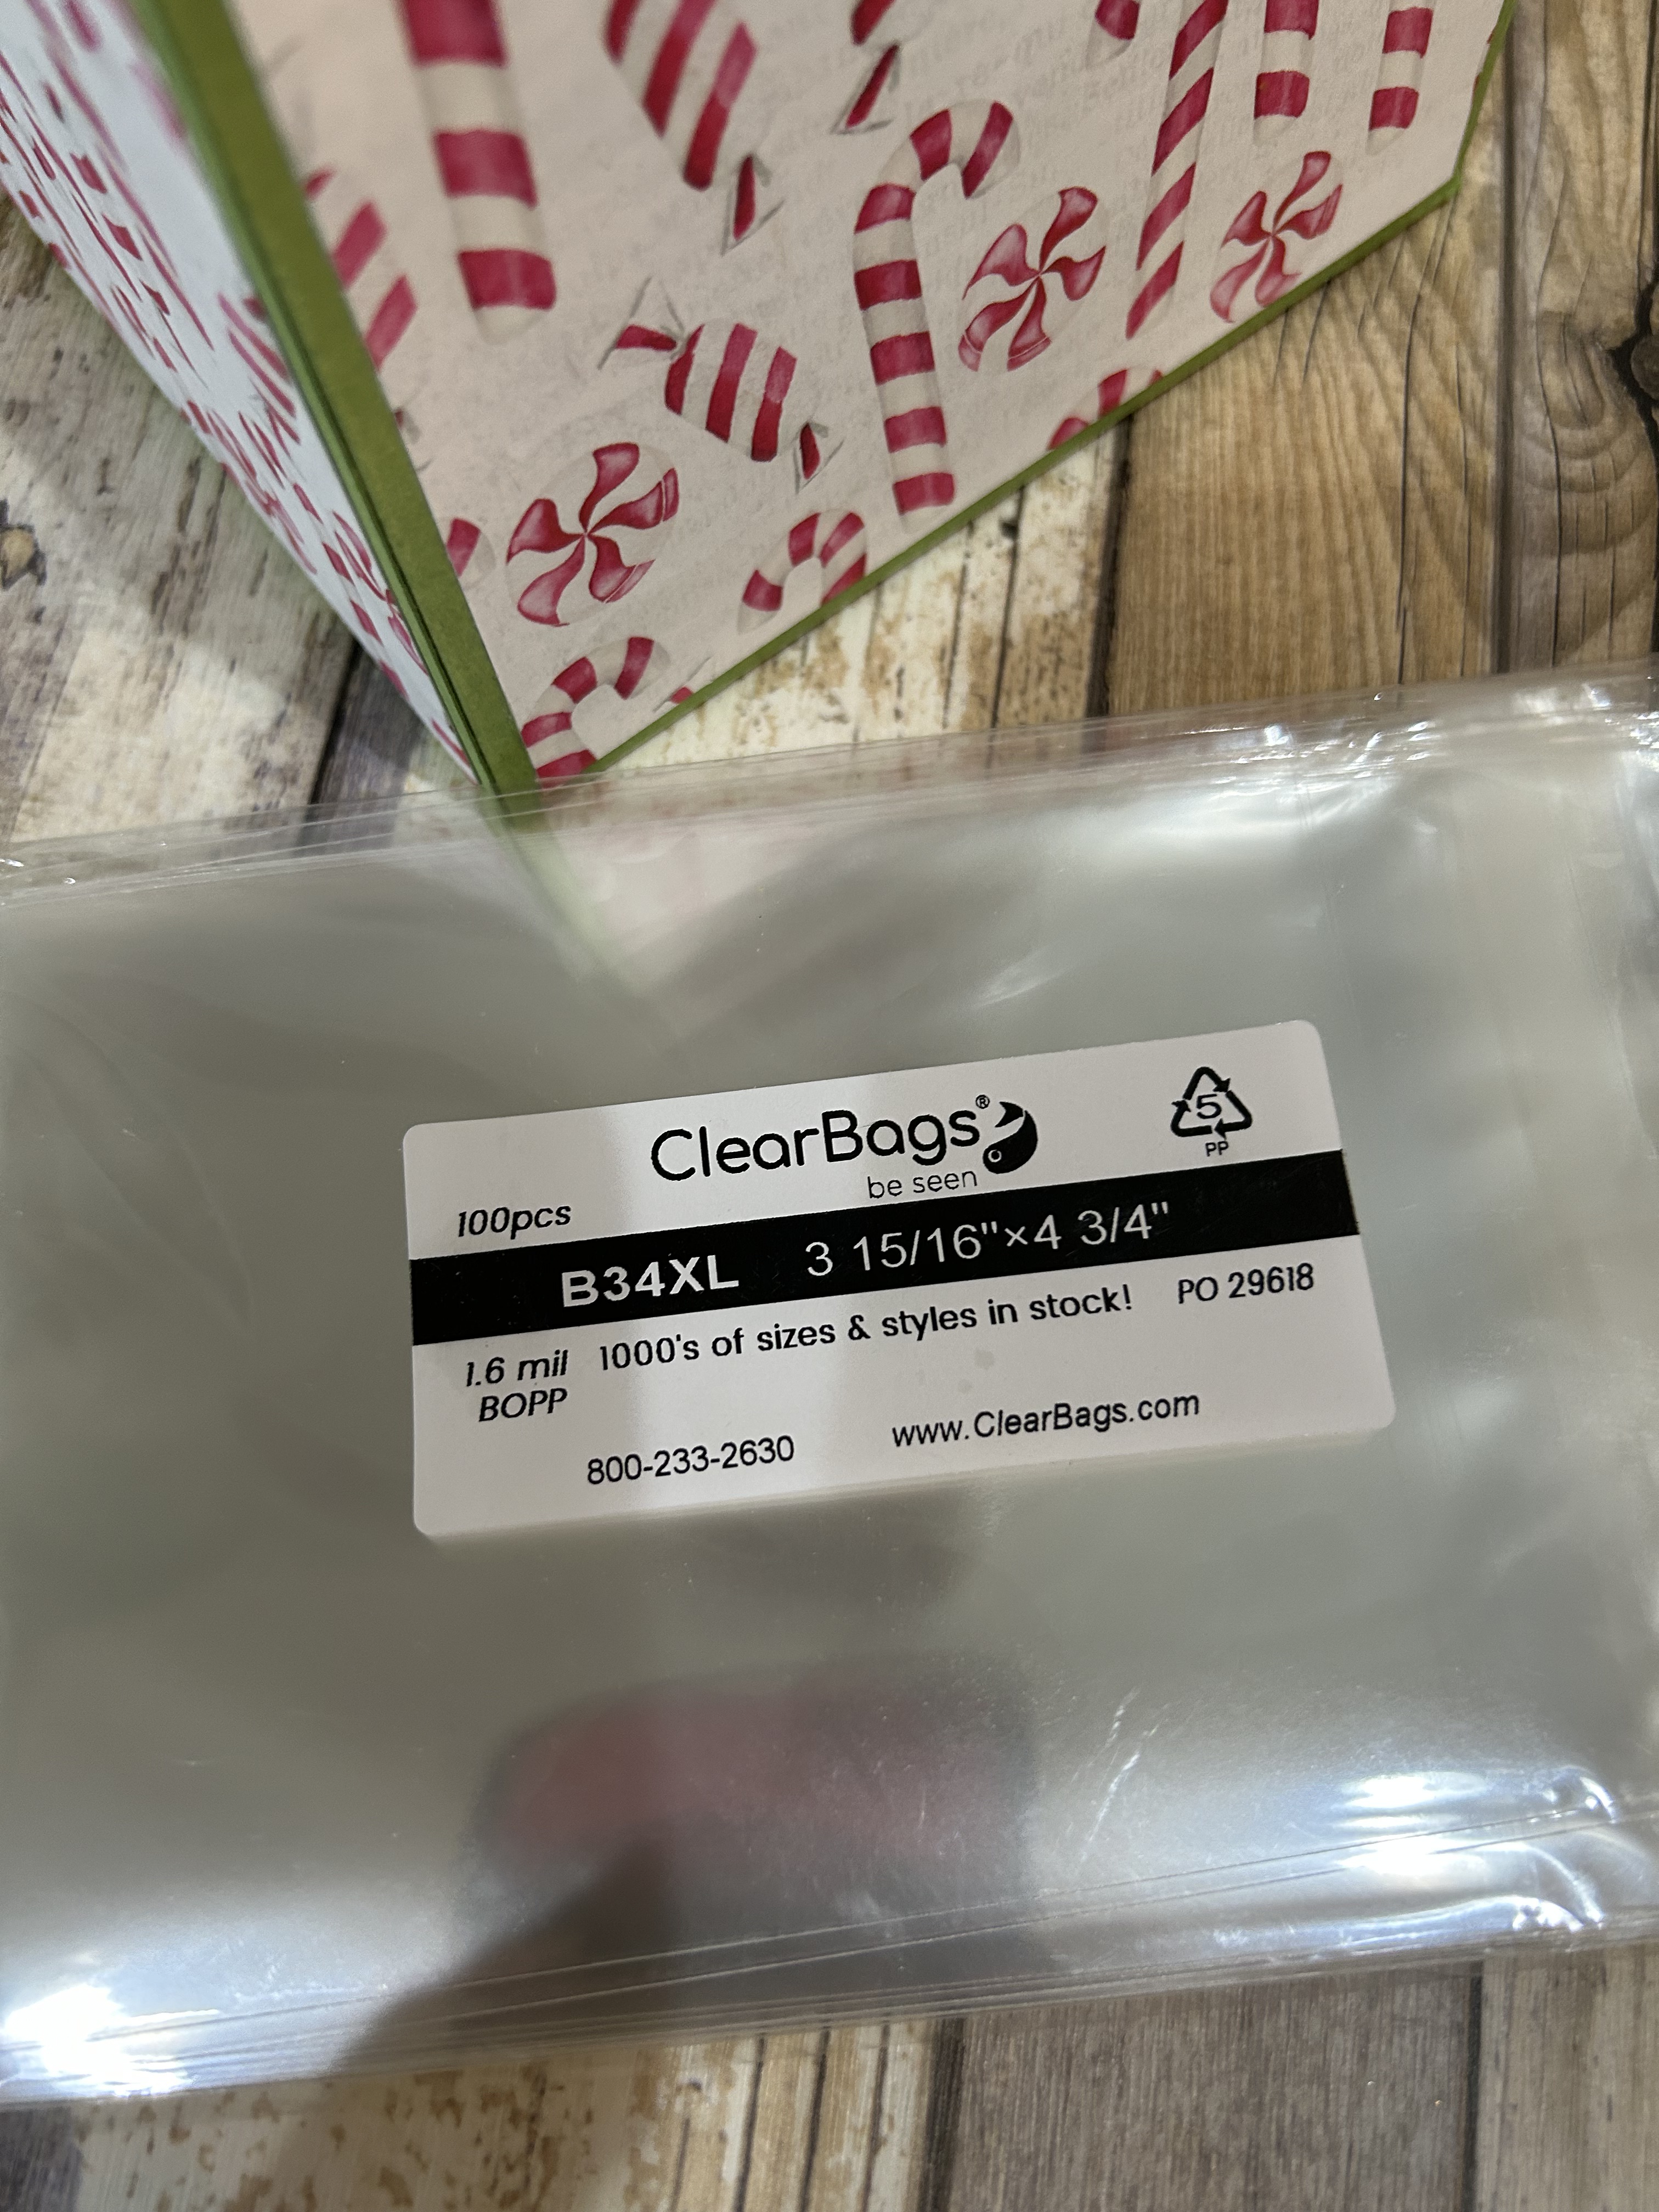
Once the cookies were set completely, I place them in cellophane bags I purchase from Clear Bags
These are perfect to hold 1 or 2 cookies and when I’m making up my large cookie boxes, they keep everything separated so flavors don’t mix and the cookies actually stay fresher!
A unique gift to give is a box within a frame…it’s like two gifts in one! I’ve designed this so you can decorate your frame with beautiful dimensional flowers so when the box is removed, you have a keepsake to add a sentiment or even a photo to where the box was! I have a video on my FB page–Susan’s Garden Club 2.
LET’S GET STARTED
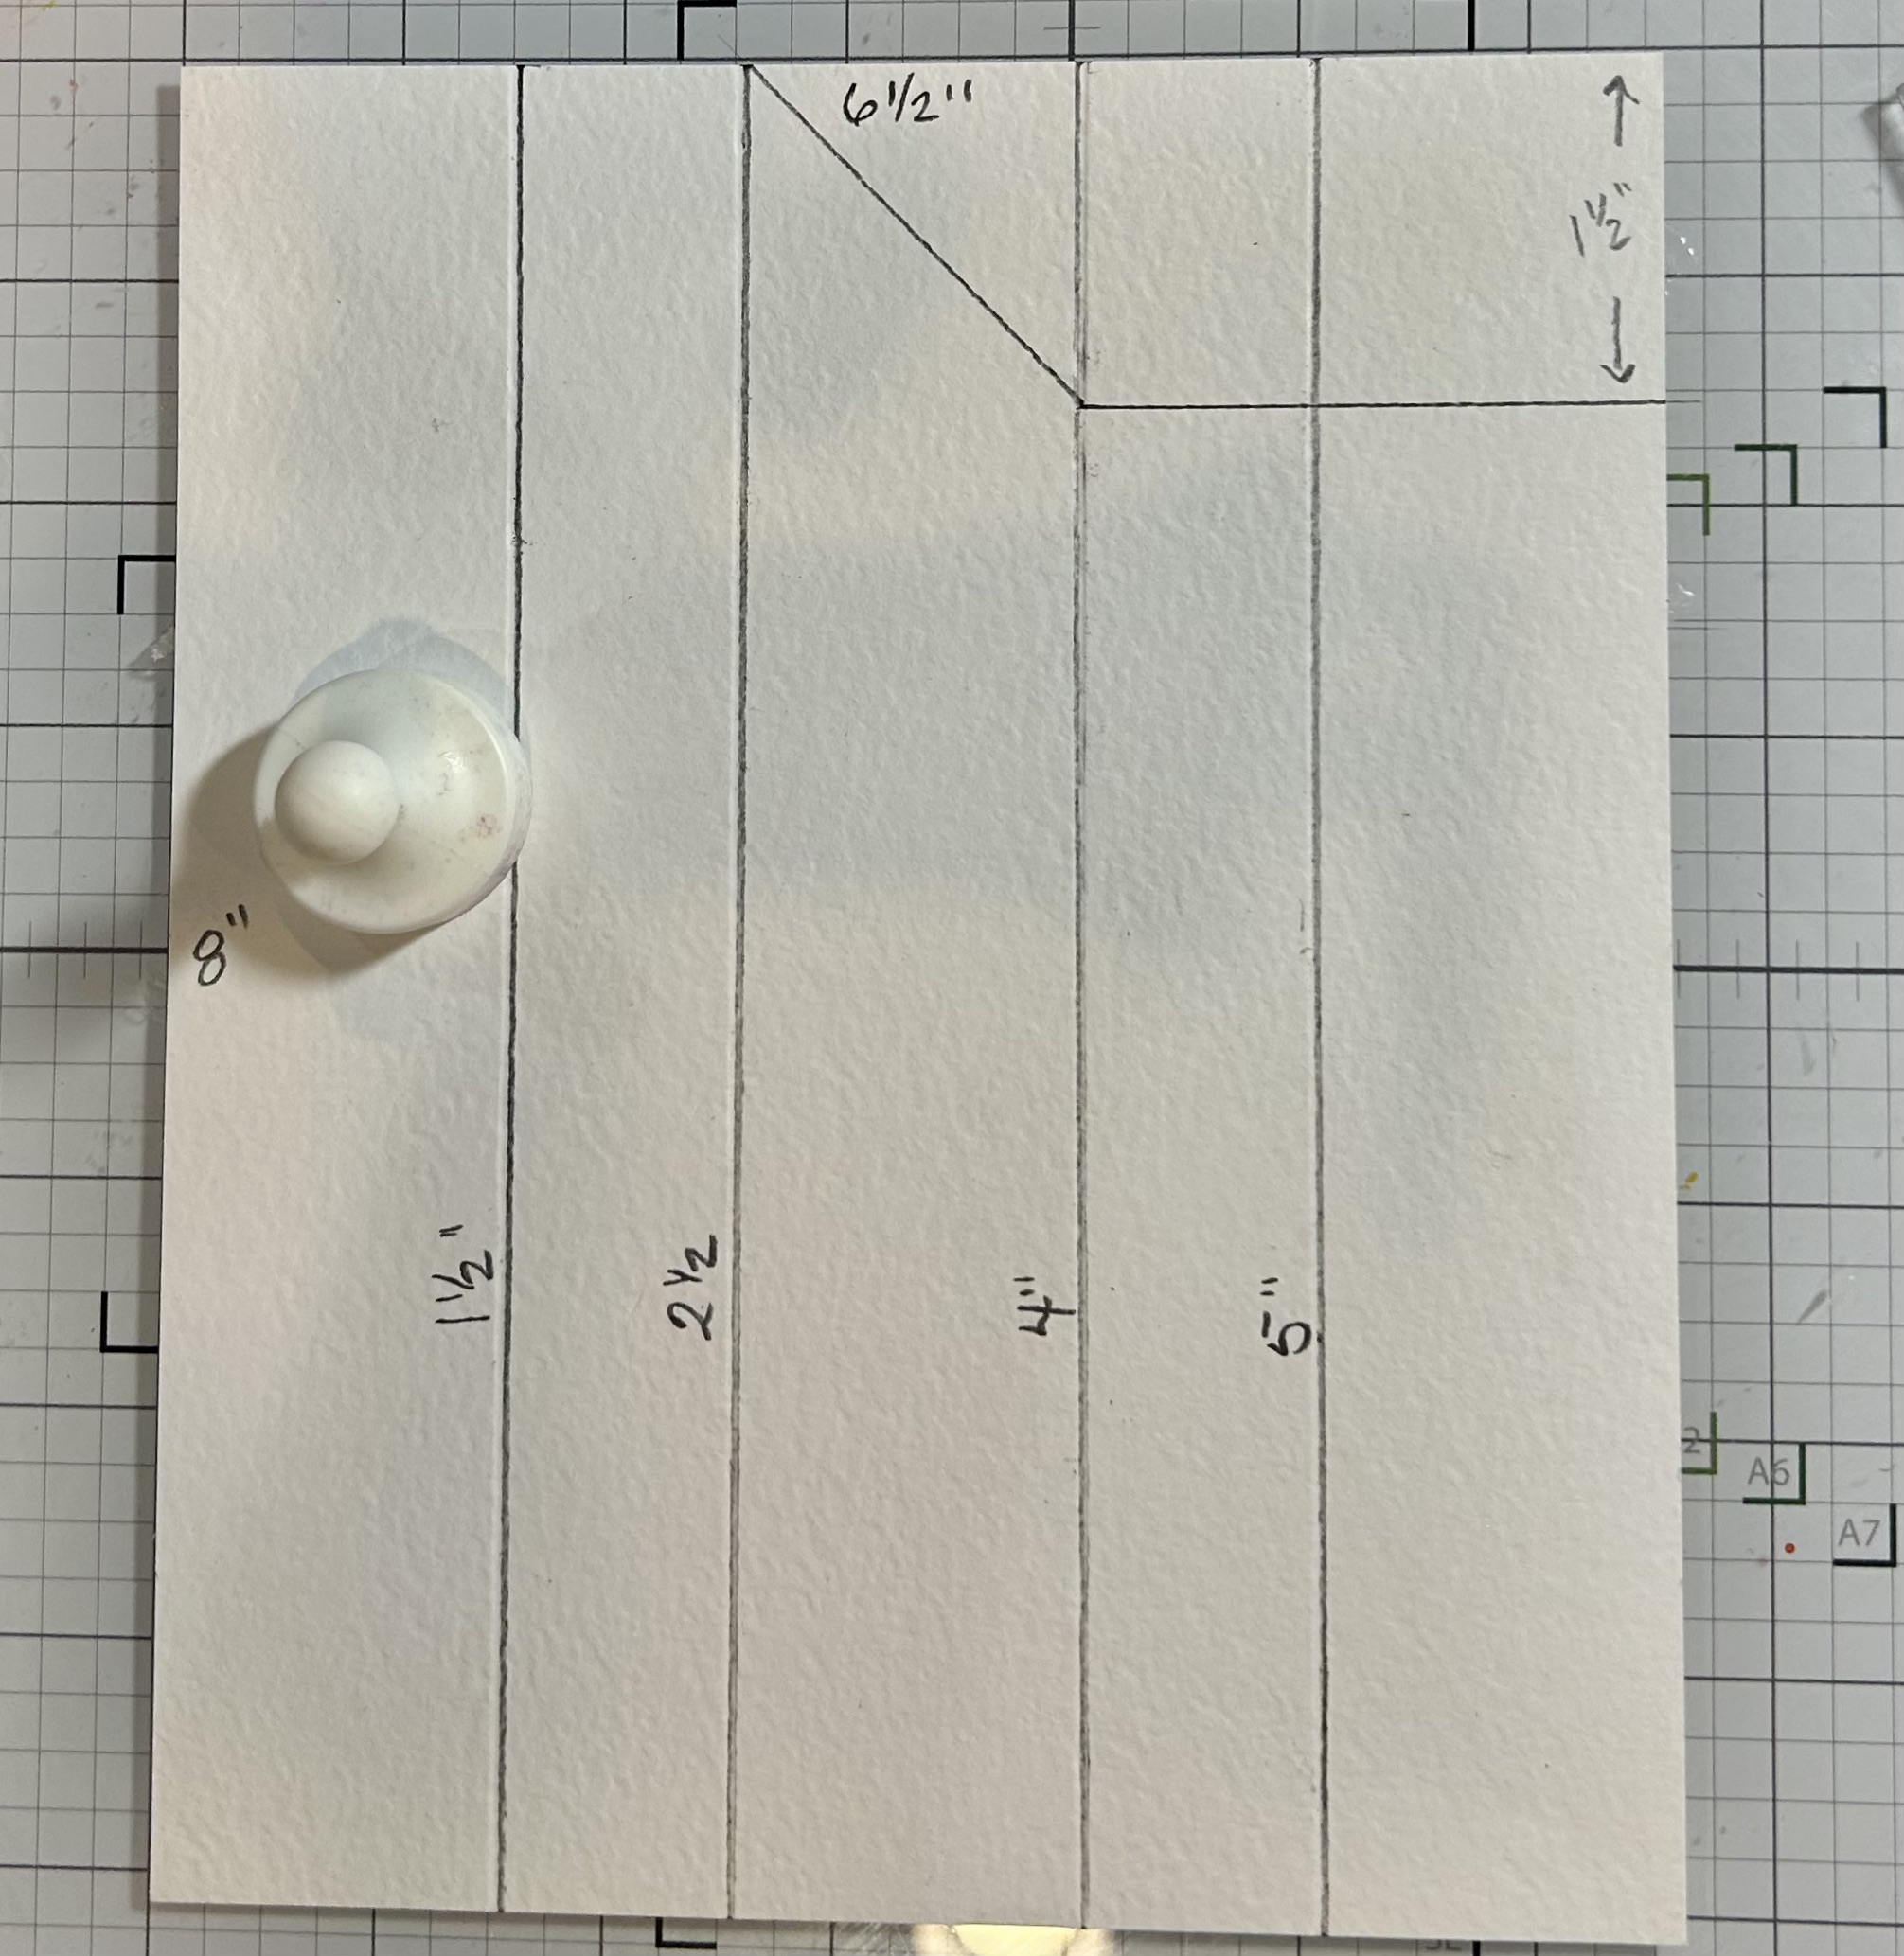
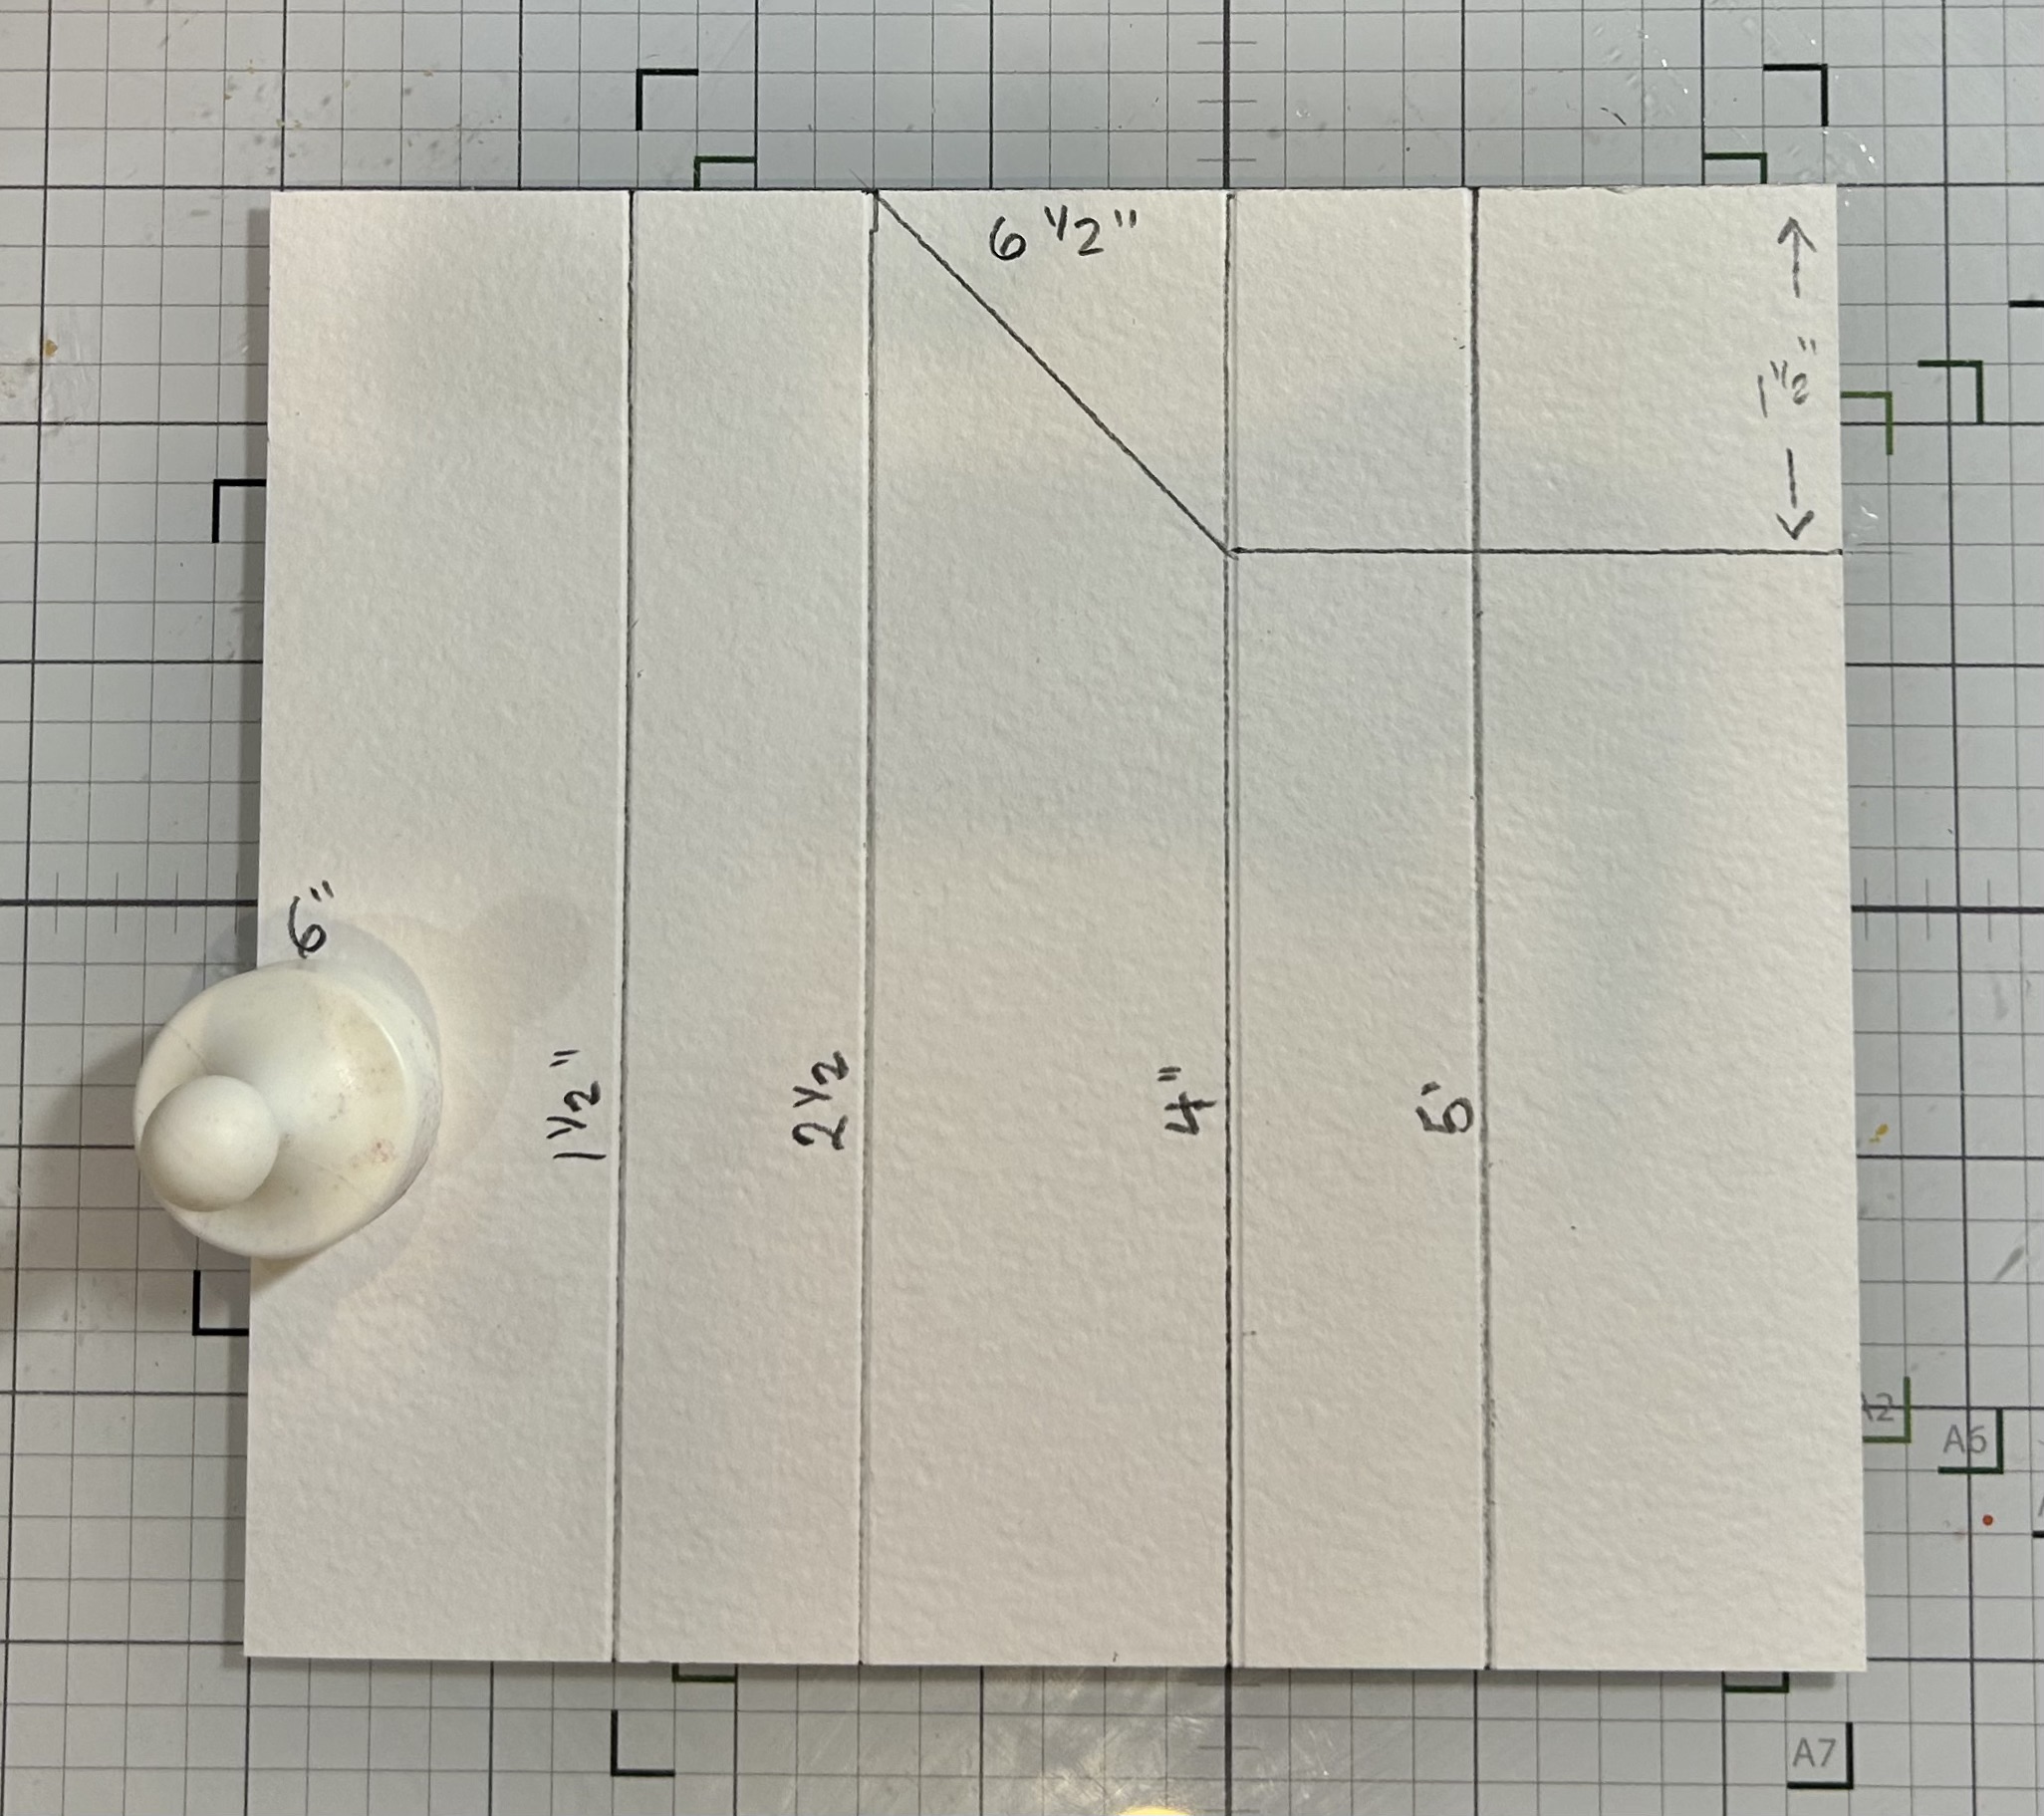
The frame is created like I have done all my frames (YouTube/Spellbinders/Susan’s Garden Frame), but made wider so you have an area to add blooms. I used patterned cardstock that is at least 80/90 lbs (117 gsm), but you can use plain cardstock 80/100 lbs. What you’re looking for is that when you score the paper, it doesn’t crack or split at that score line.
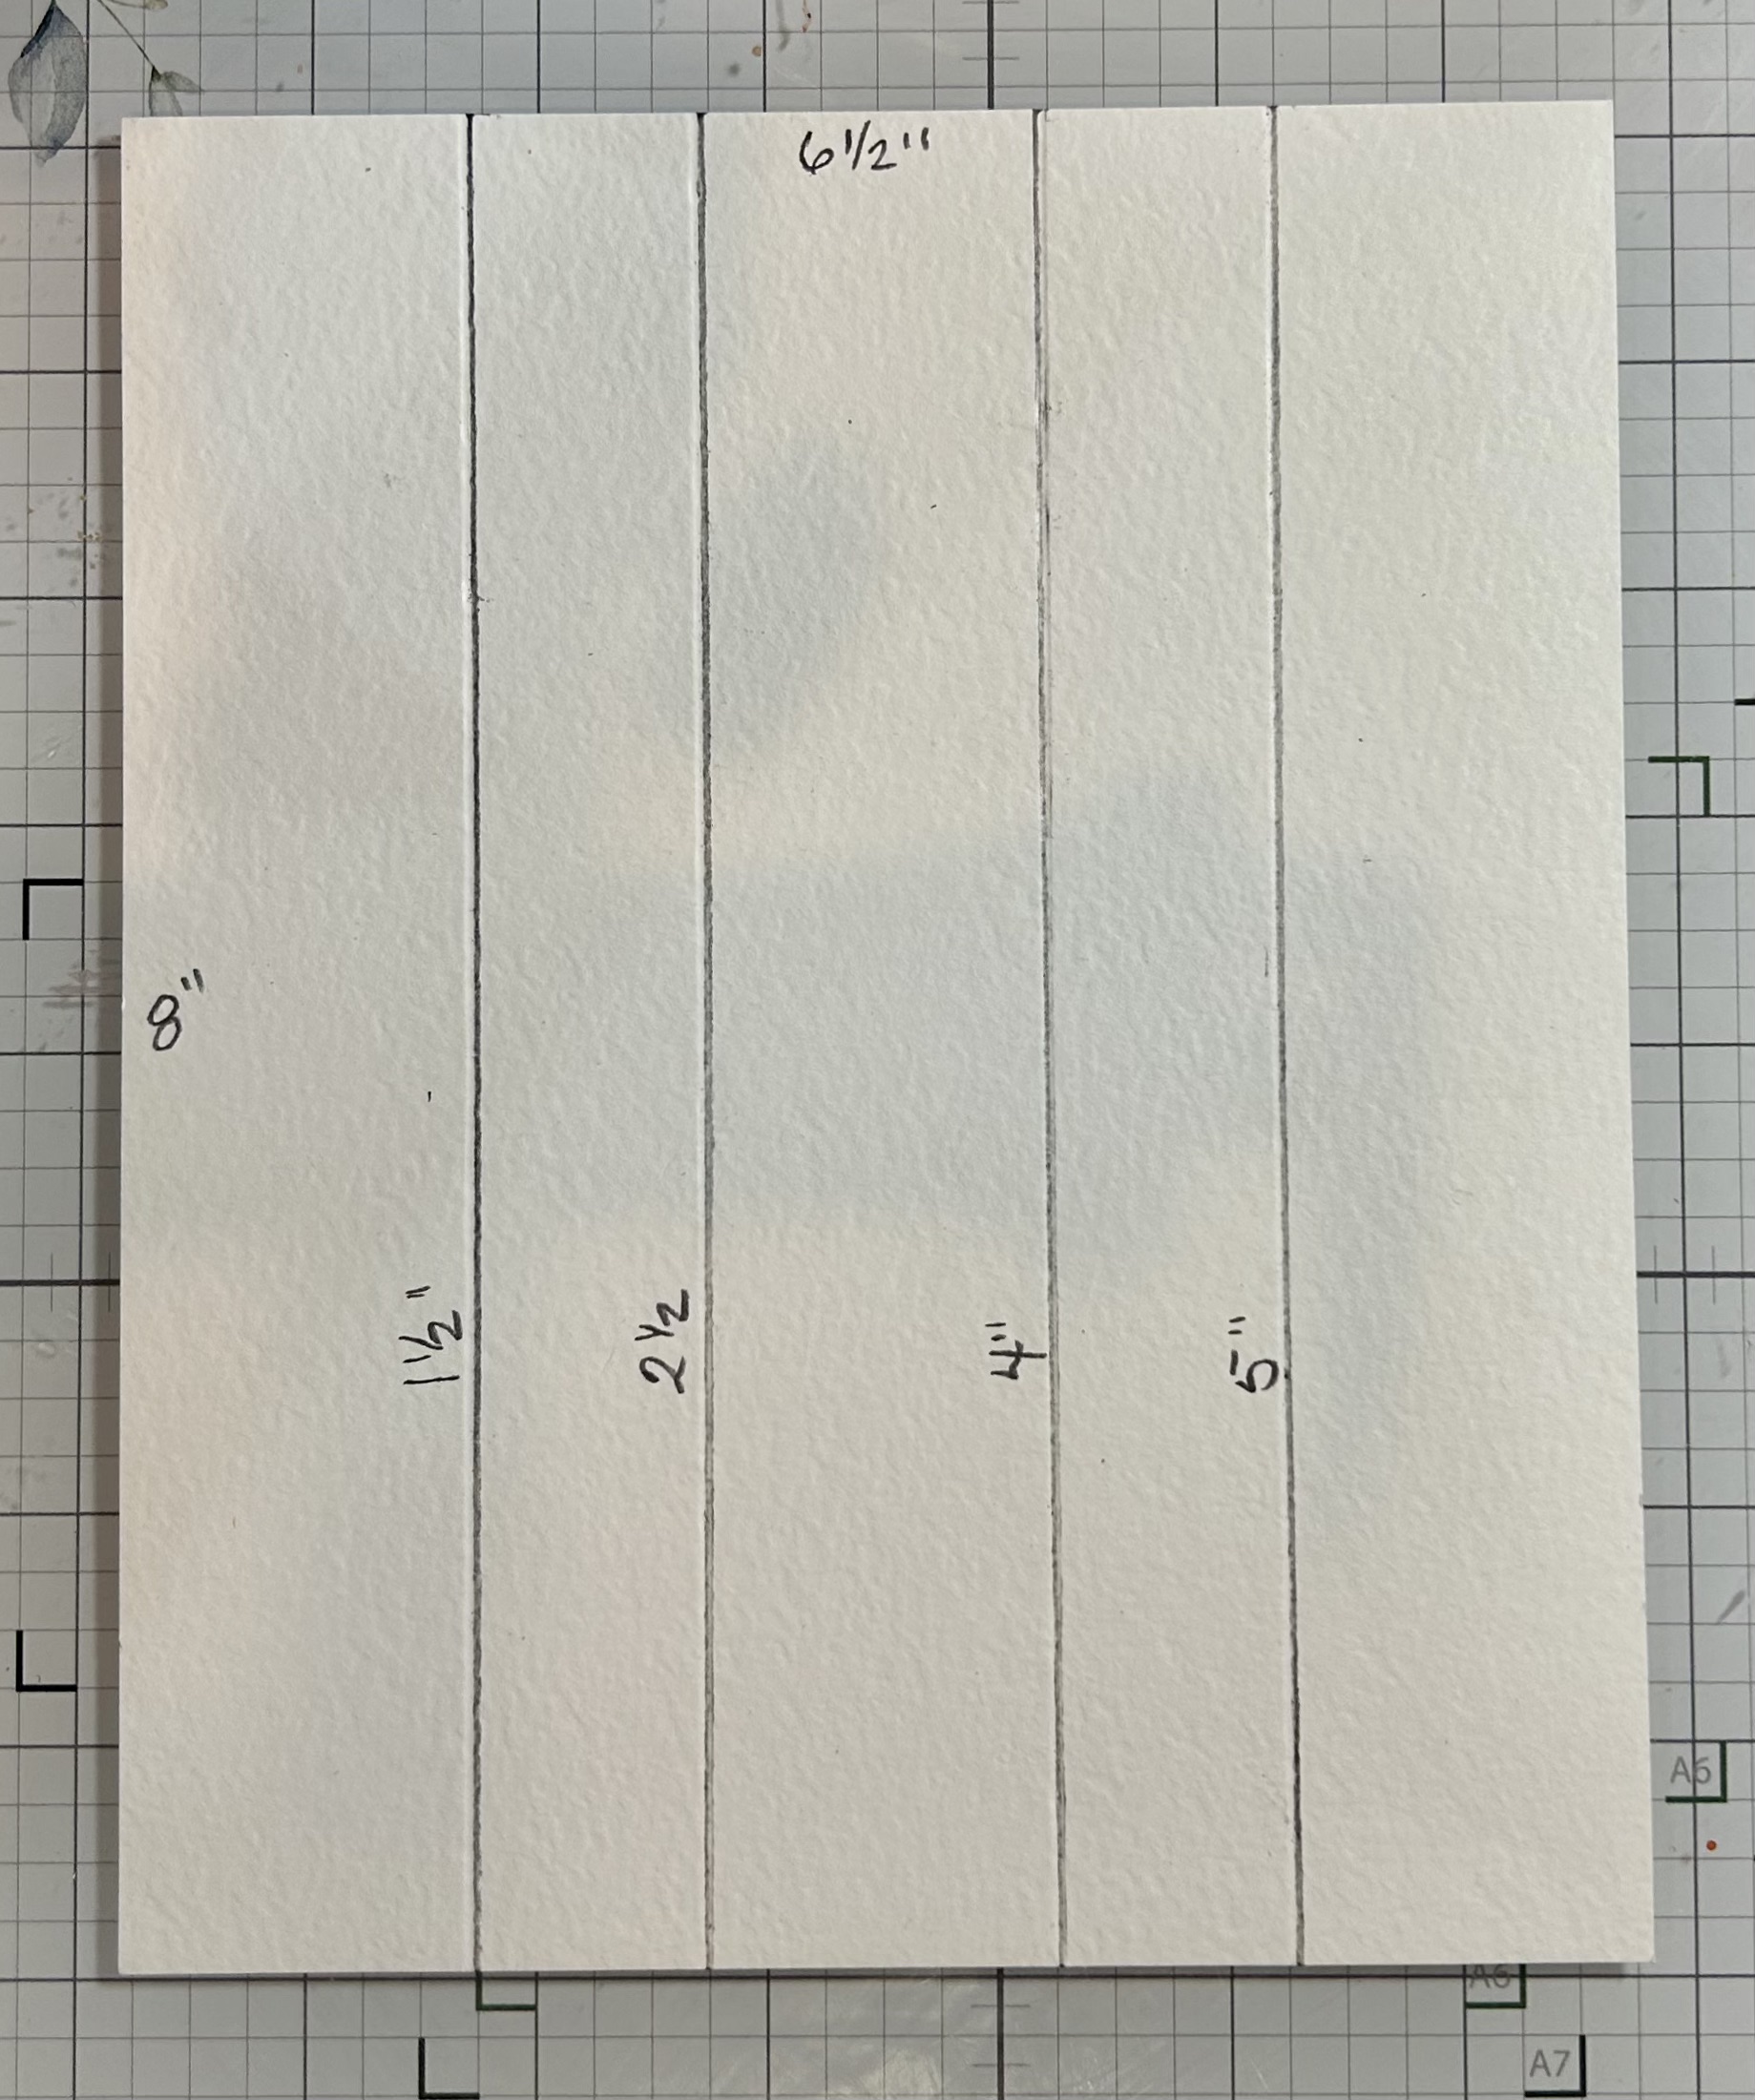
Cut 2 of each of the sizes: 6 1/2″ x 8″ and 6 1/2″ x 6″ (you will need three sheets of patterned cardstock to do this.) With the 6 1/2″ size at the top of your scoreboard, score at 1 1/2″ – 2 1/2″ -4″ -5″ on on four pieces. Then you will measure down (on all the same sides) 1 1/2″, draw a line from that mark to the second score line (4″), then up from that point to the next score line (at a 45-degree angle) to the 2 1/2″ score line. See photos below. Fold and burnish on all score lines. Assemble the frame as shown on my video.
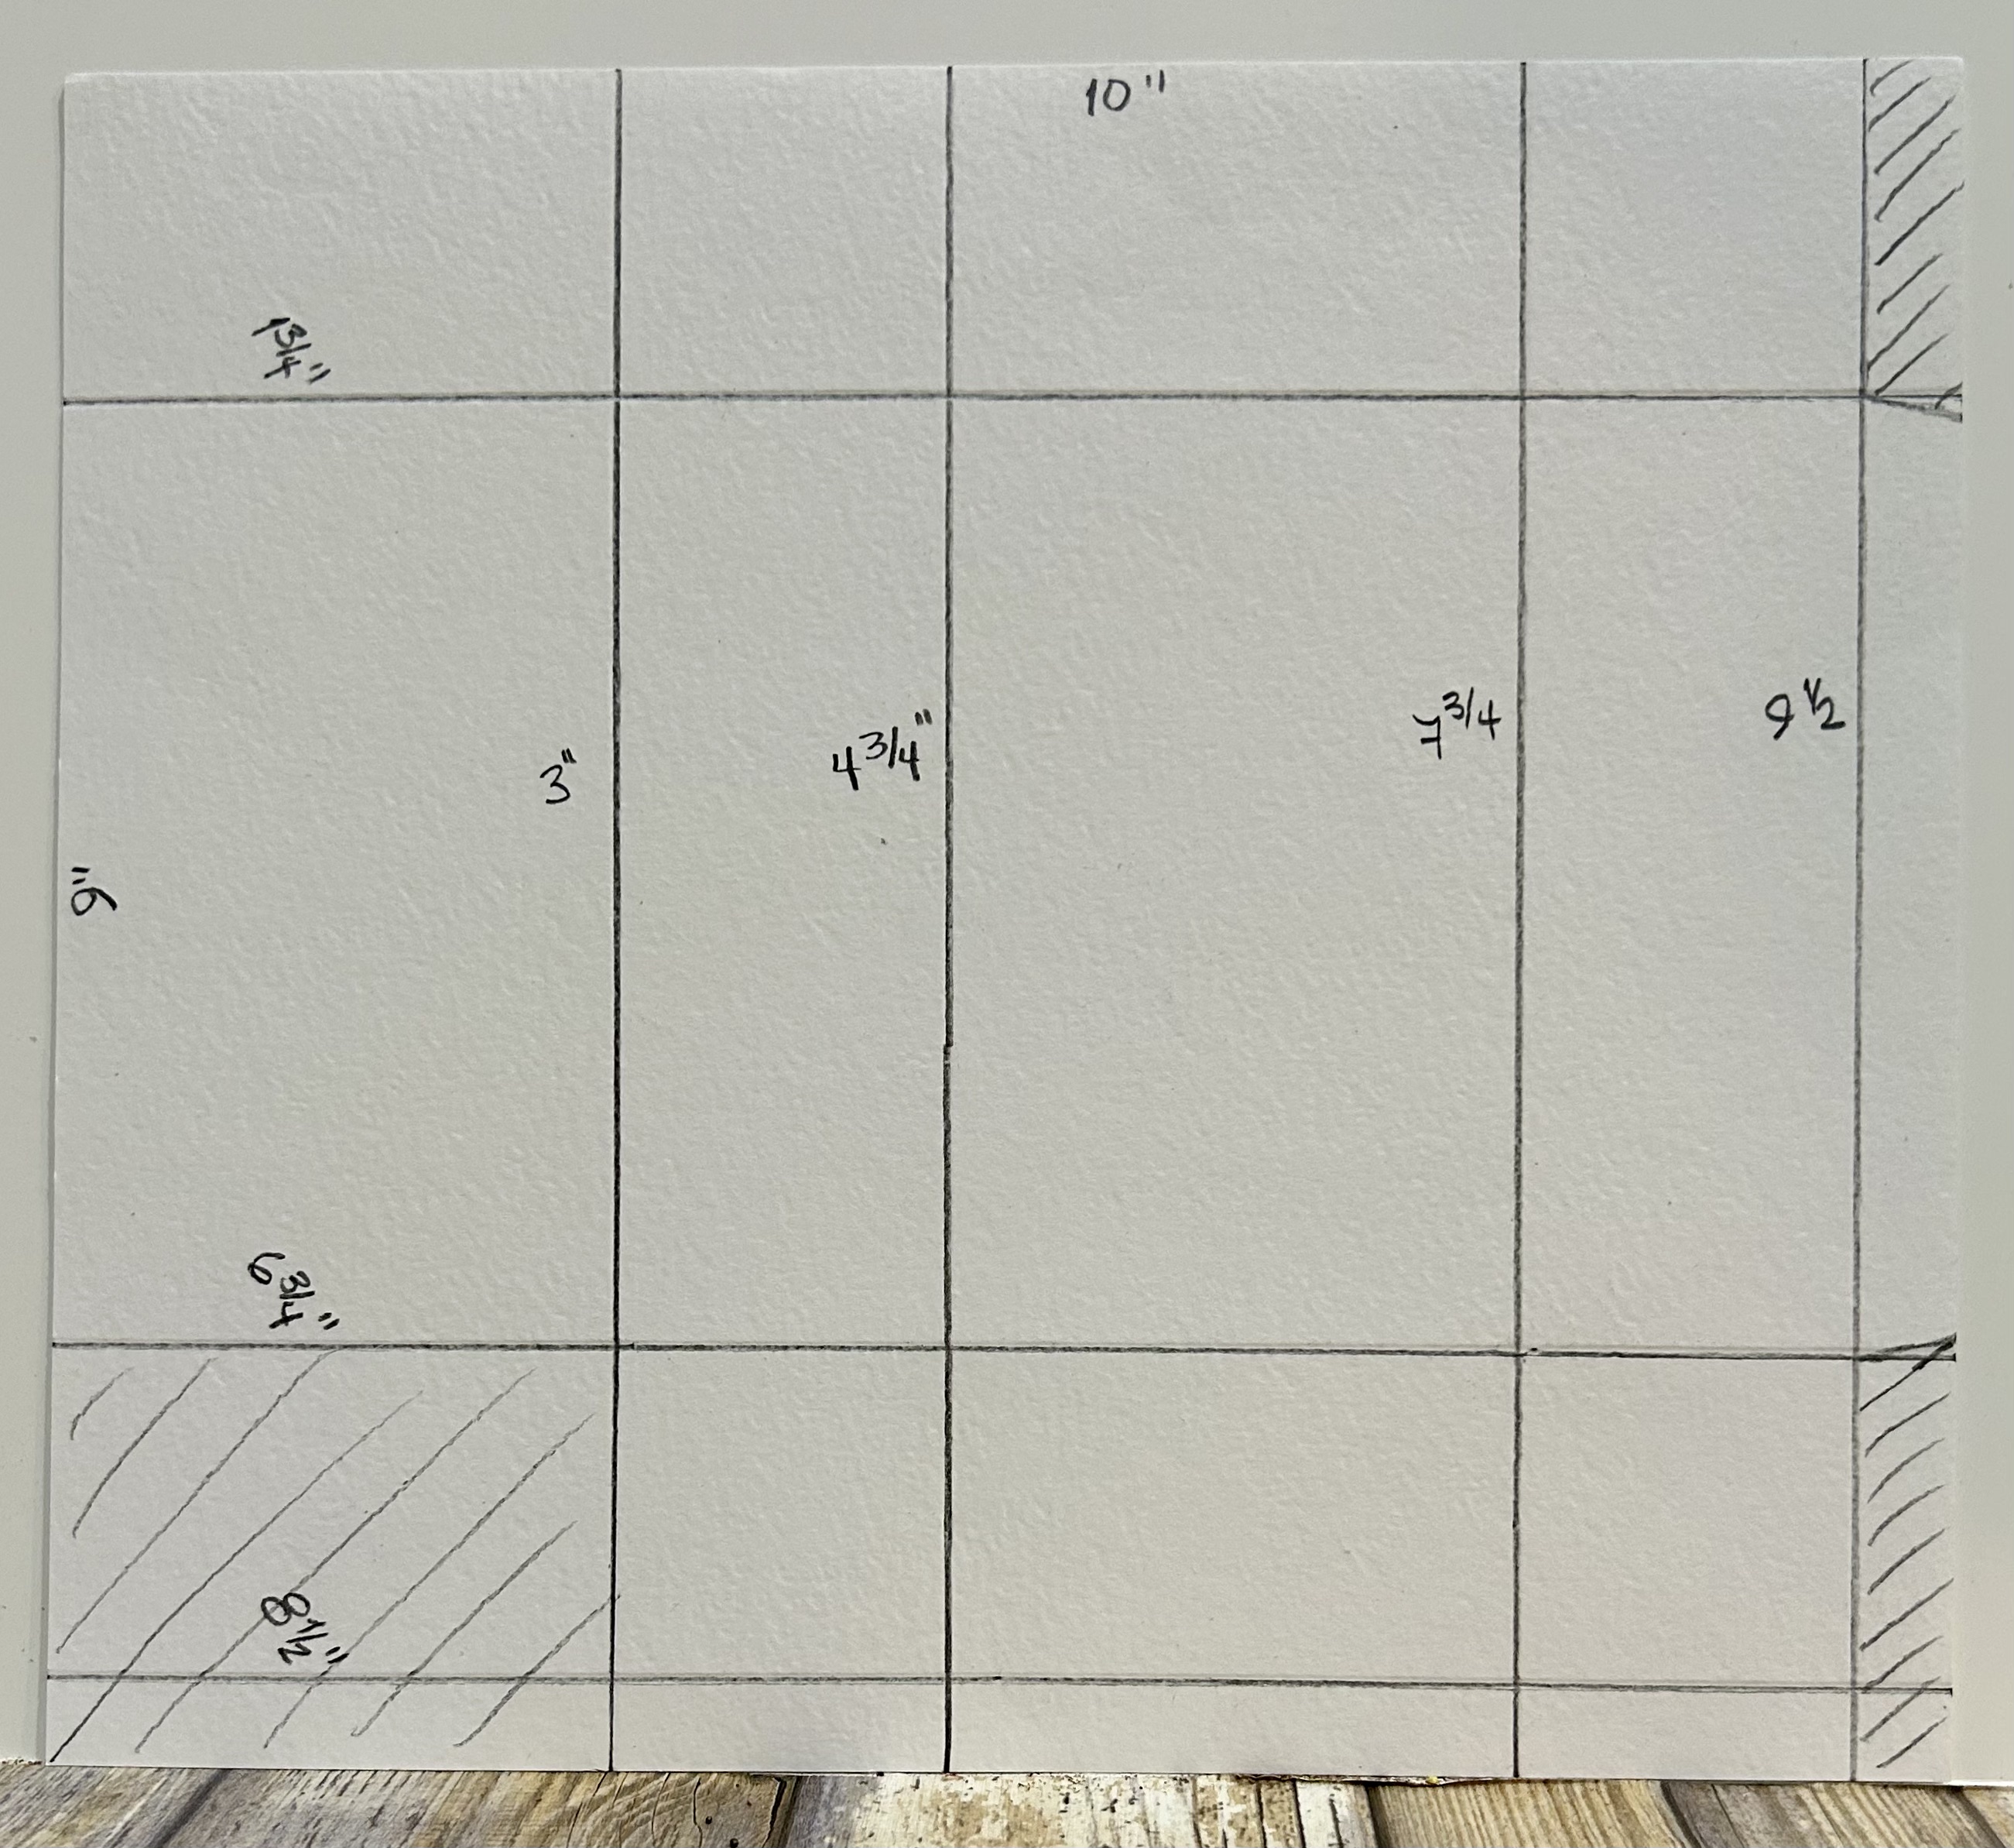
Next, the Gift Box. Cut a piece of cardstock 100 lb./300 gsm 9″ x 10″. Here is the template to use to create it.
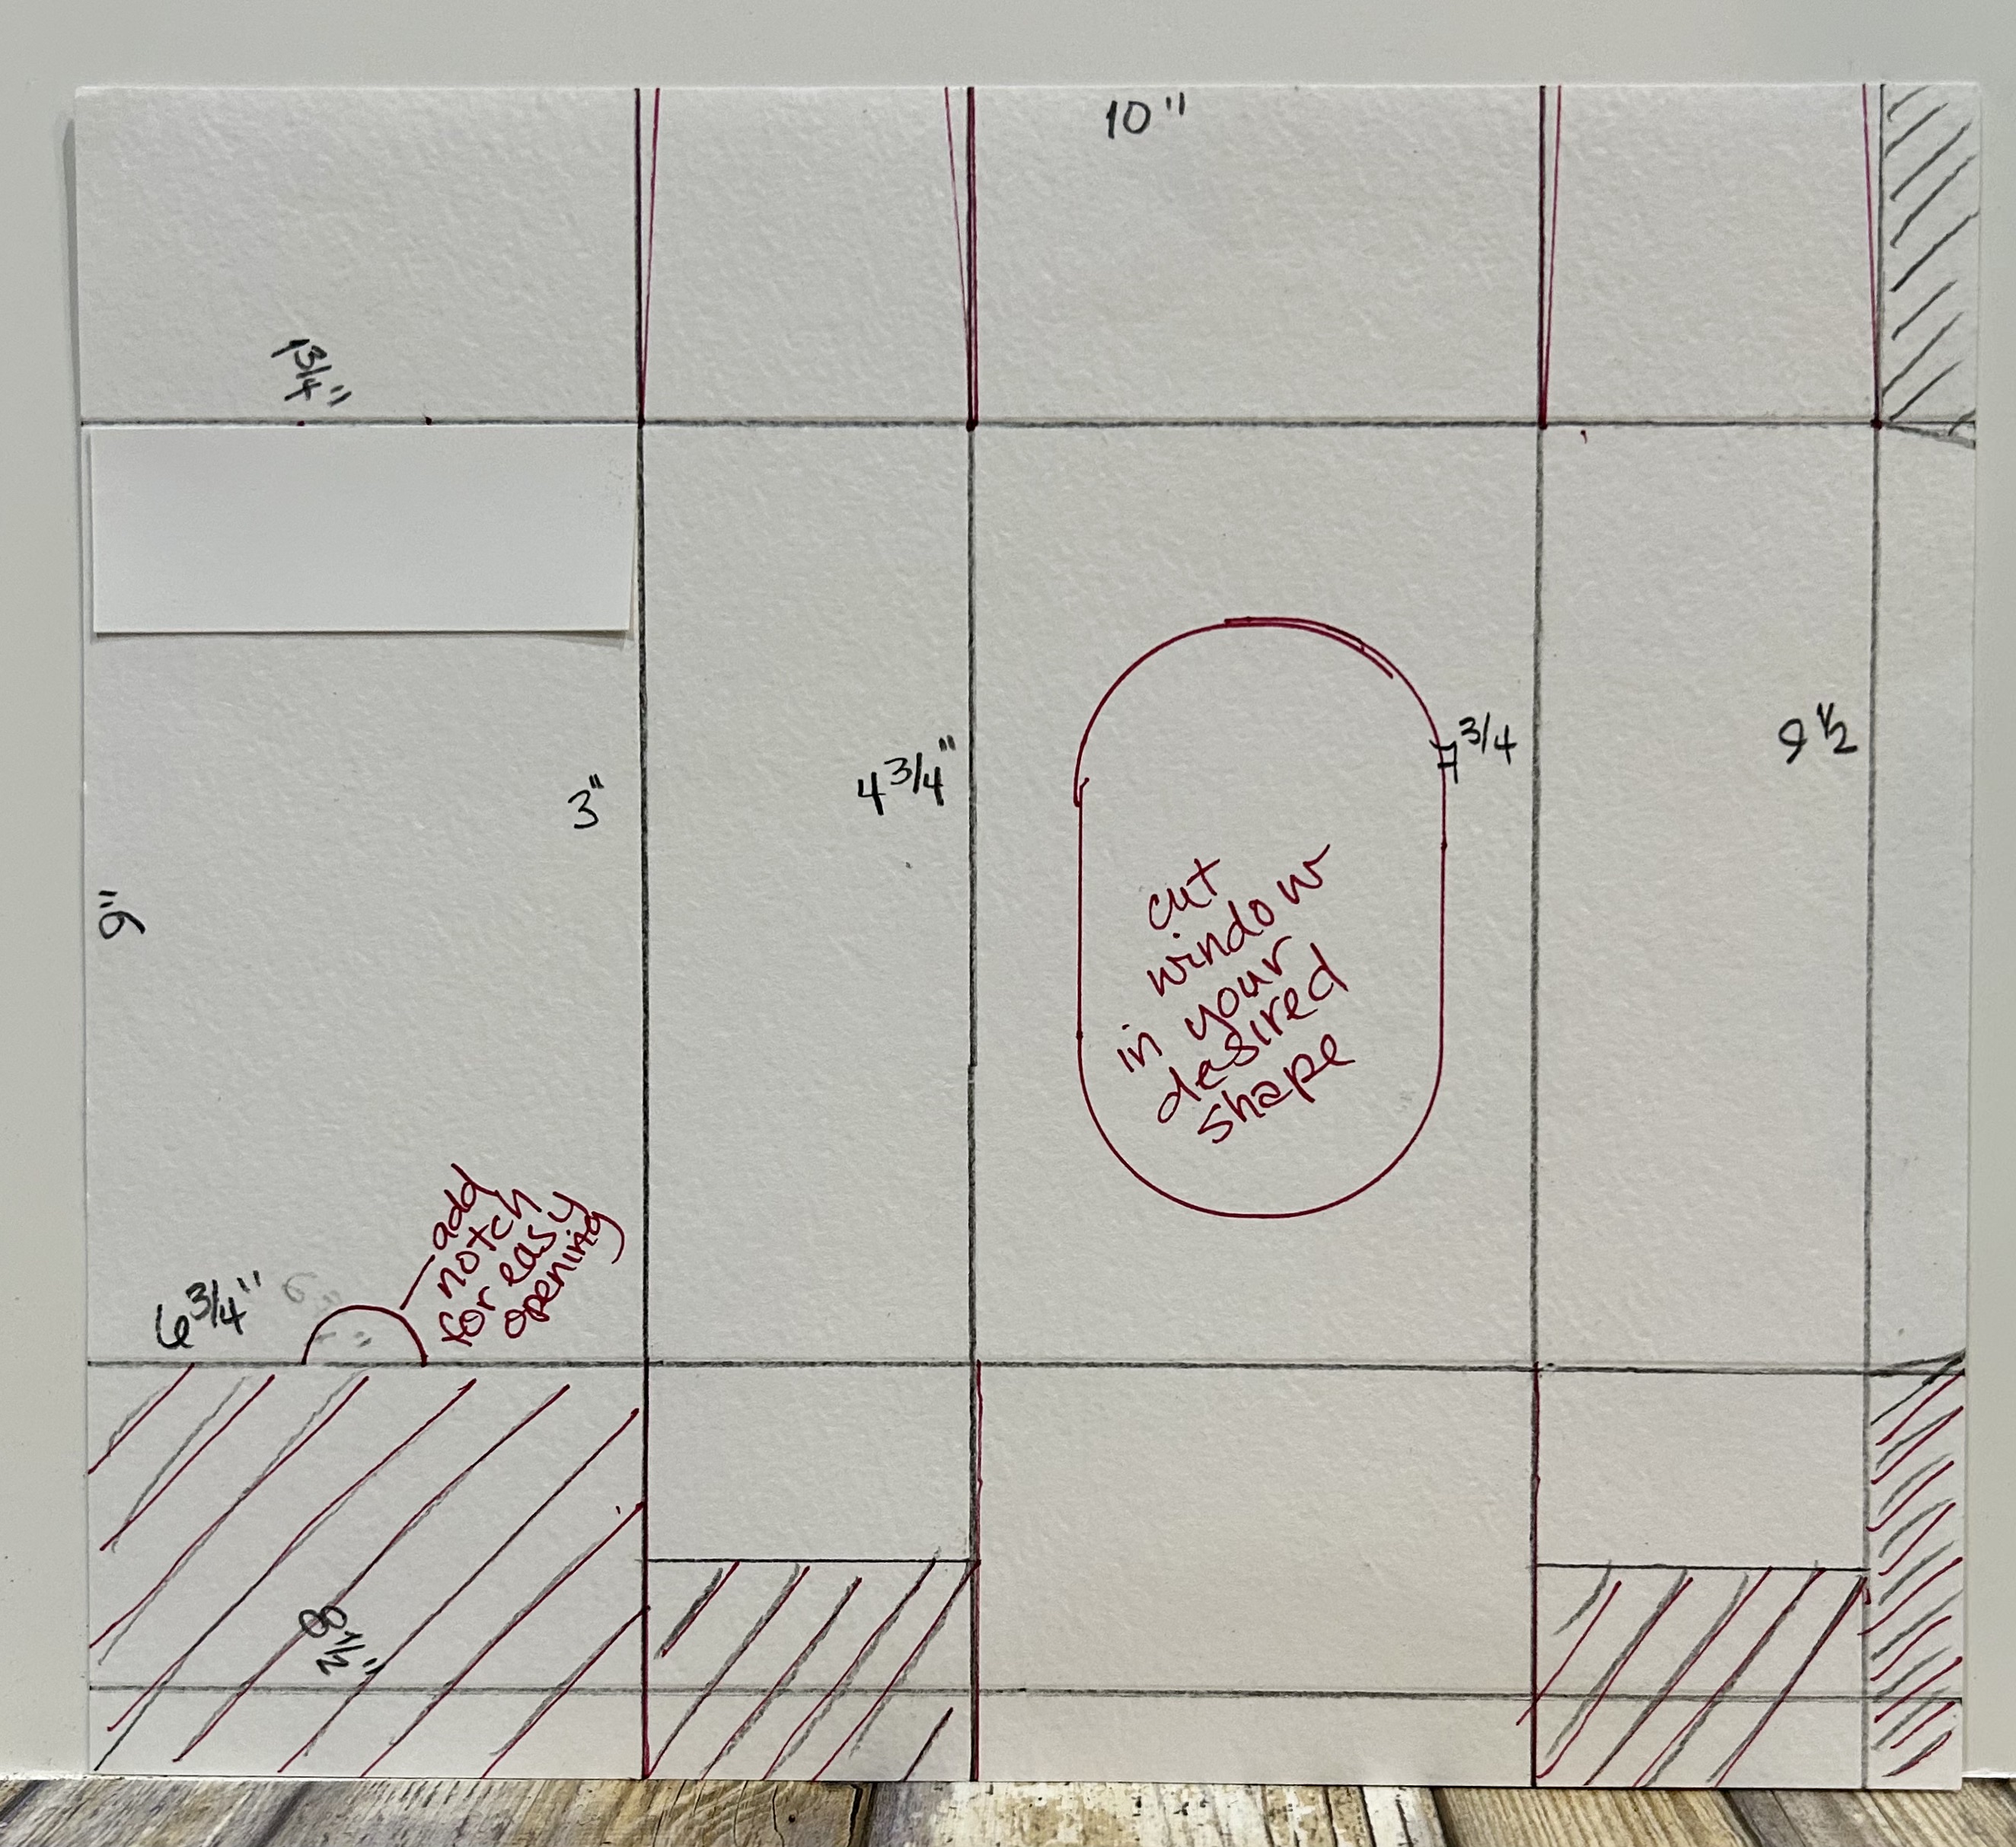
With the 10″side up on your scoreboard, score at 3″ – 4 3/4″ – 7 3/4″ and 9 1/2″, then turn to the 9″ side with that 1/2″ score line at the top and score at 1 3/4″ – 6 3/4″ – 8 1/2″. Trim away all the areas with slash (/) lines and cut up on straight lines to create flaps. *Note that I trimmed back the bottom flaps that close the bottom of the box.
If you want to create a window, you can use a die, but you need to have a Spellbinders Platinum machine (or compatible machine) to run it through and you will need to fold down that 1/2″ scored line on the side of the base.
Burnish all the score lines. Start by gluing the bottom of the box, first large flap, then the two sides and finally the last large flap.
For the top of the box, cut a sliver out of each of the side flaps for ease of closing and if you have a corner/round punch, trim the closure. Also, you a 1/2″ round punch to create a notch which will help in opening the box. You can refer to my video on LIVE to see how this is all done.
The box will fit perfectly into the opening in the frame and now you can create your bouquet(s)!
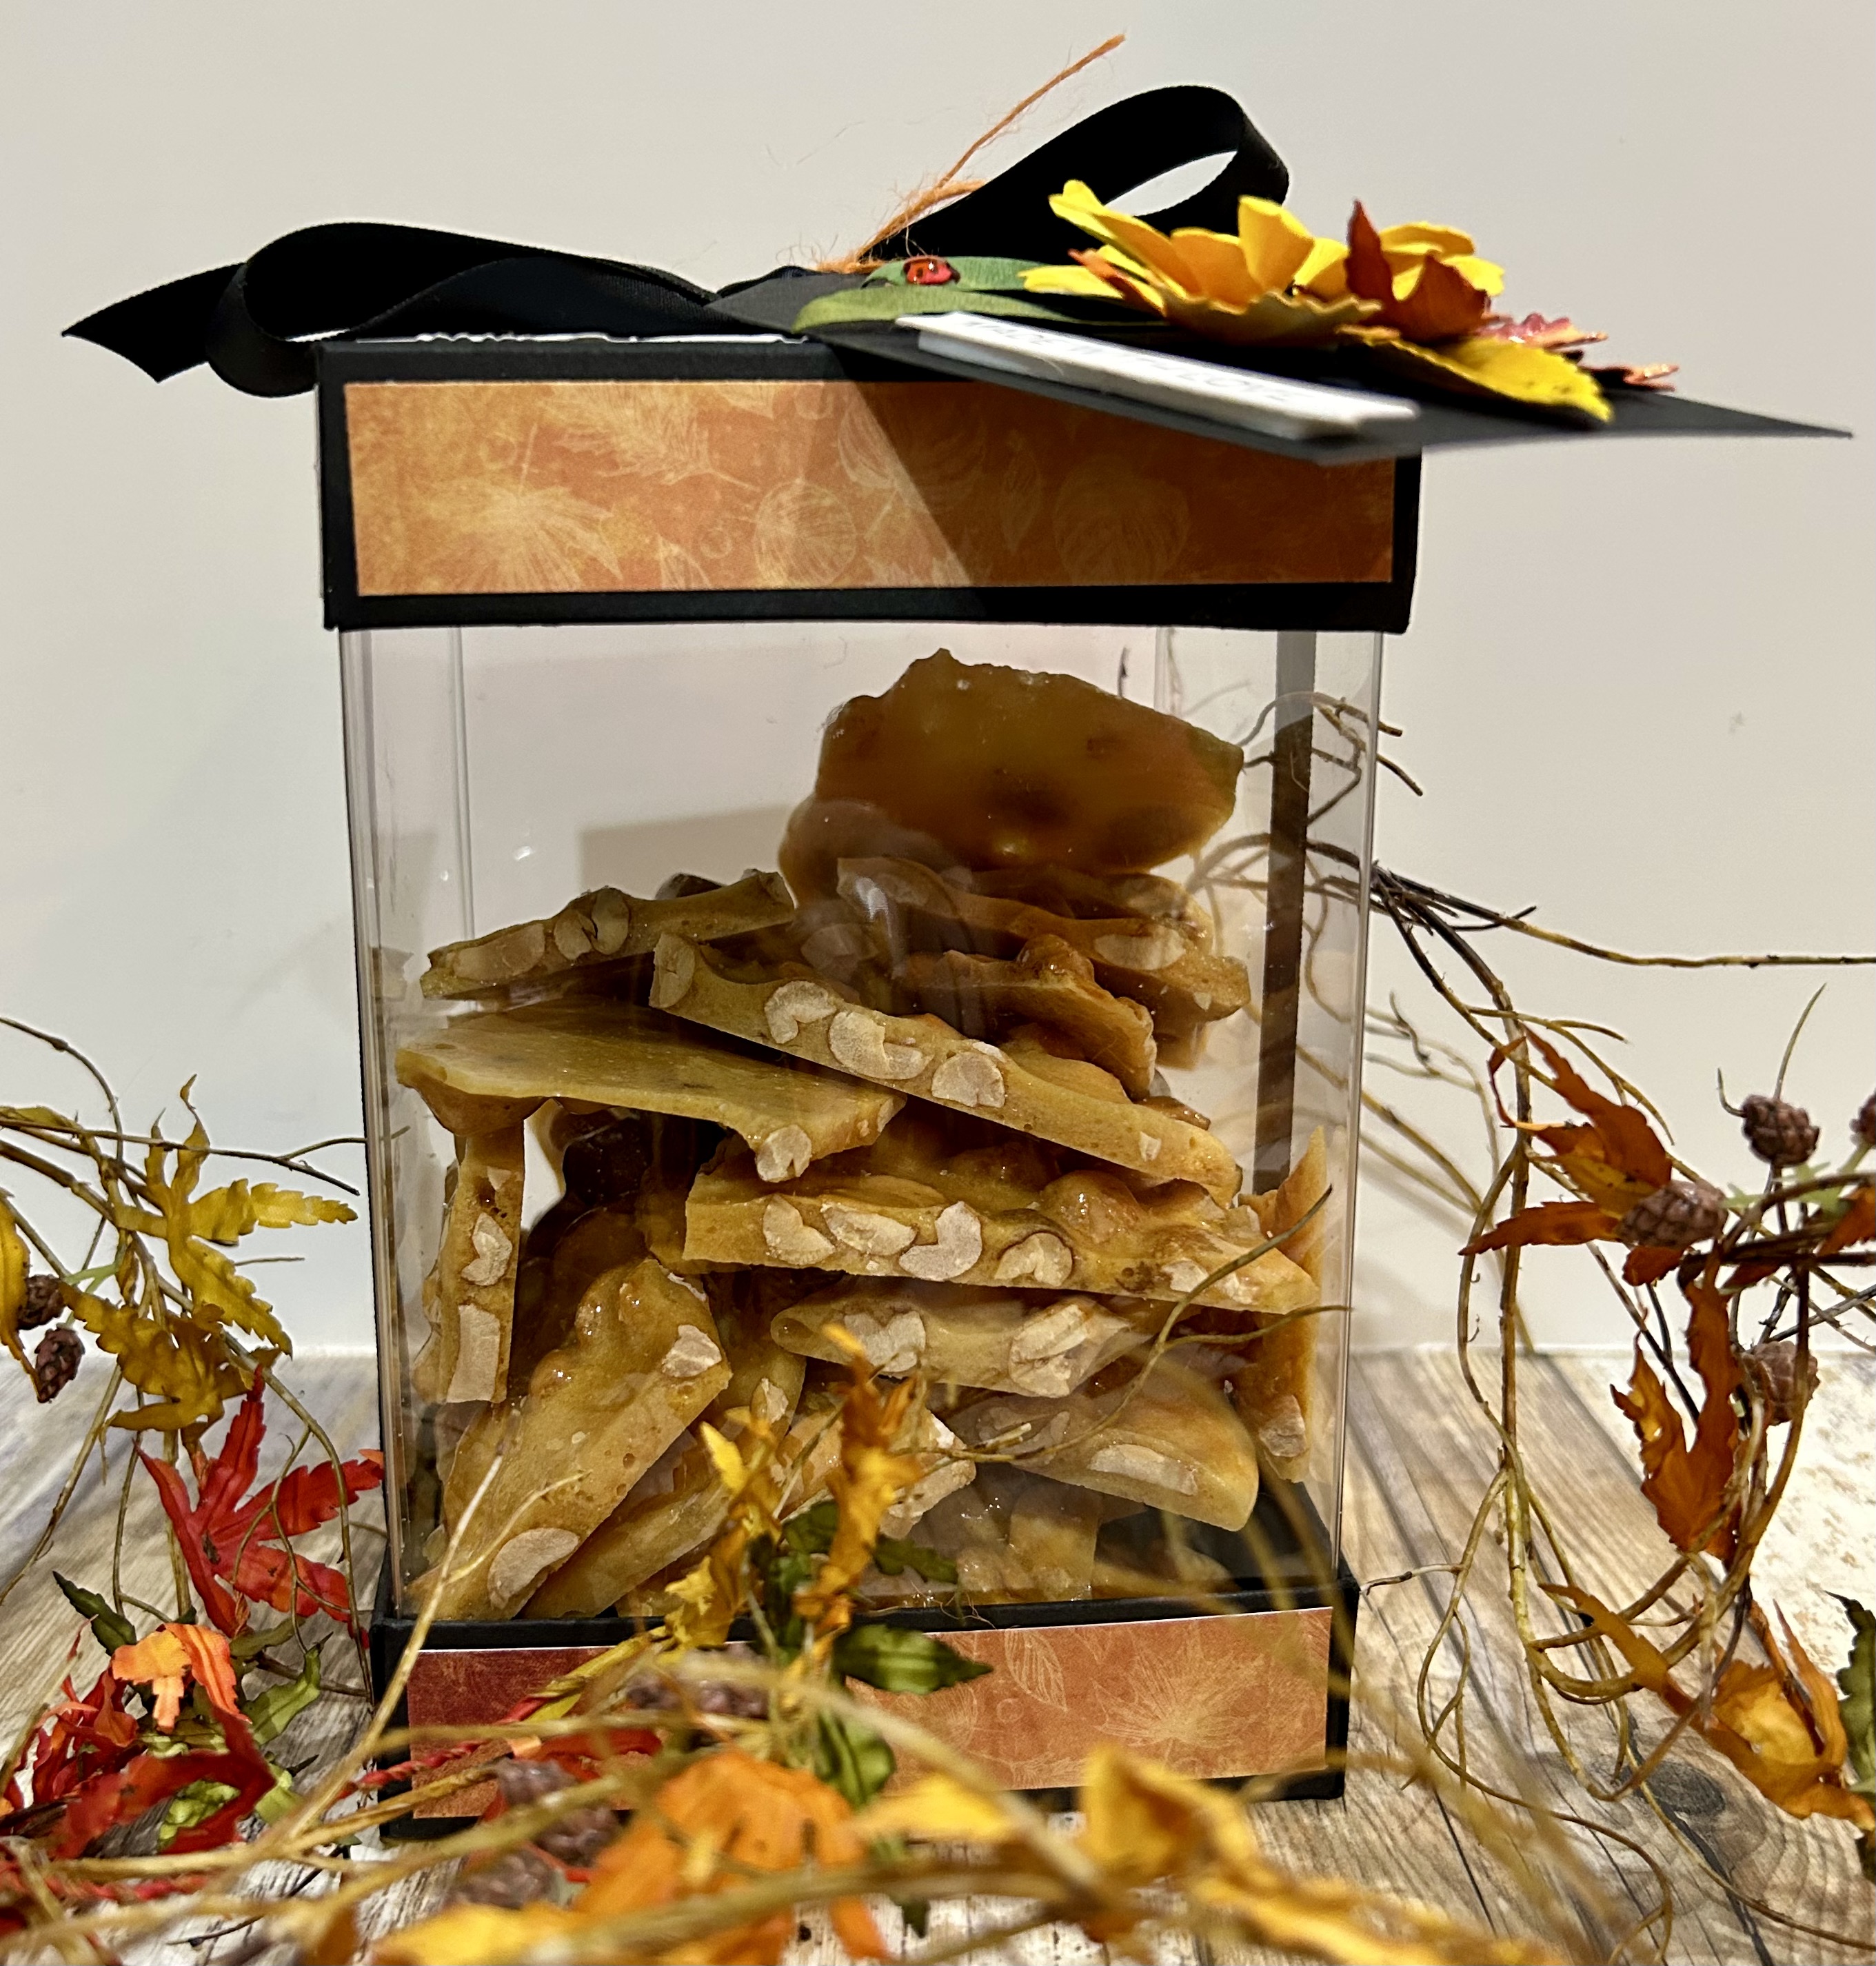
CLEAR GIFT BOX
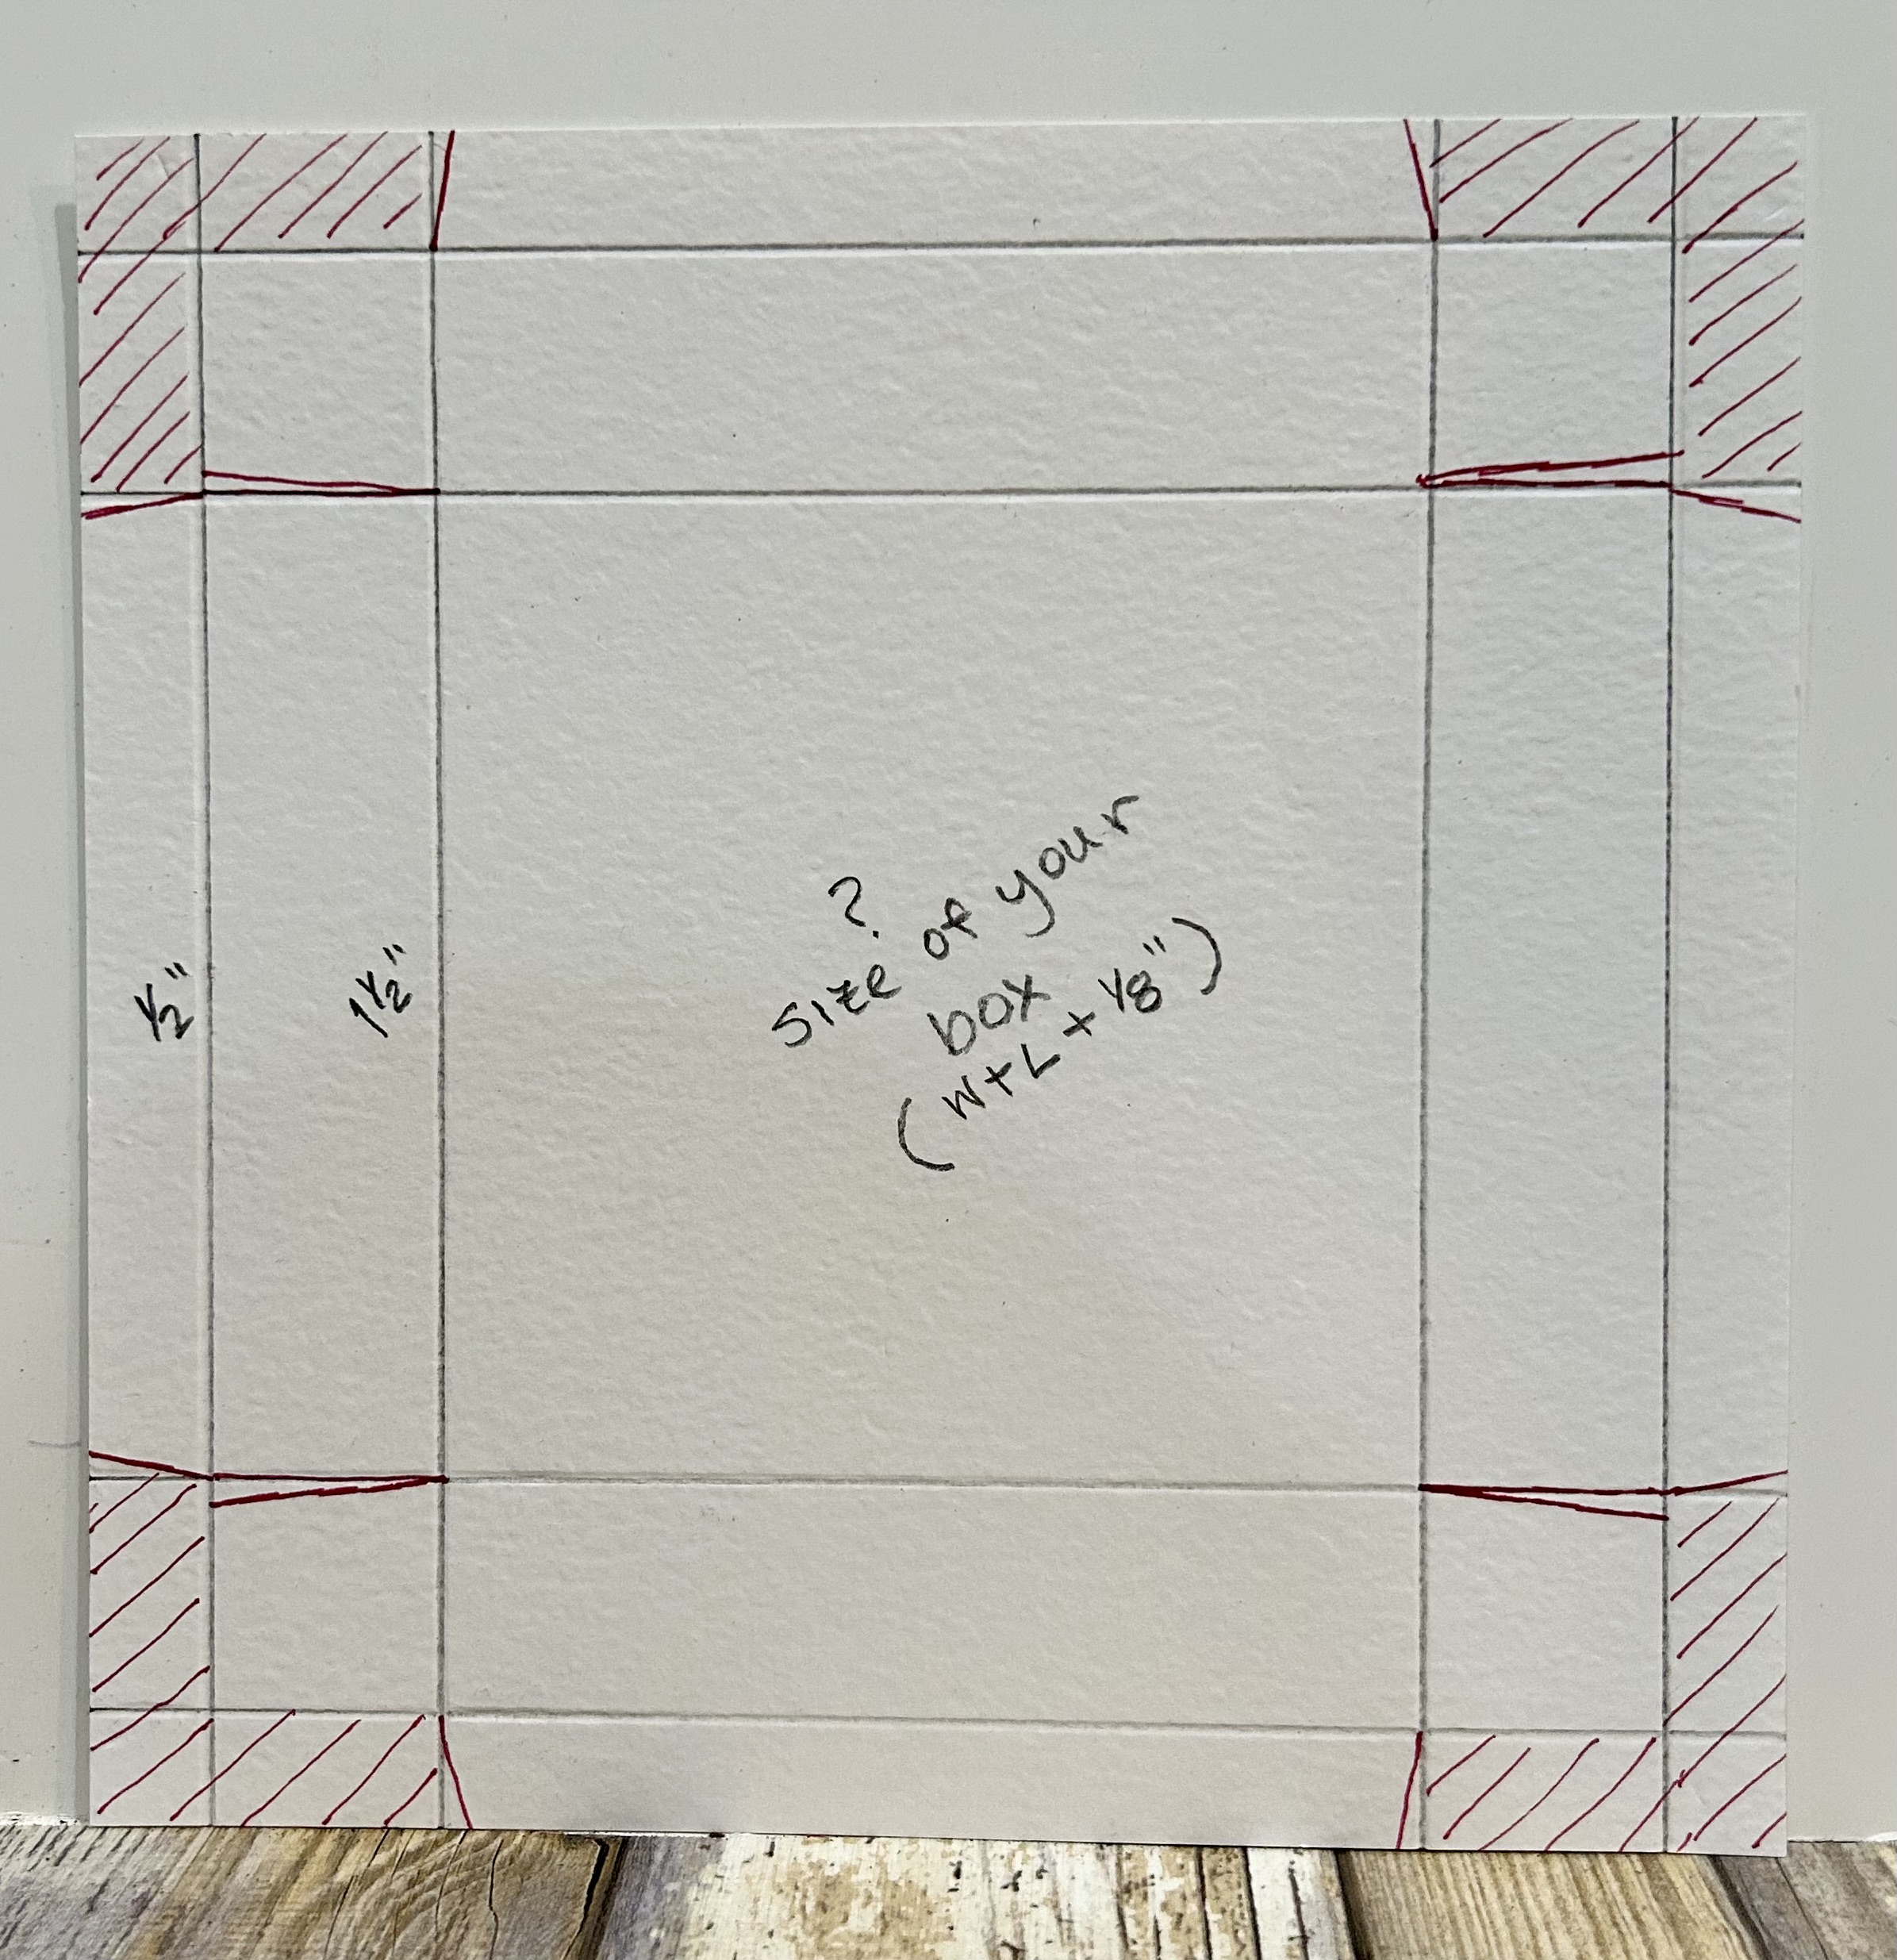
This was another idea to create a box by adding a top and bottom decorative piece to. My box was 4″ square, but you can do any size you have with keeping to the template!
Score at 1/2″ and 1 1/2″ (turning your cardstock 90-degrees each time) so all four sides are scored the same. Trim away all (/) red slash lines and cut slivers as shown above. If you are adding patterned cardstock to the side and top, the measurement will be 3/4″-wide x 1/4″ less than your box size and my panel for the top of the box was the measure of that center square minus 1/4″. (For example, my box was 4″ square + I added a 1/8″, so my side panels were 3/4″ x 3 7/8″ and top embossed panel was 3 7/8″ x 3 7/8″.) Add these panels before you construct the top and bottom. Construct box, one side at a time, gluing the tabs. Once they have set, fold down the 1/2″ sections to give you a finished look on your top & bottom.
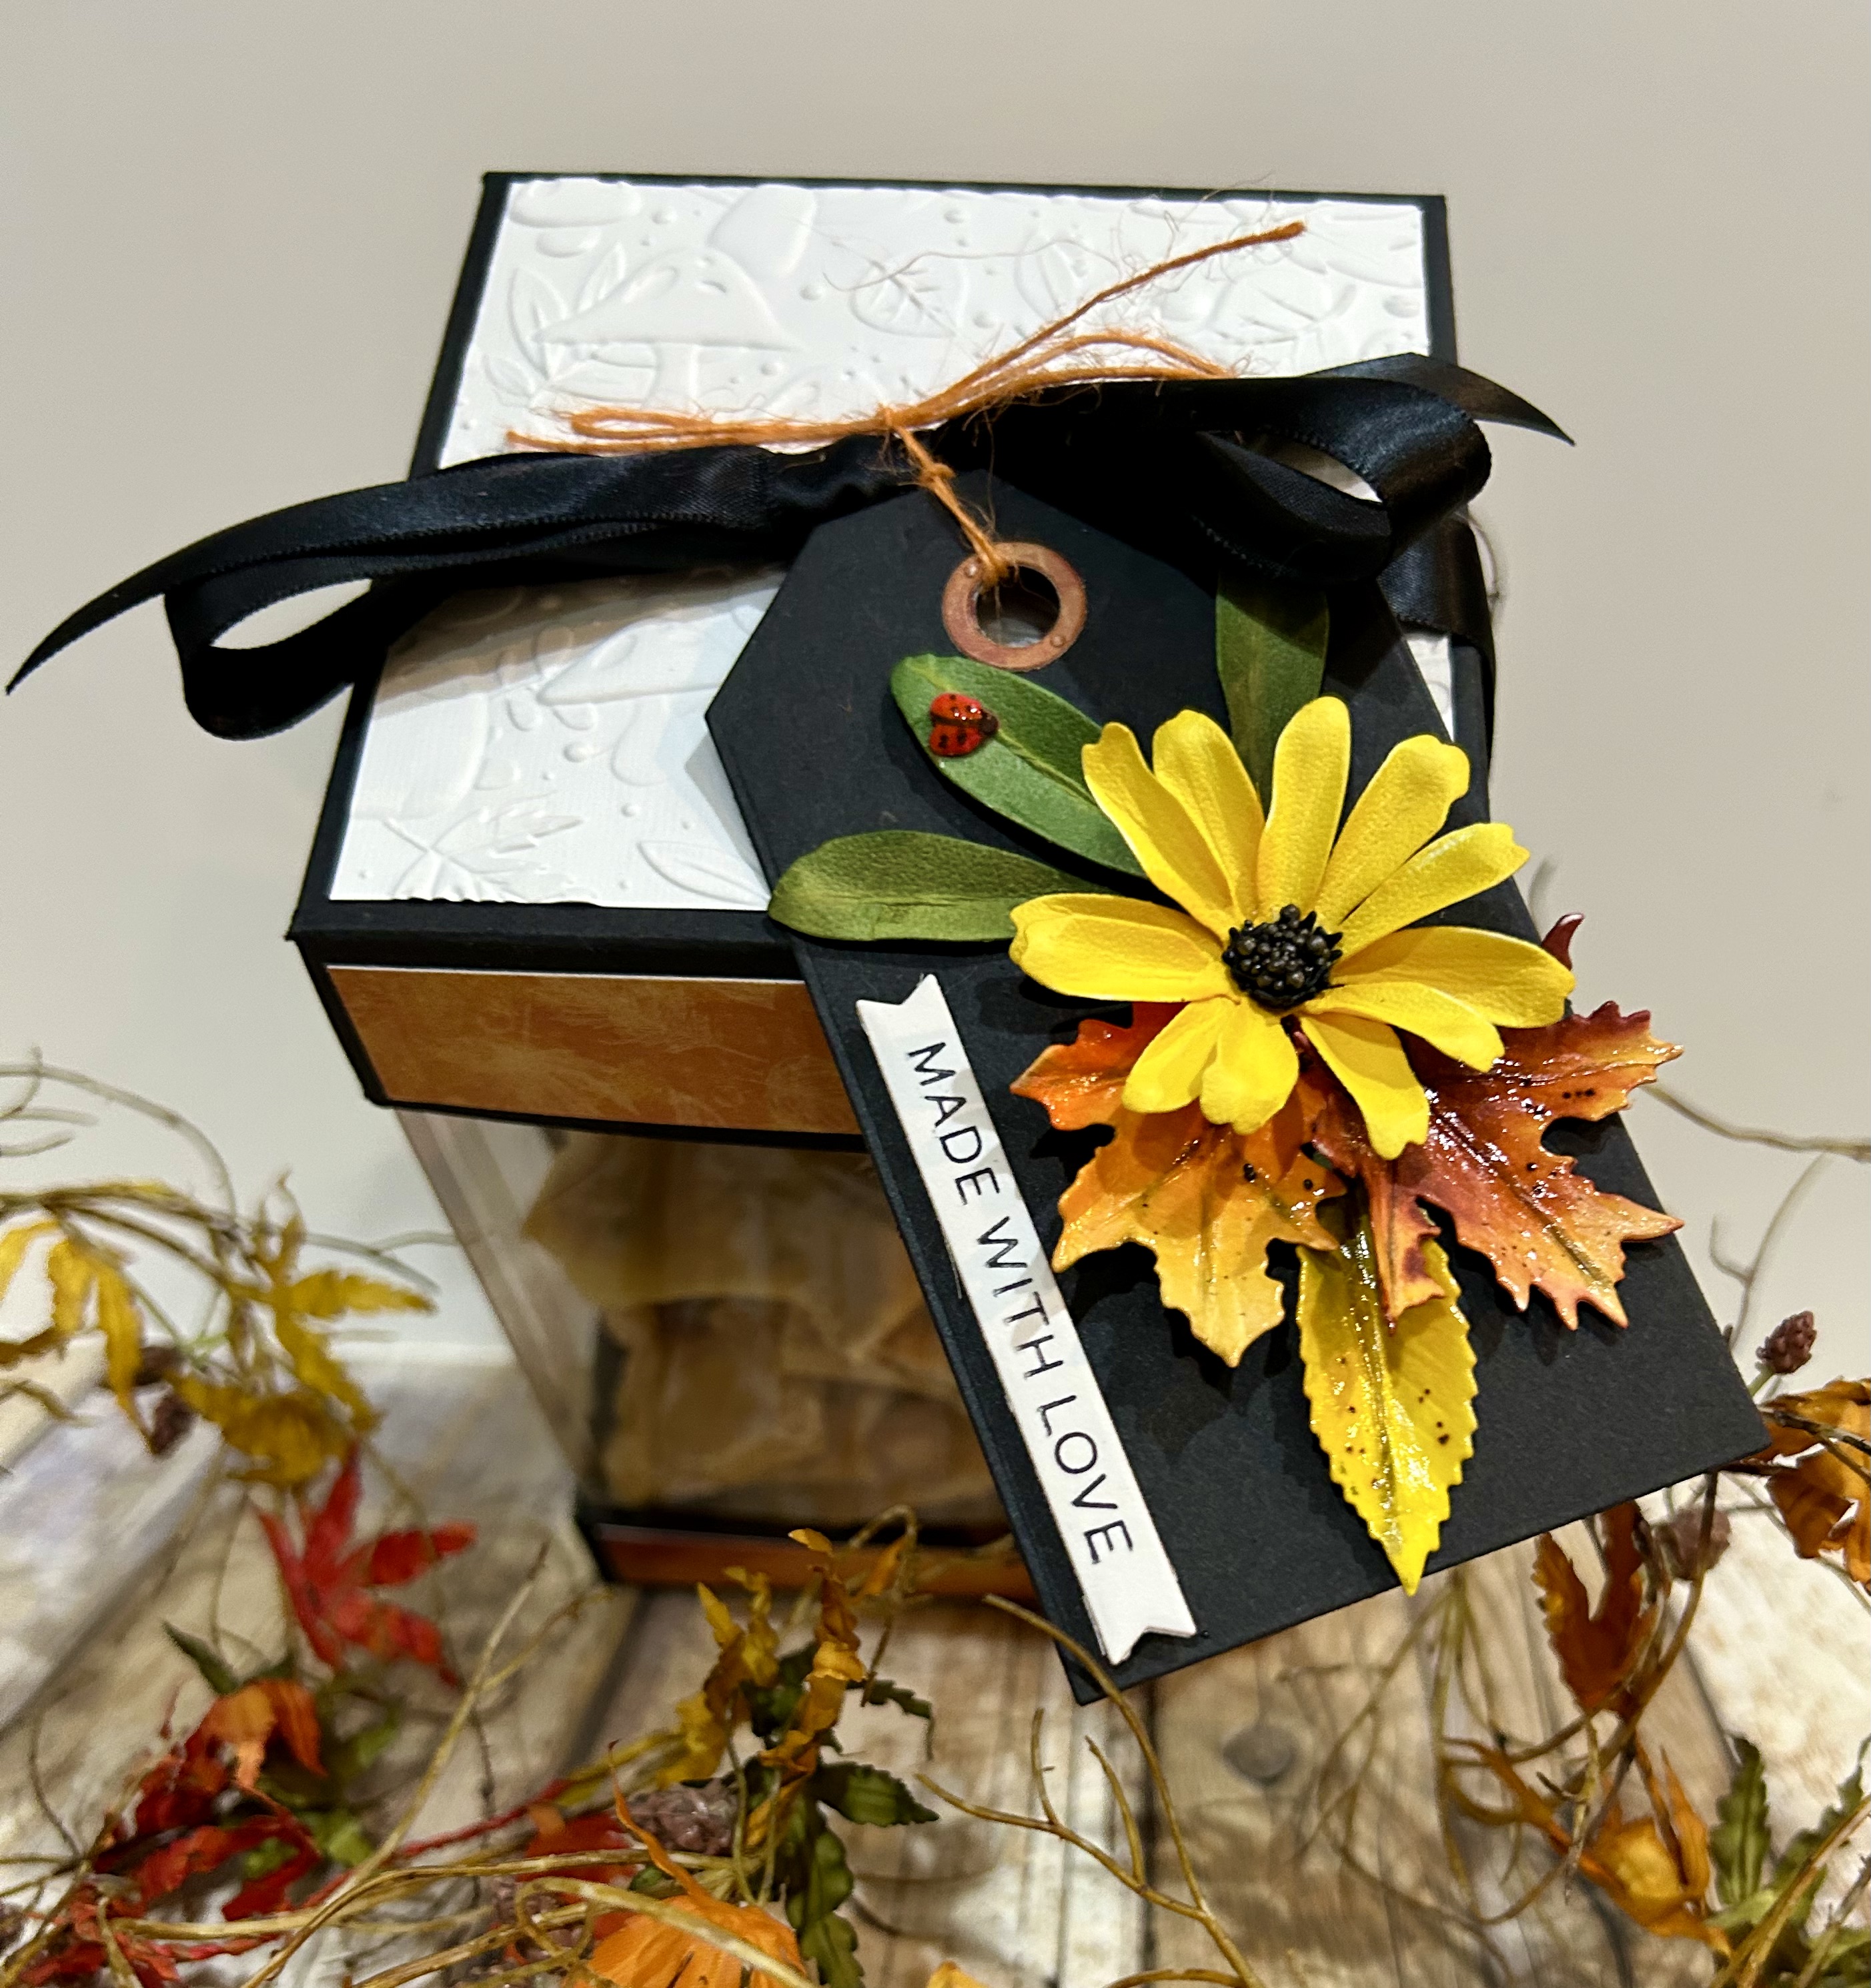
Enclose the plastic box with the top and bottom, then I tied it with a matching ribbon and added a decorative tag with my Black-eyed Susan and Autumn Foliage! And, of course, homemade Peanut Brittle was inside! Recipe below.
MICROWAVE PEANUT BRITTLE – Power Level High
Lightly grease a baking sheet
1 cup granulated Sugar and 1/2 cup White Karo Syrup…………………………..In a 1 1/2-quart glass casserole bowl, stir together sugar and syrup. Microwave for 3 minutes 30 seconds.
1 cup dry roasted salted Peanuts…………………………………………………….Stir in peanuts and microwave for 2 minutes 30 seconds
1 tsp. unsalted butter and 1 tsp. Vanilla Extract…………………………………..Add to the mixture, blending well. Microwave for 45 seconds.
1 tsp. Baking Soda…………………………………………………………………….Add to mixture and gently stir in until light and foamy.
Quickly pour mixture onto the lightly greased baking sheet and let cool 1/2 to 1 hour. When cool, break into pieces and store in an airtight container.
*You can also substitute dry roasted almonds, cashews, or pecan halves.
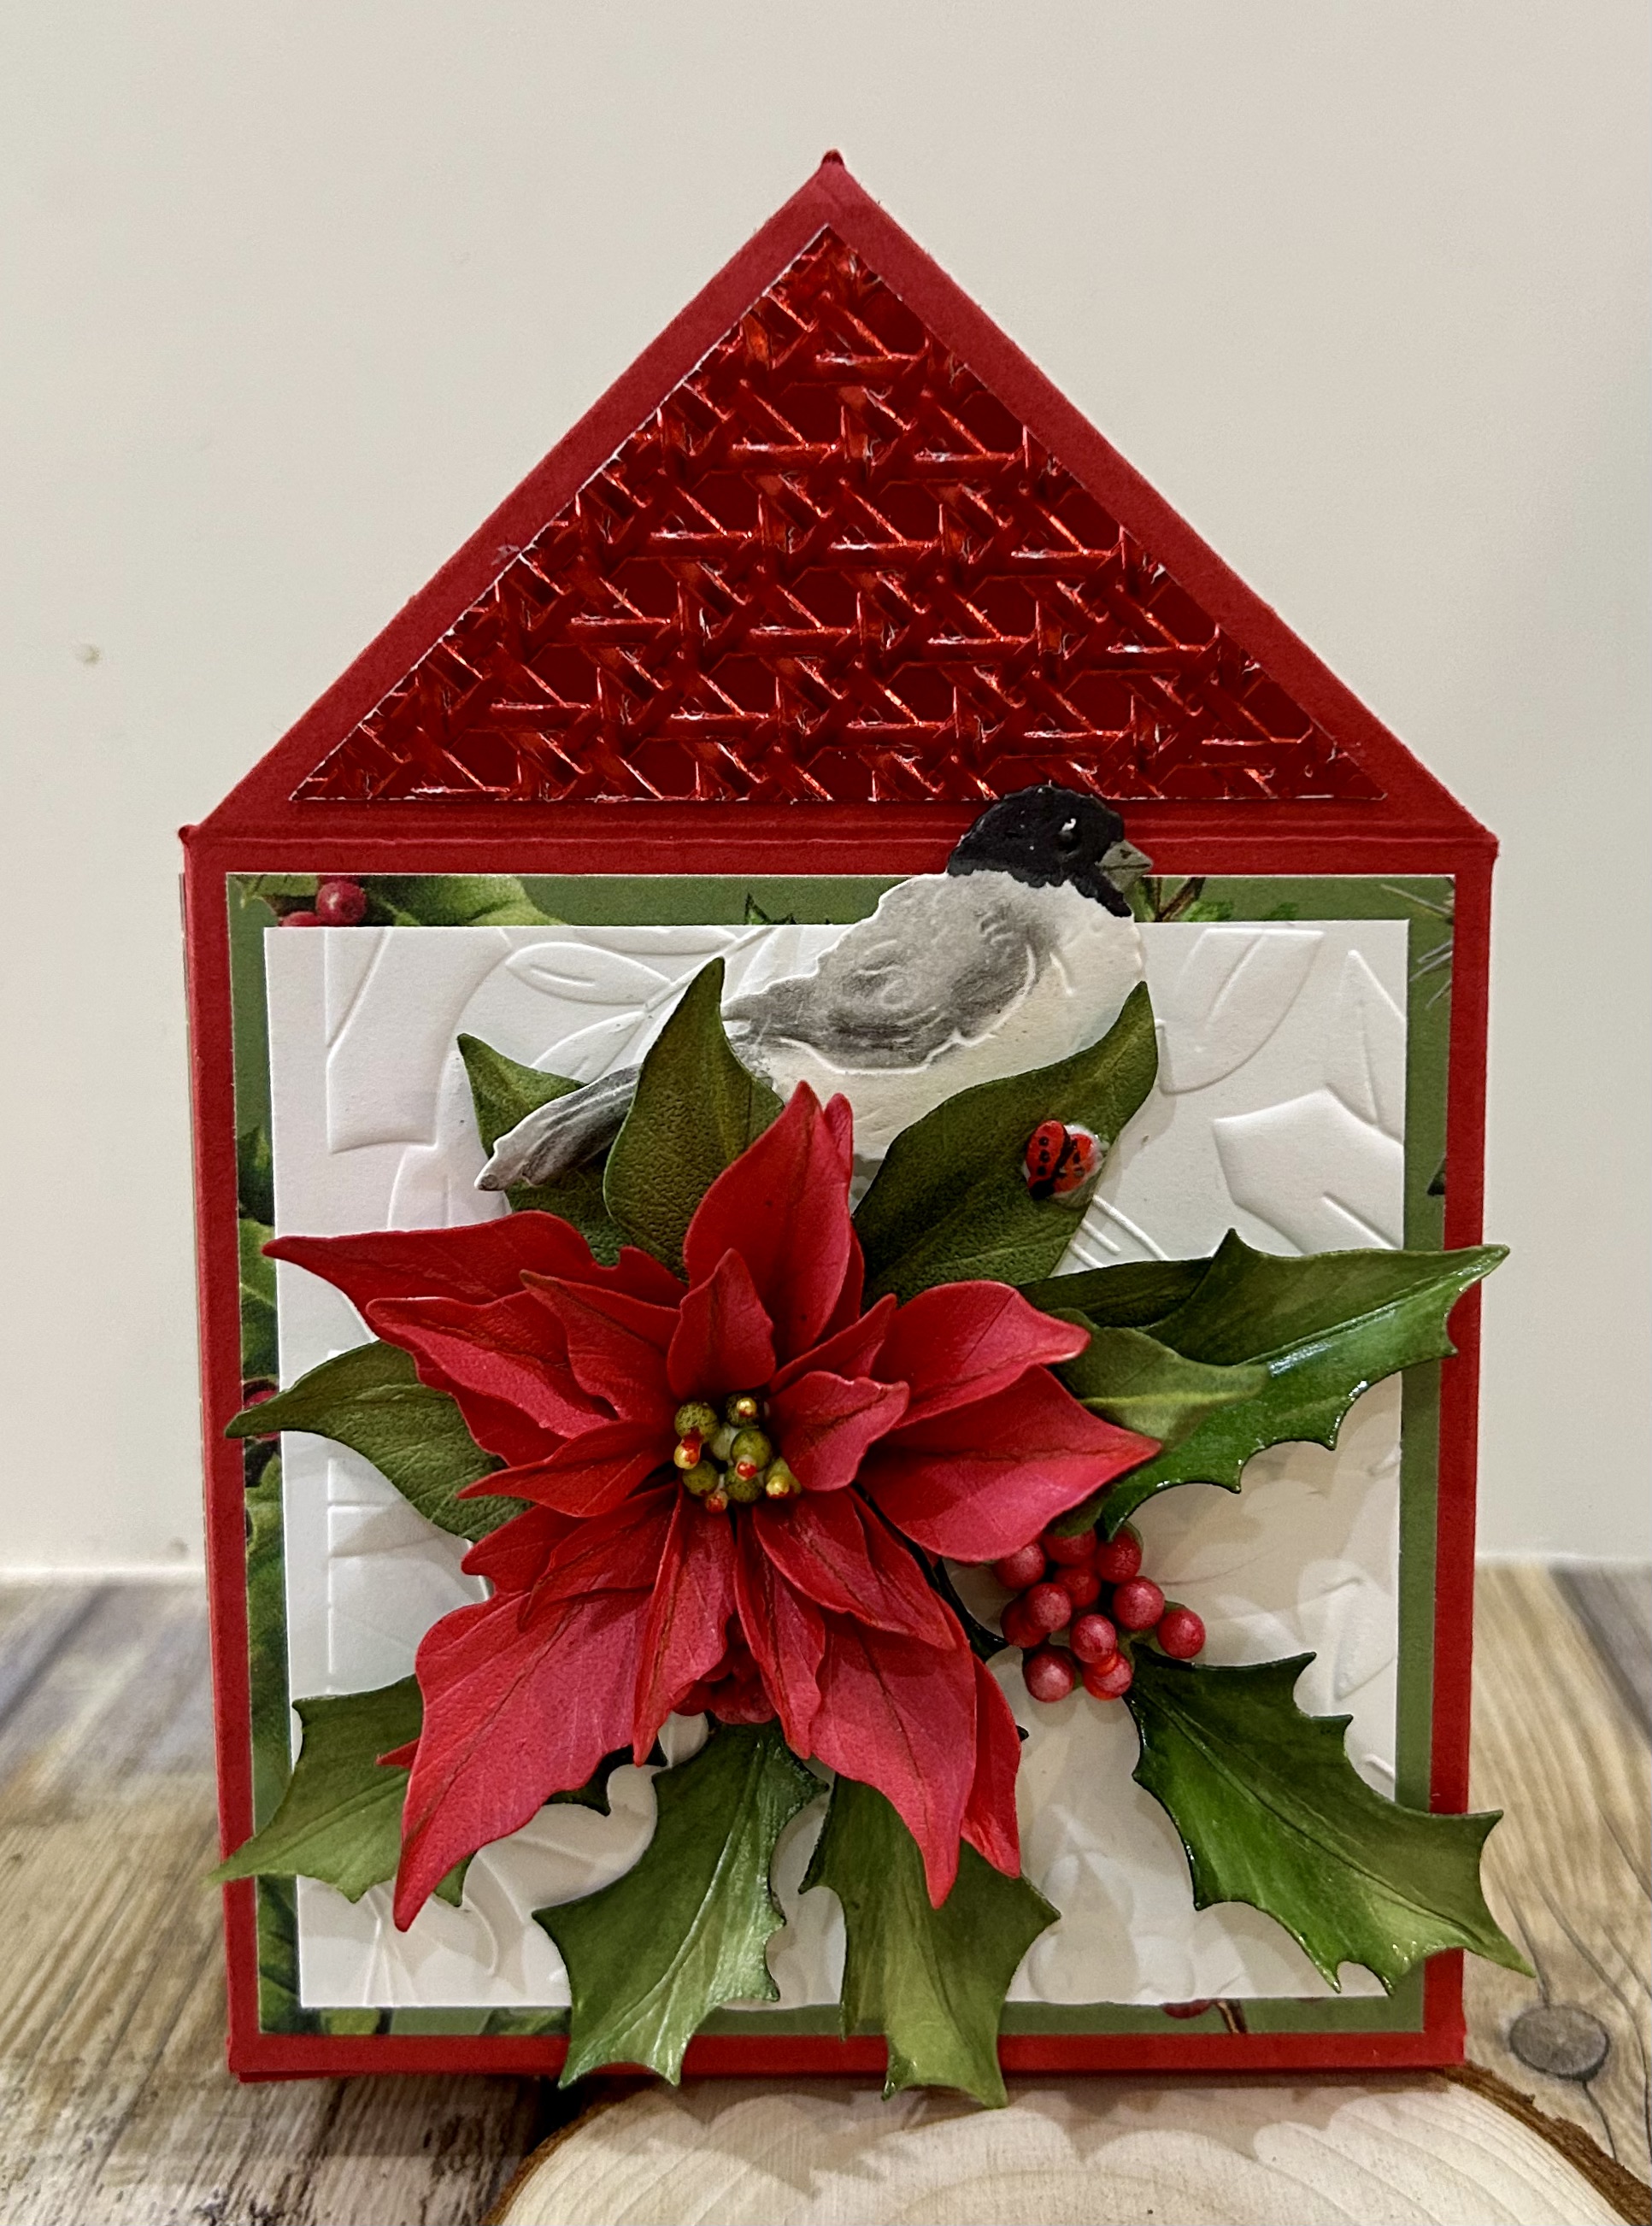
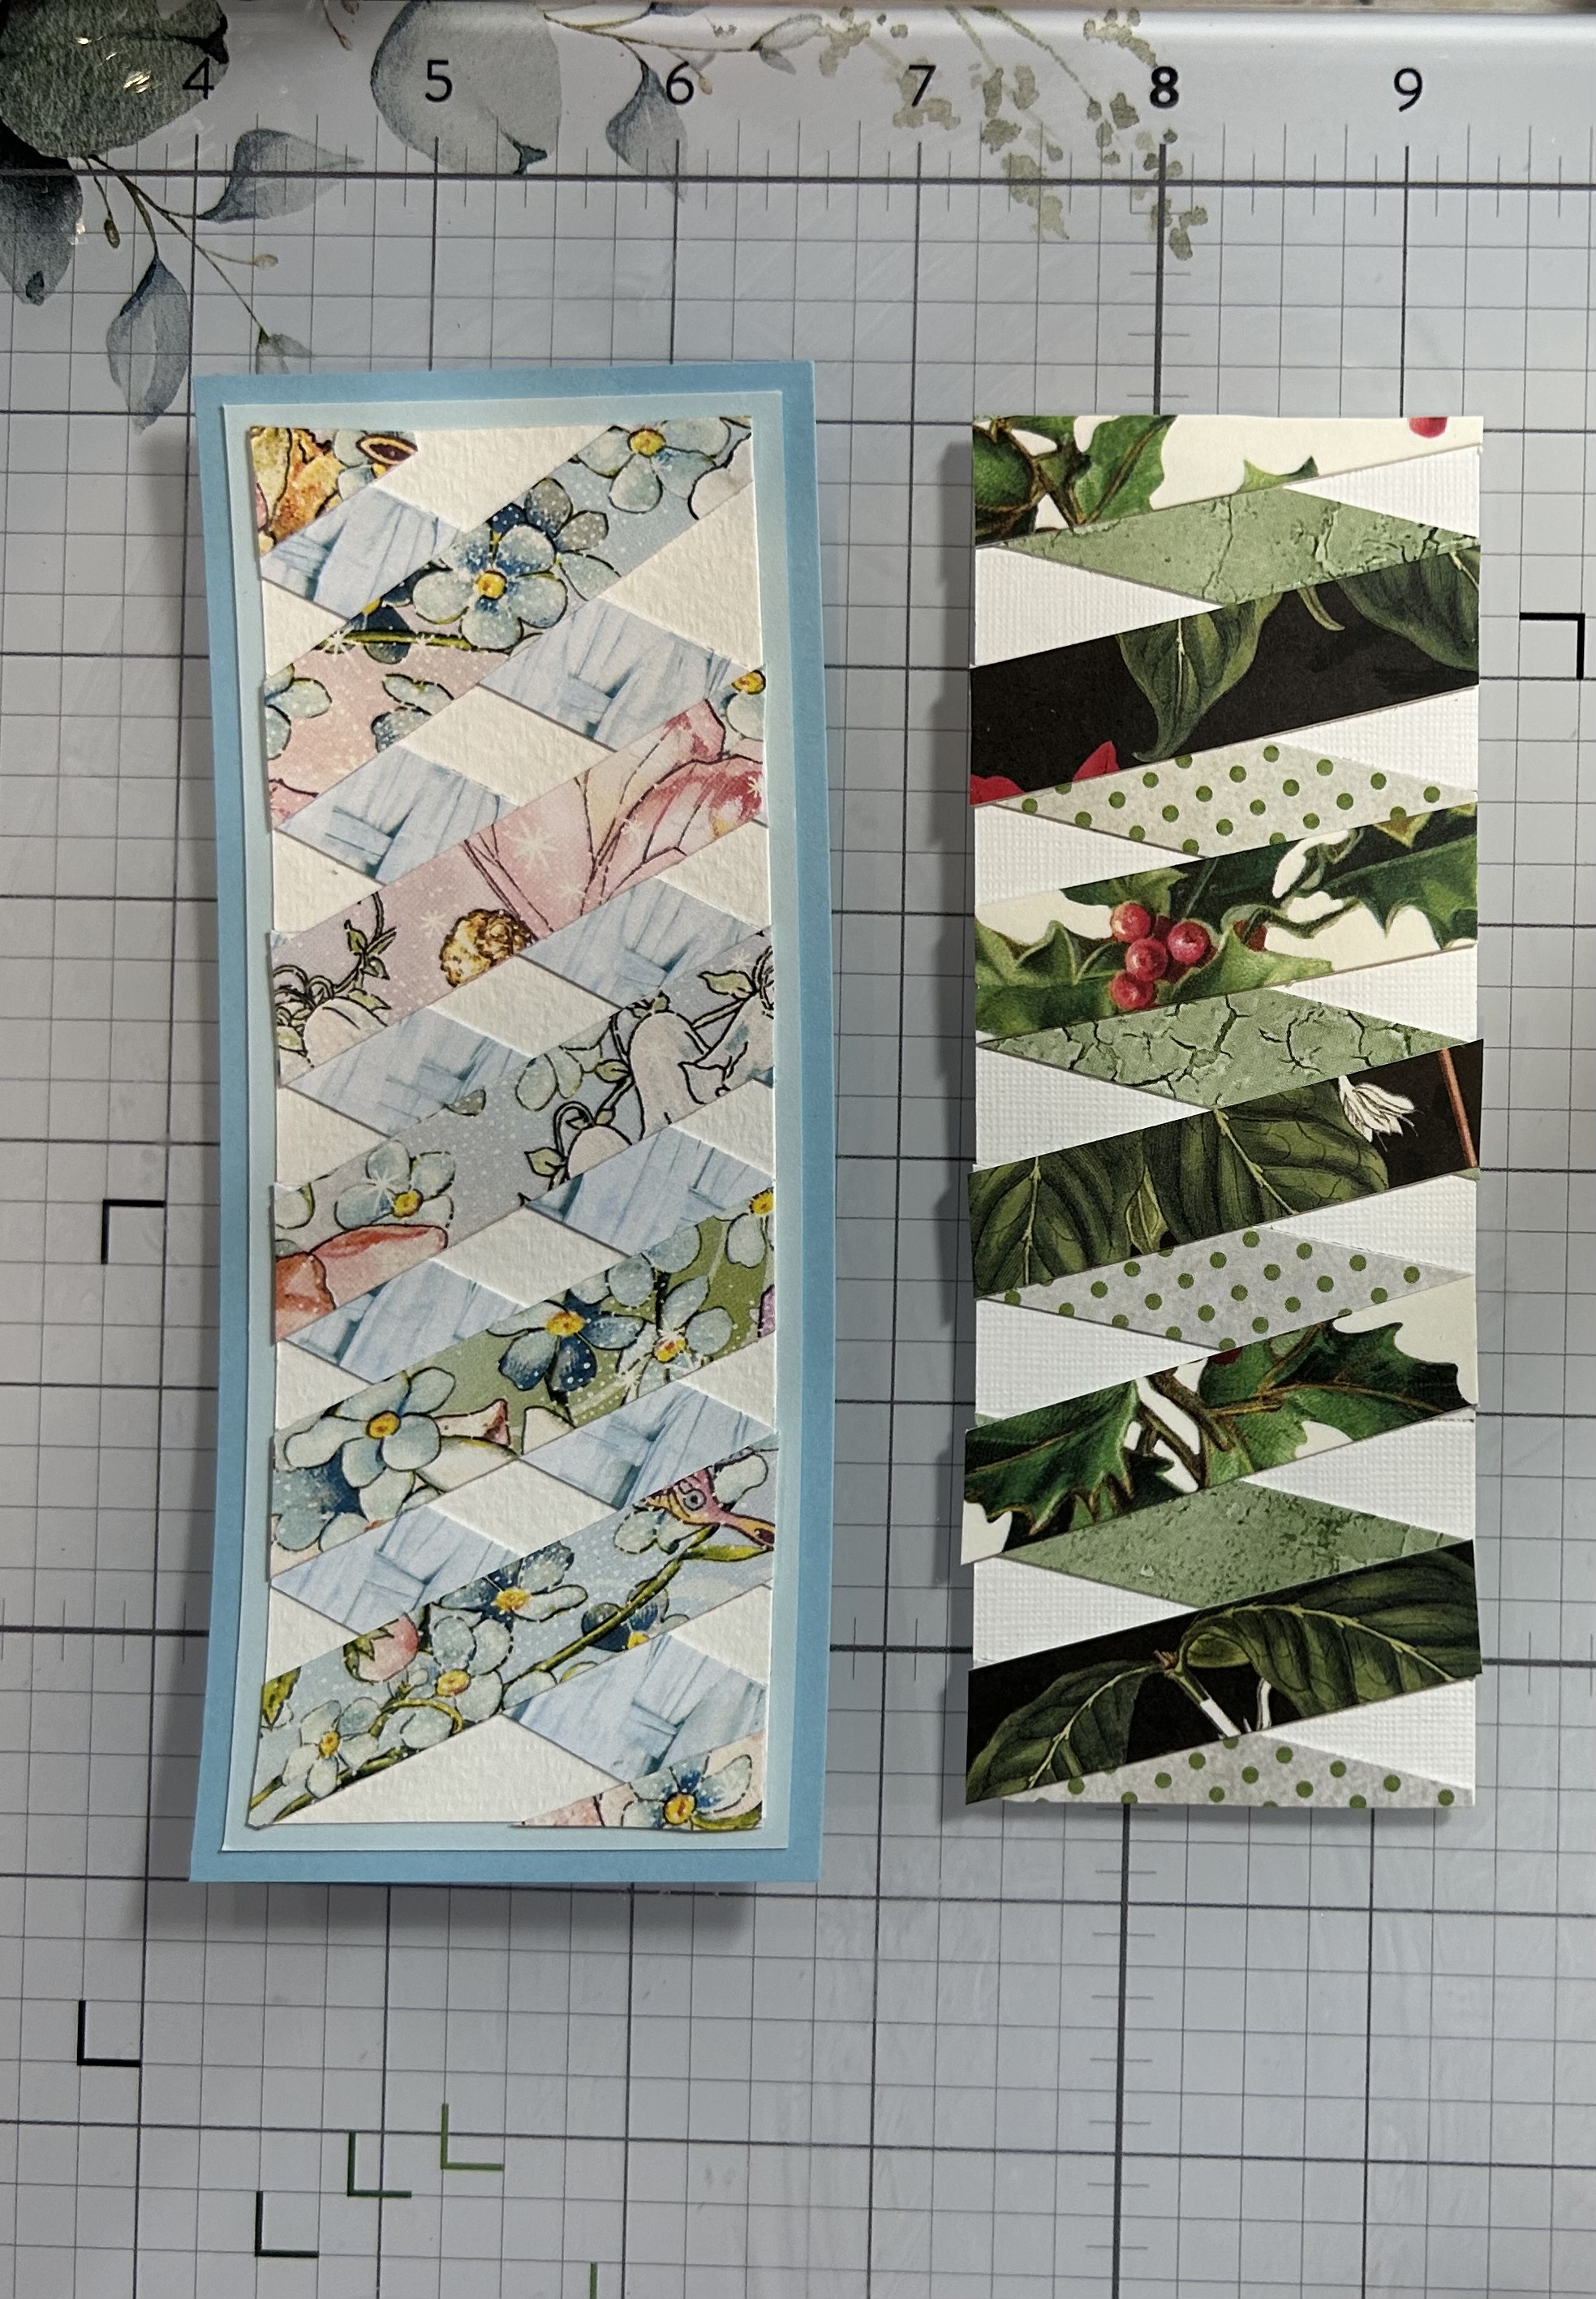
The Hexagon Pop Out Card is a unique design to show off your paper flower bouquets. A 6″ x 6″ project that stands up and easy to create.
Let’s Get Started
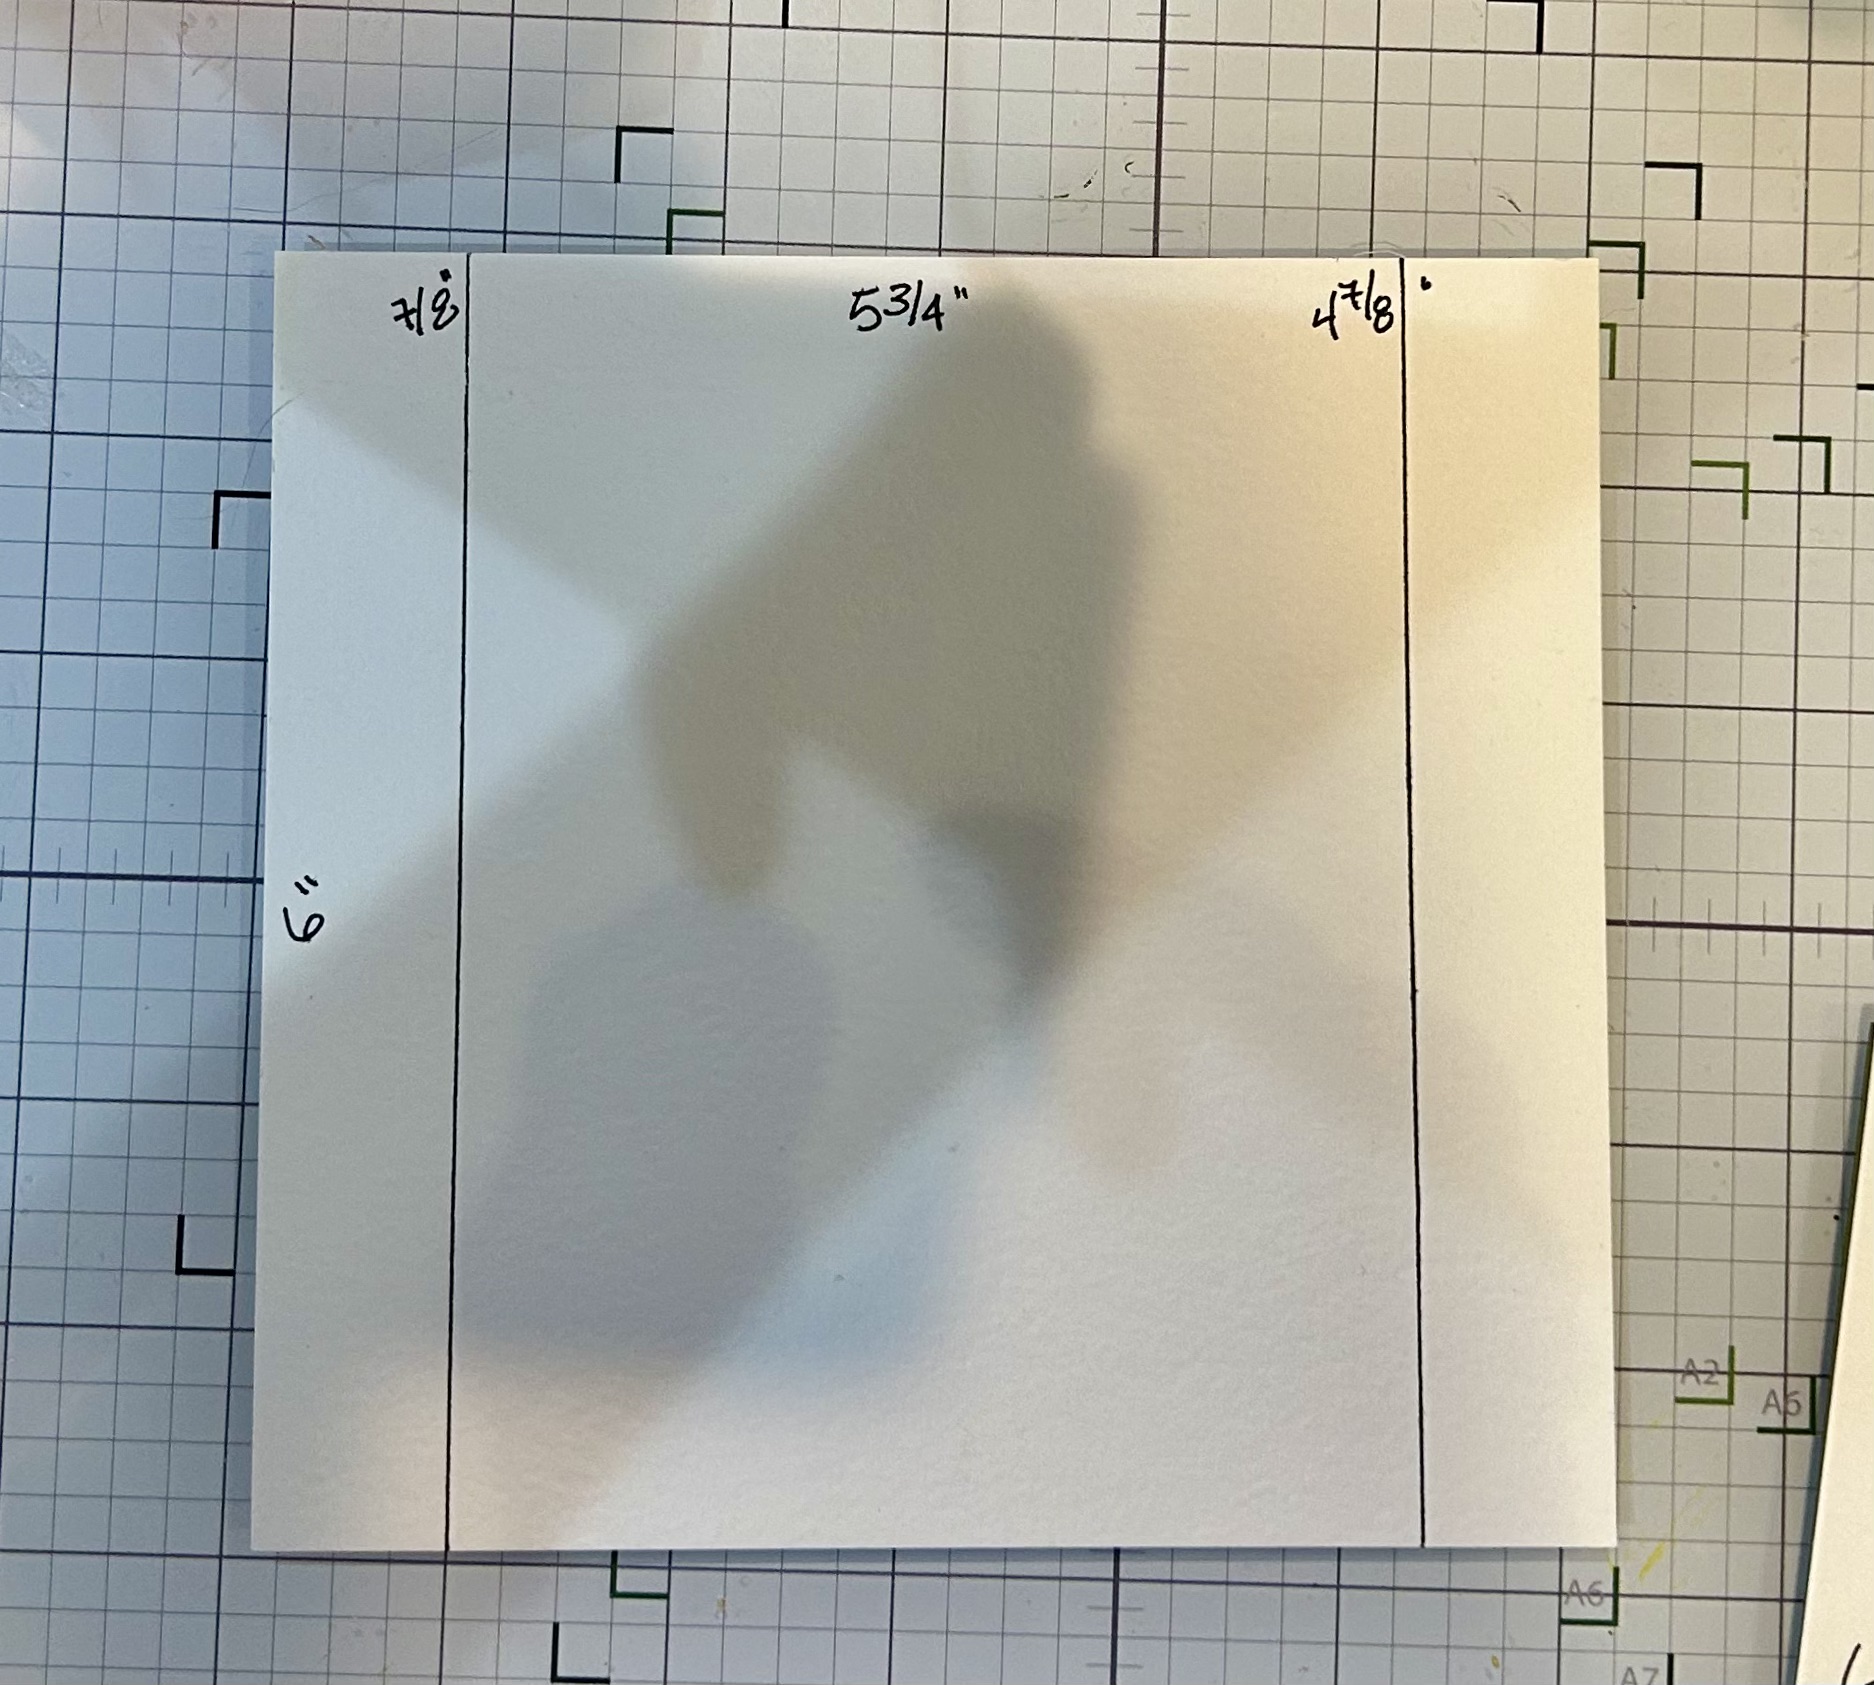
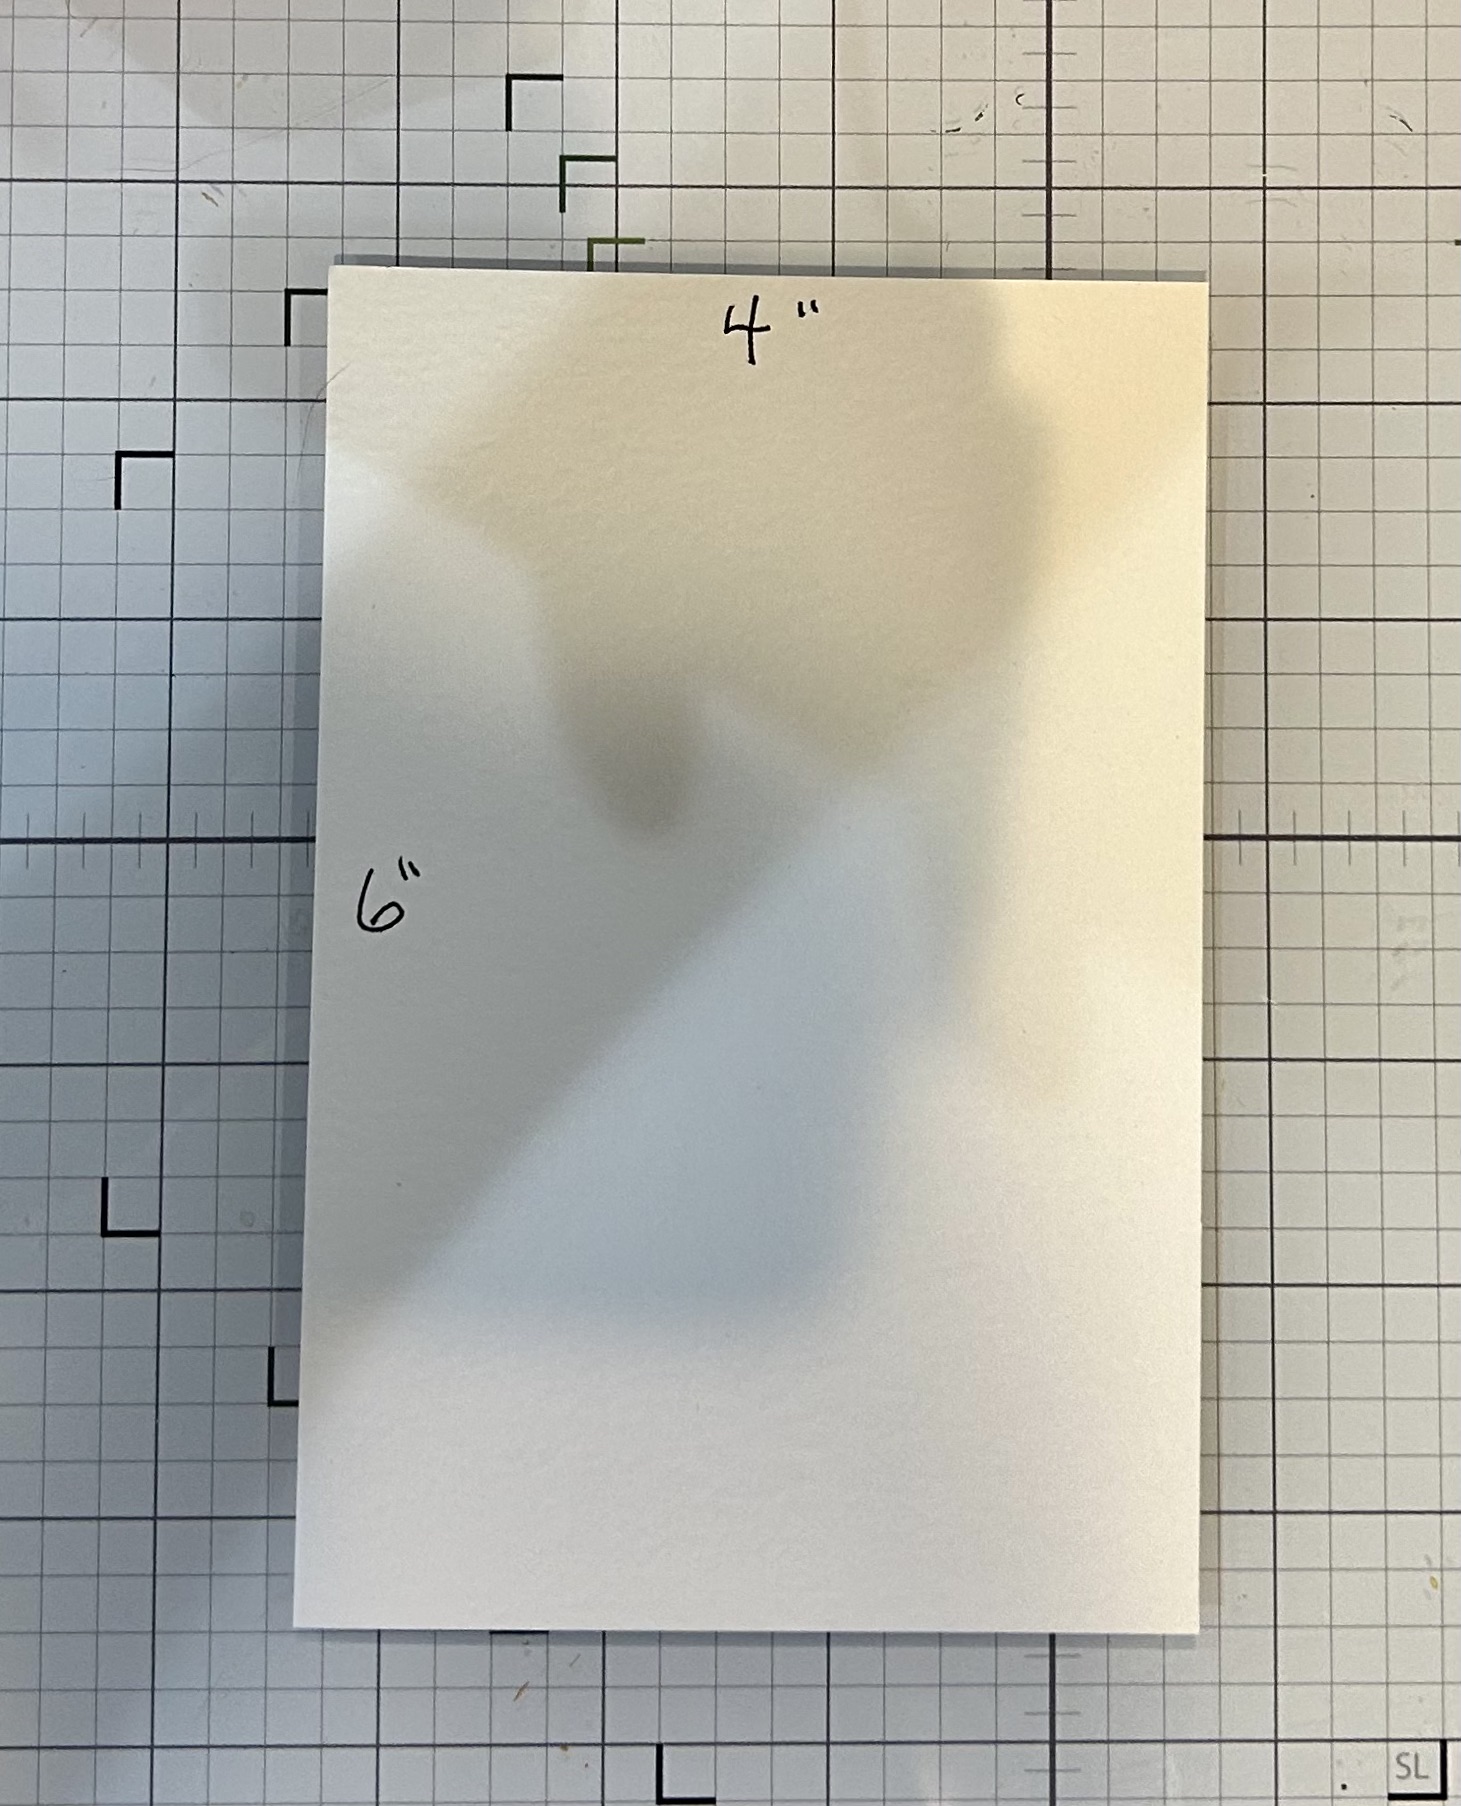
You will need to cut the base pieces from 100 lb./300 gsm. Cut (2 )pieces 1 1/2″ x 12″ (you can get by with 11 3/4 or 11 1/2), (1) piece 5 3/4″ x 6″ and (1) piece 4″ x 6″.
For the 5 3/4″ x 6″ and with the 5 3/4″ side up on the score board, score at 7/8″ and 4 7/8″. Burnish “valley” folds on these score lines.
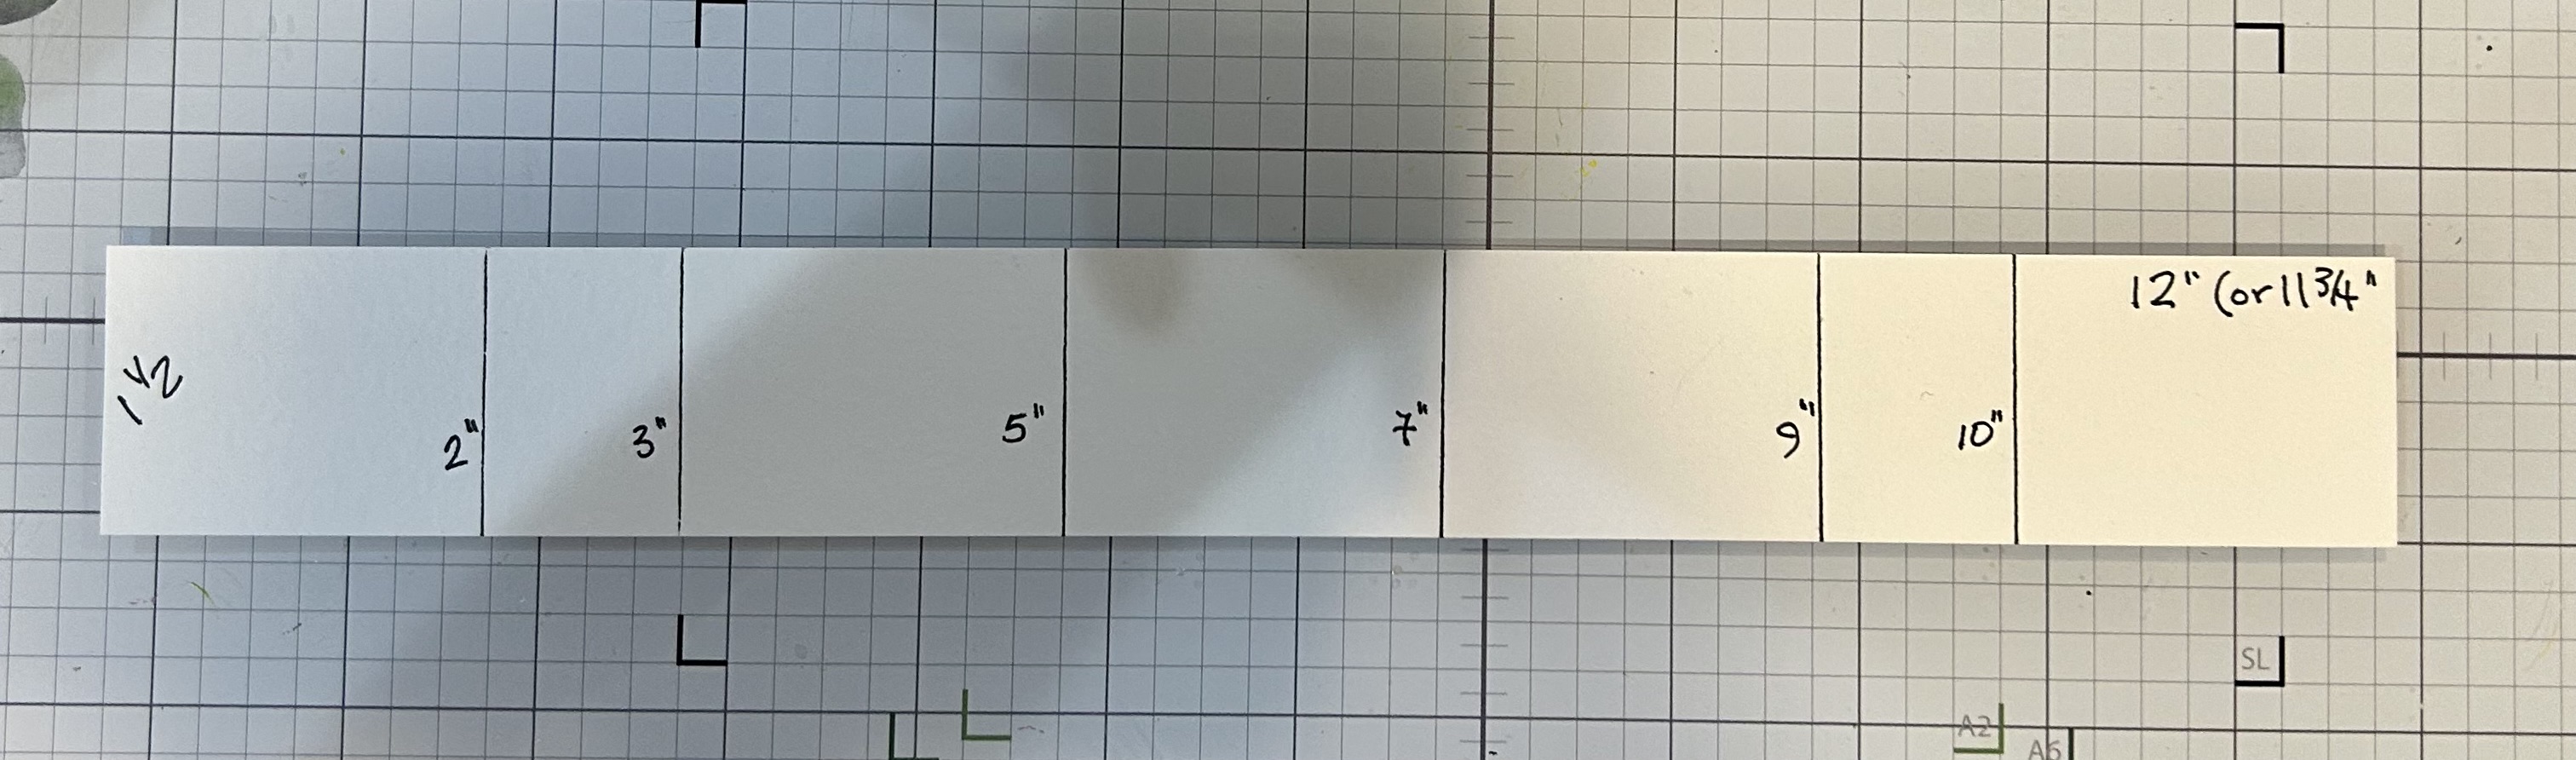
For the two 1 1/2 x 12″ pieces, score at 2″ , 3″, 5″, 7″, 9″ and 10″. Burnish “mountain” folds on these score lines.
Panels:
Mirror Cardstock
(2) 3 3/4″ x 5 3/4″
(2) 3/4″ x 5 3/4″
(2) 3/4″ x 2 3/4″
(6) 1 1/4″ x 1 3/4″
(4) 7/8″ x 1 1/4″
Patterned Cardstock
(1) 3 1/2″ x 5 1/2″
(6) 1″ x 1 1/2″
(4) 5/8″ x 1″
White Cardstock
(1) 3 1/2″ x 5 1/2″
Whatever you choose for your center, I cut one to match the base color and one in white, which I embossed.
Have fun with this card, styling for whatever season or occasion you choose!
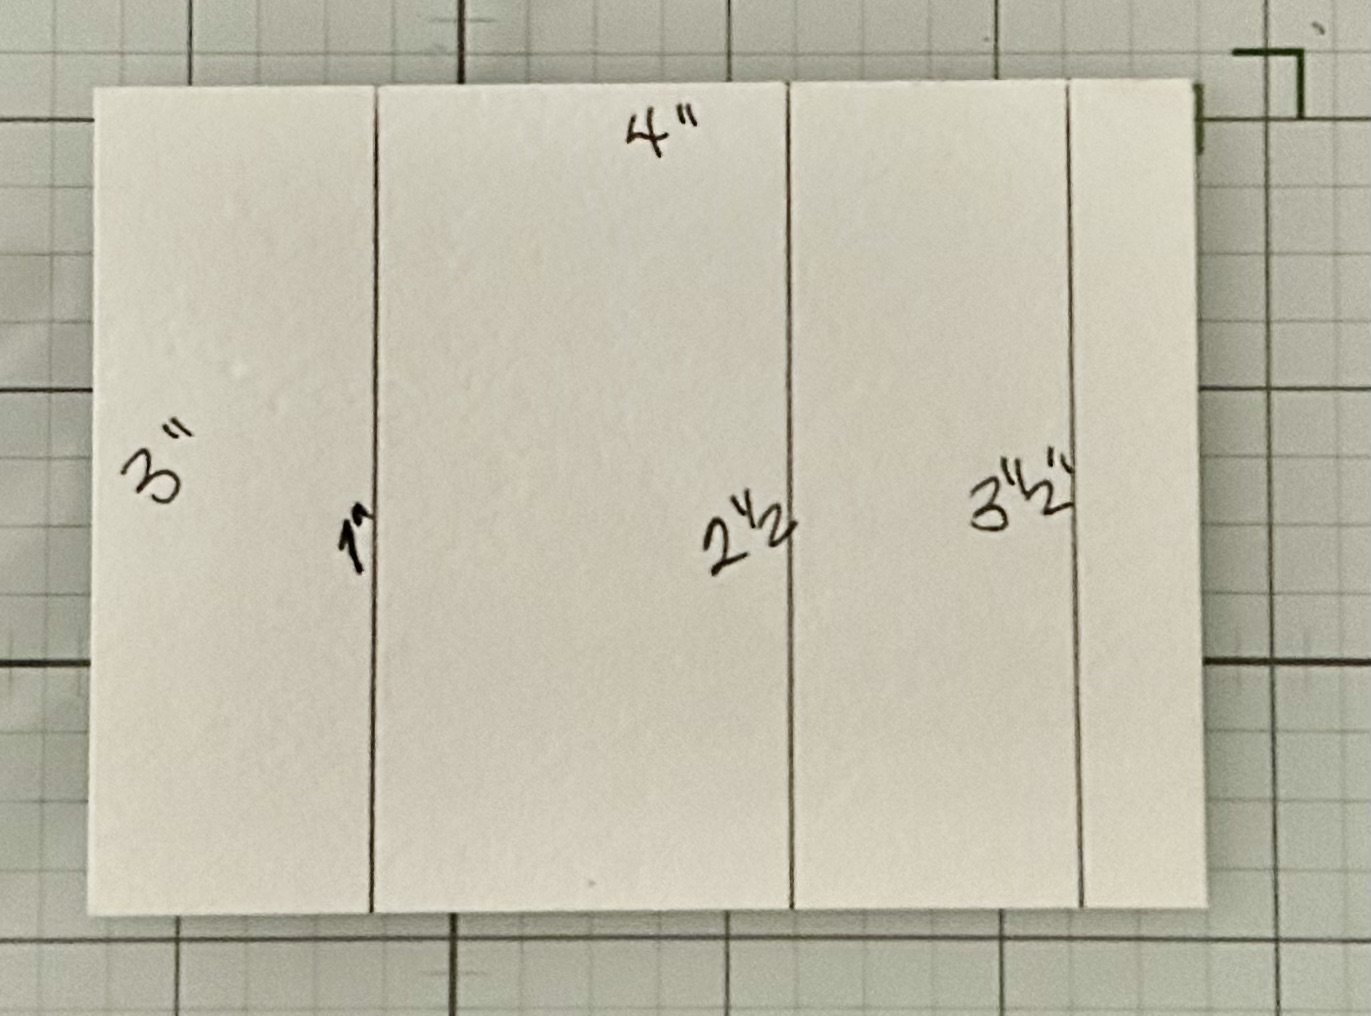
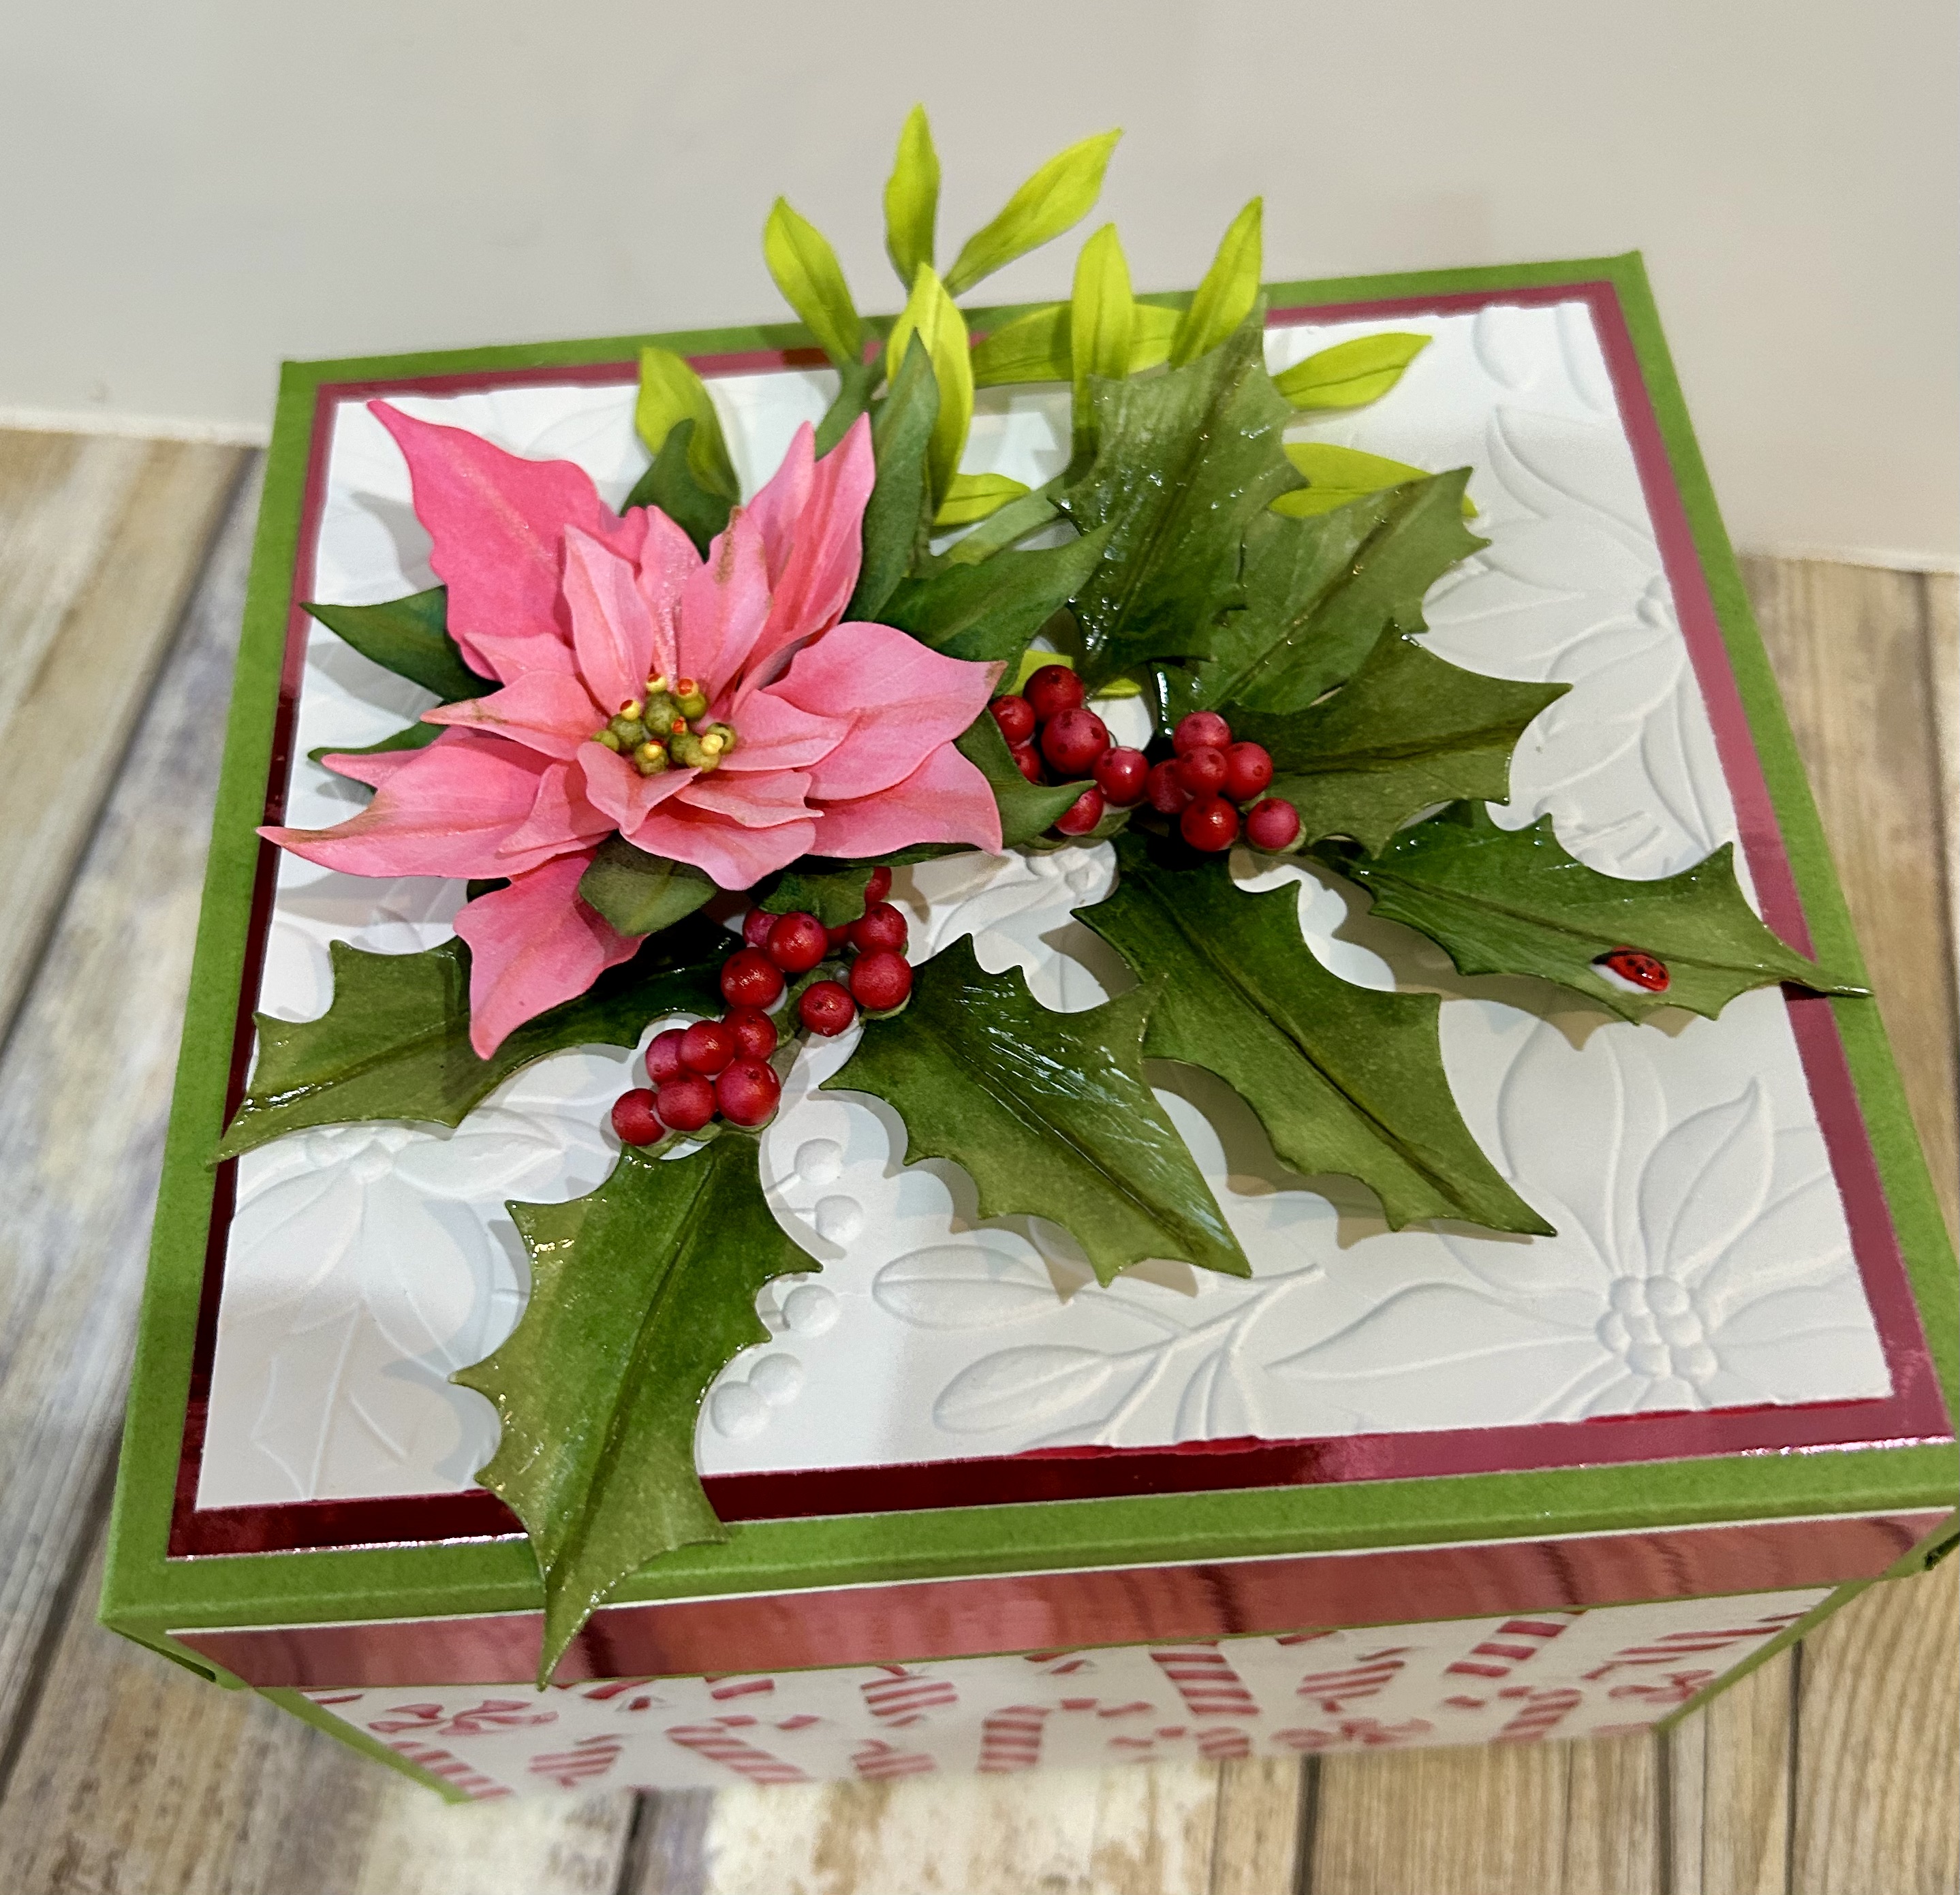
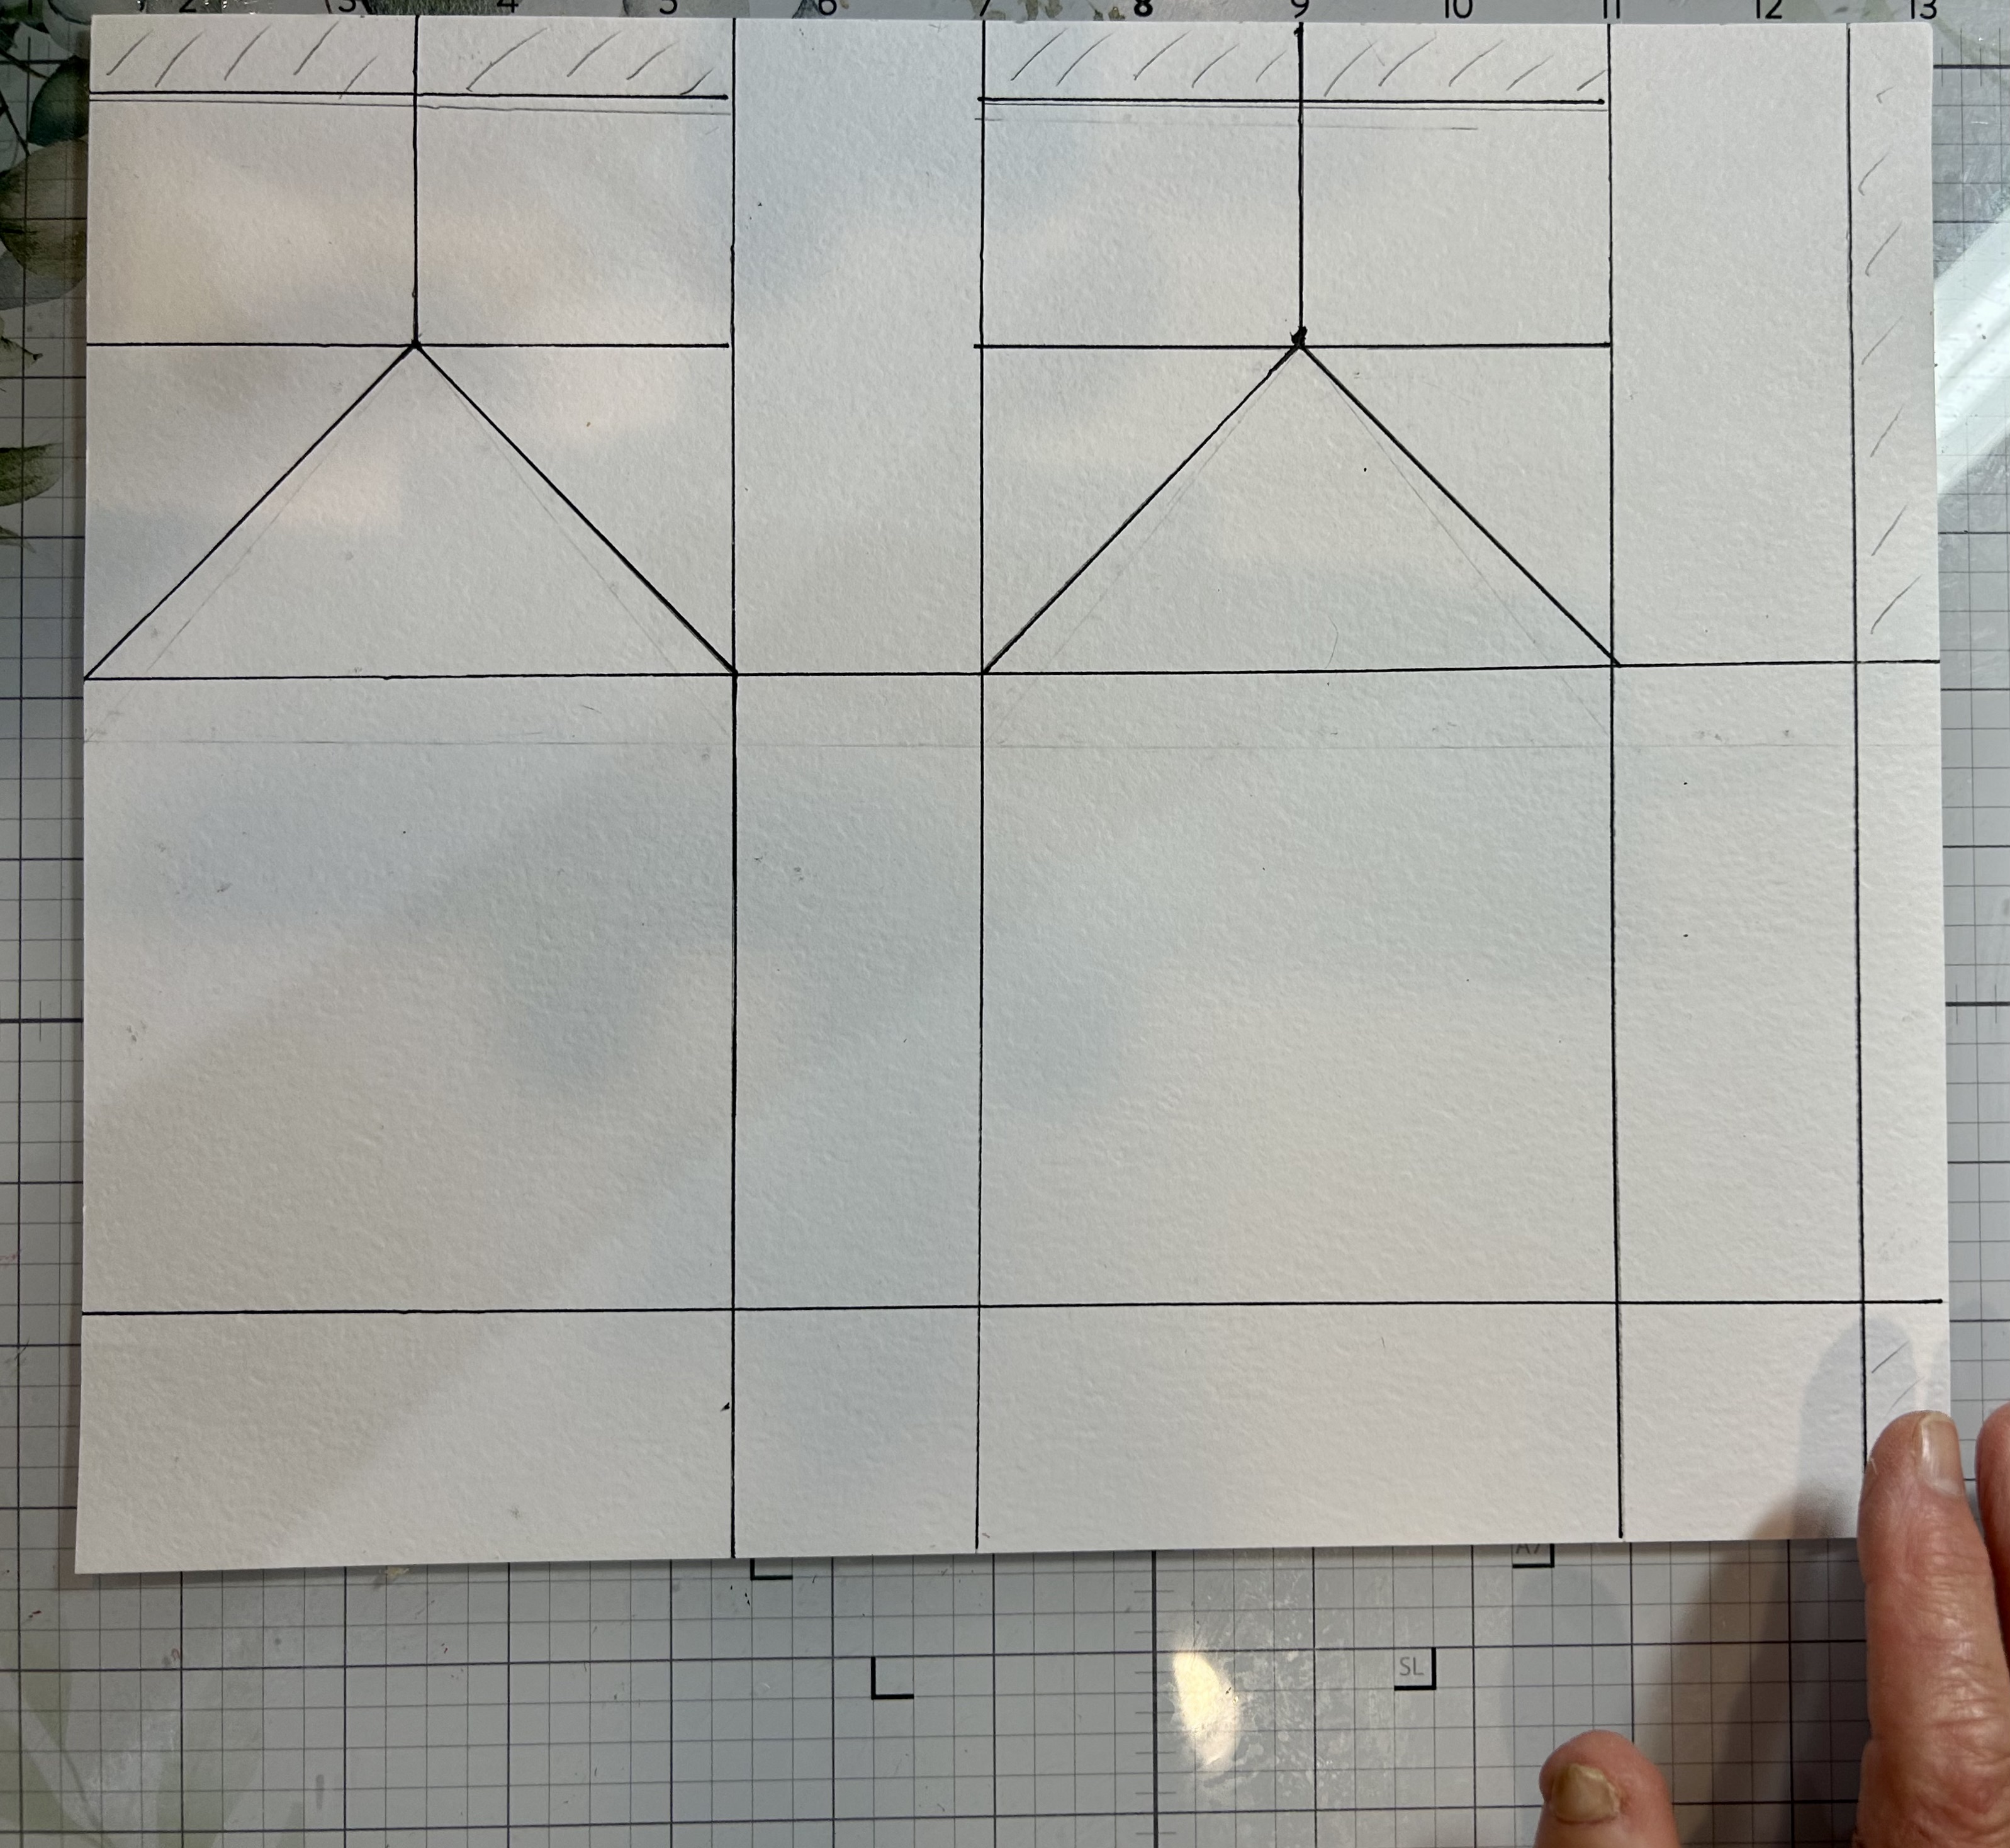
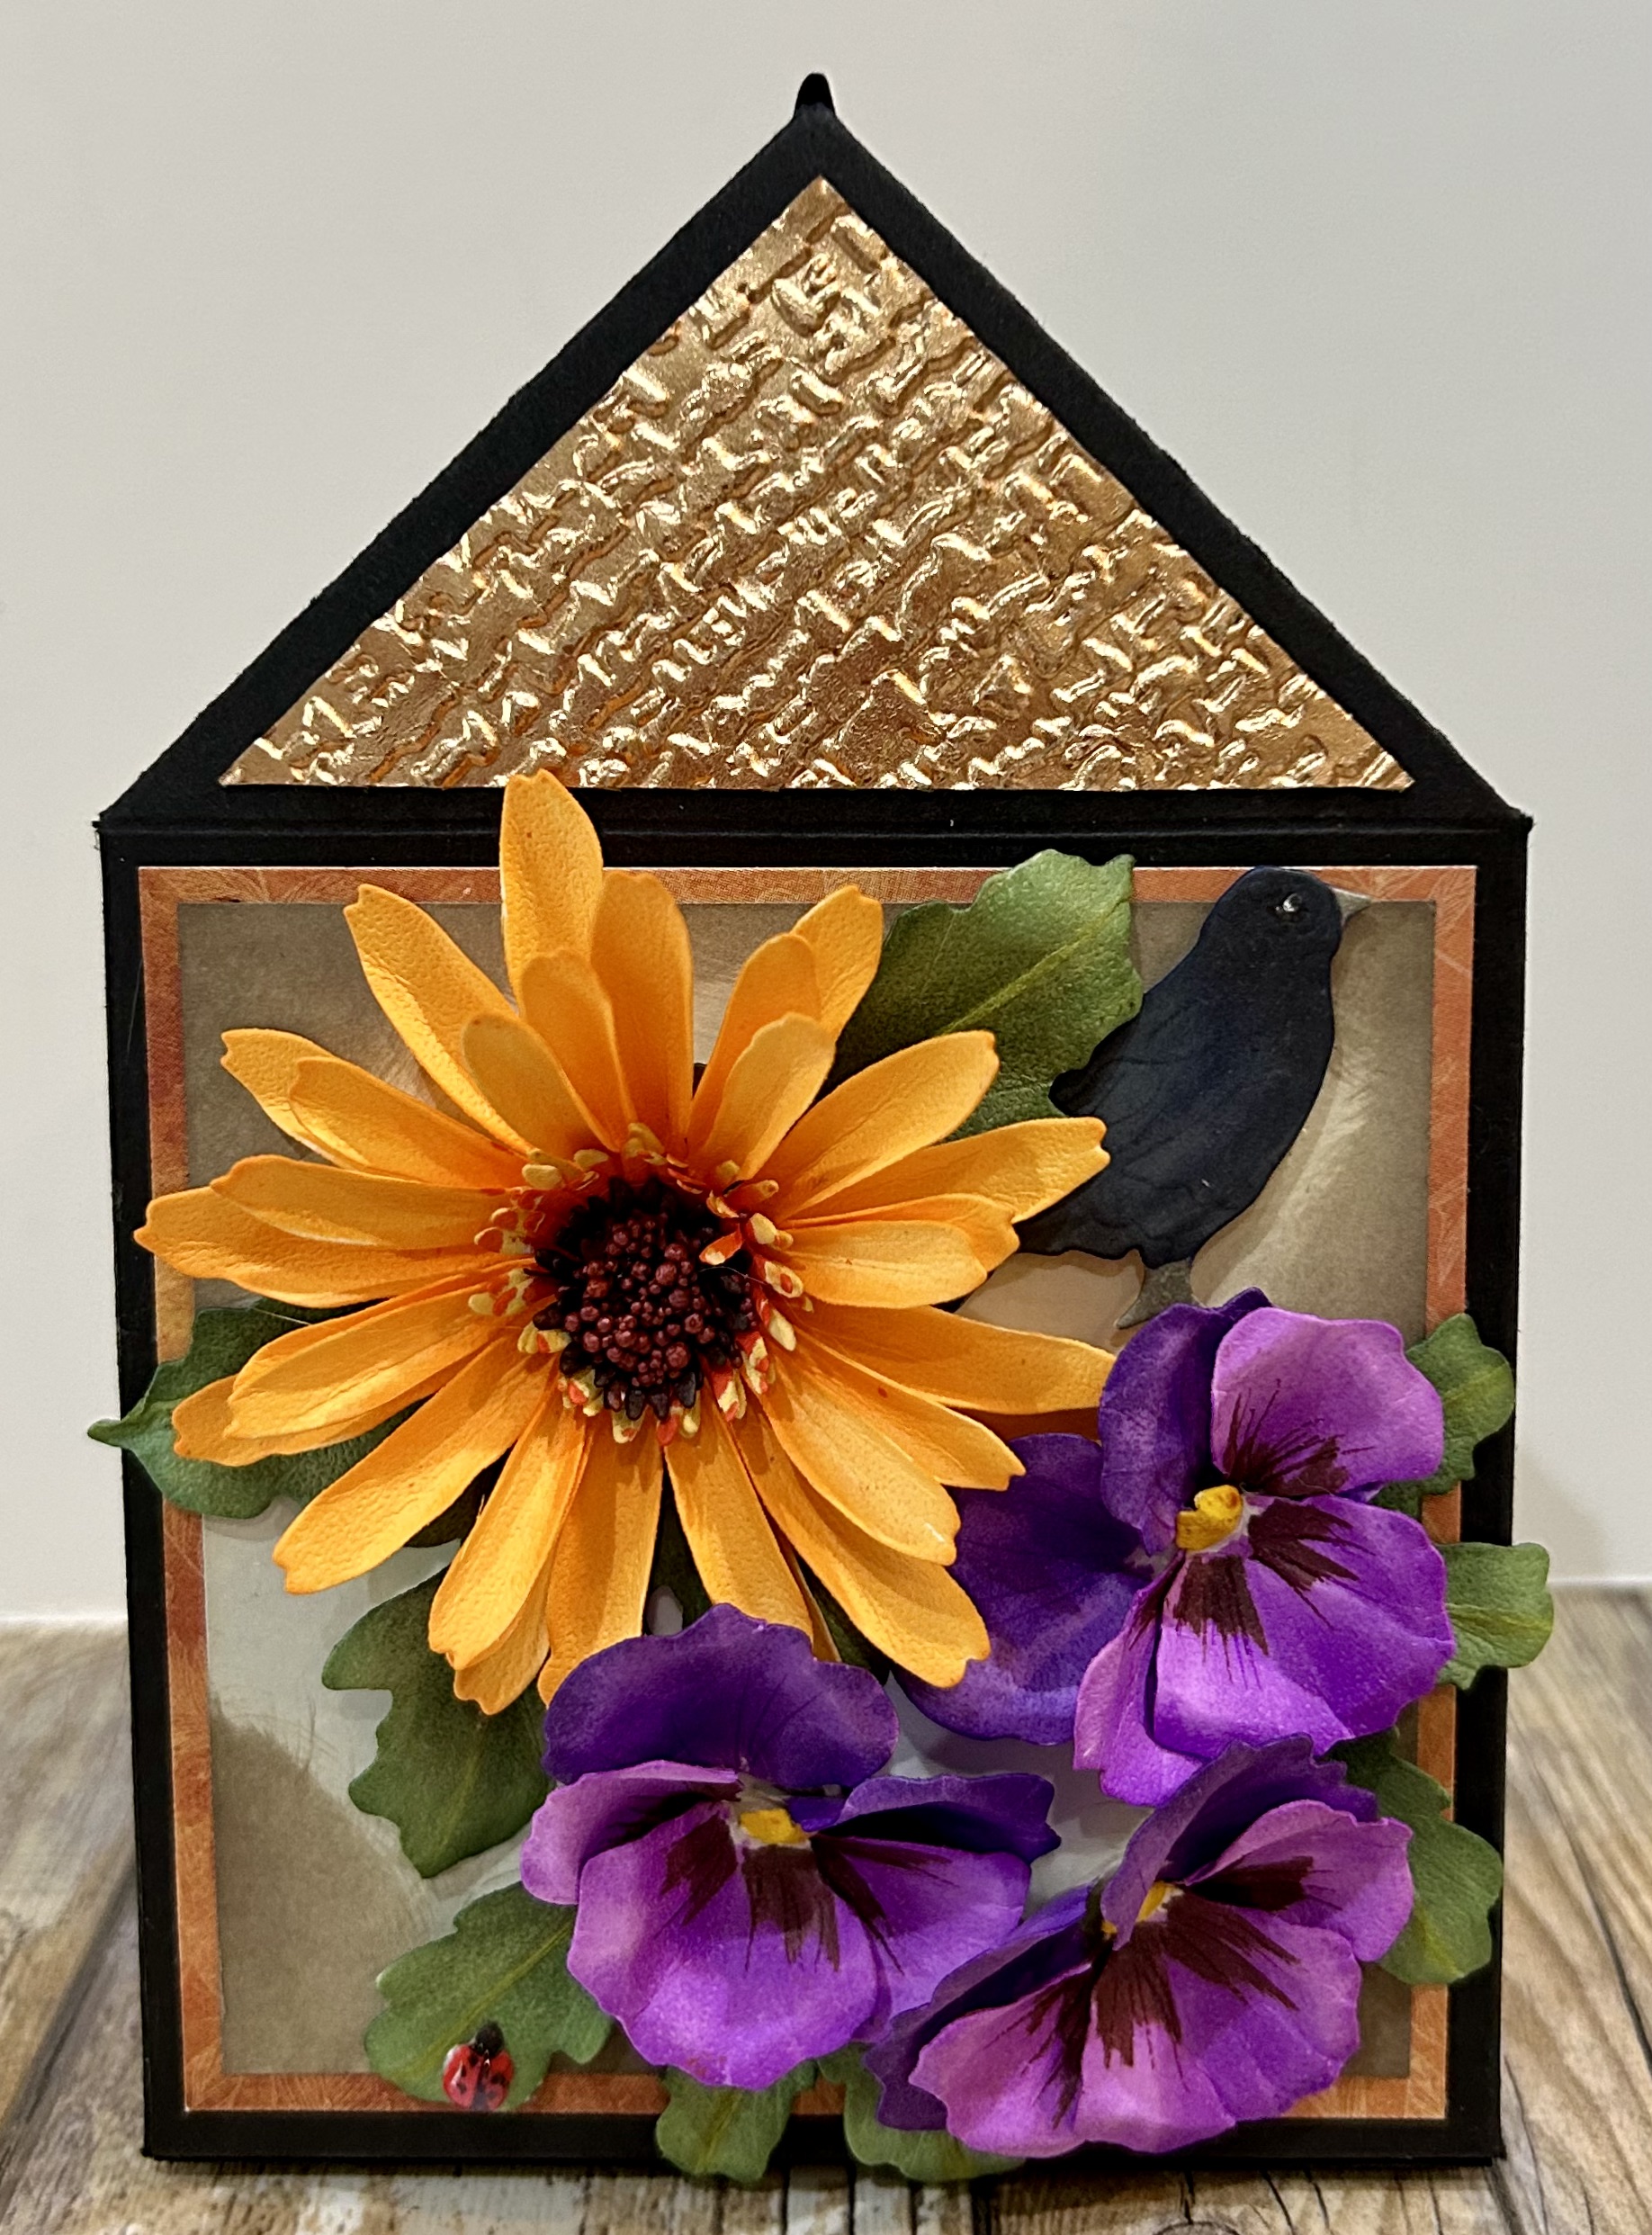
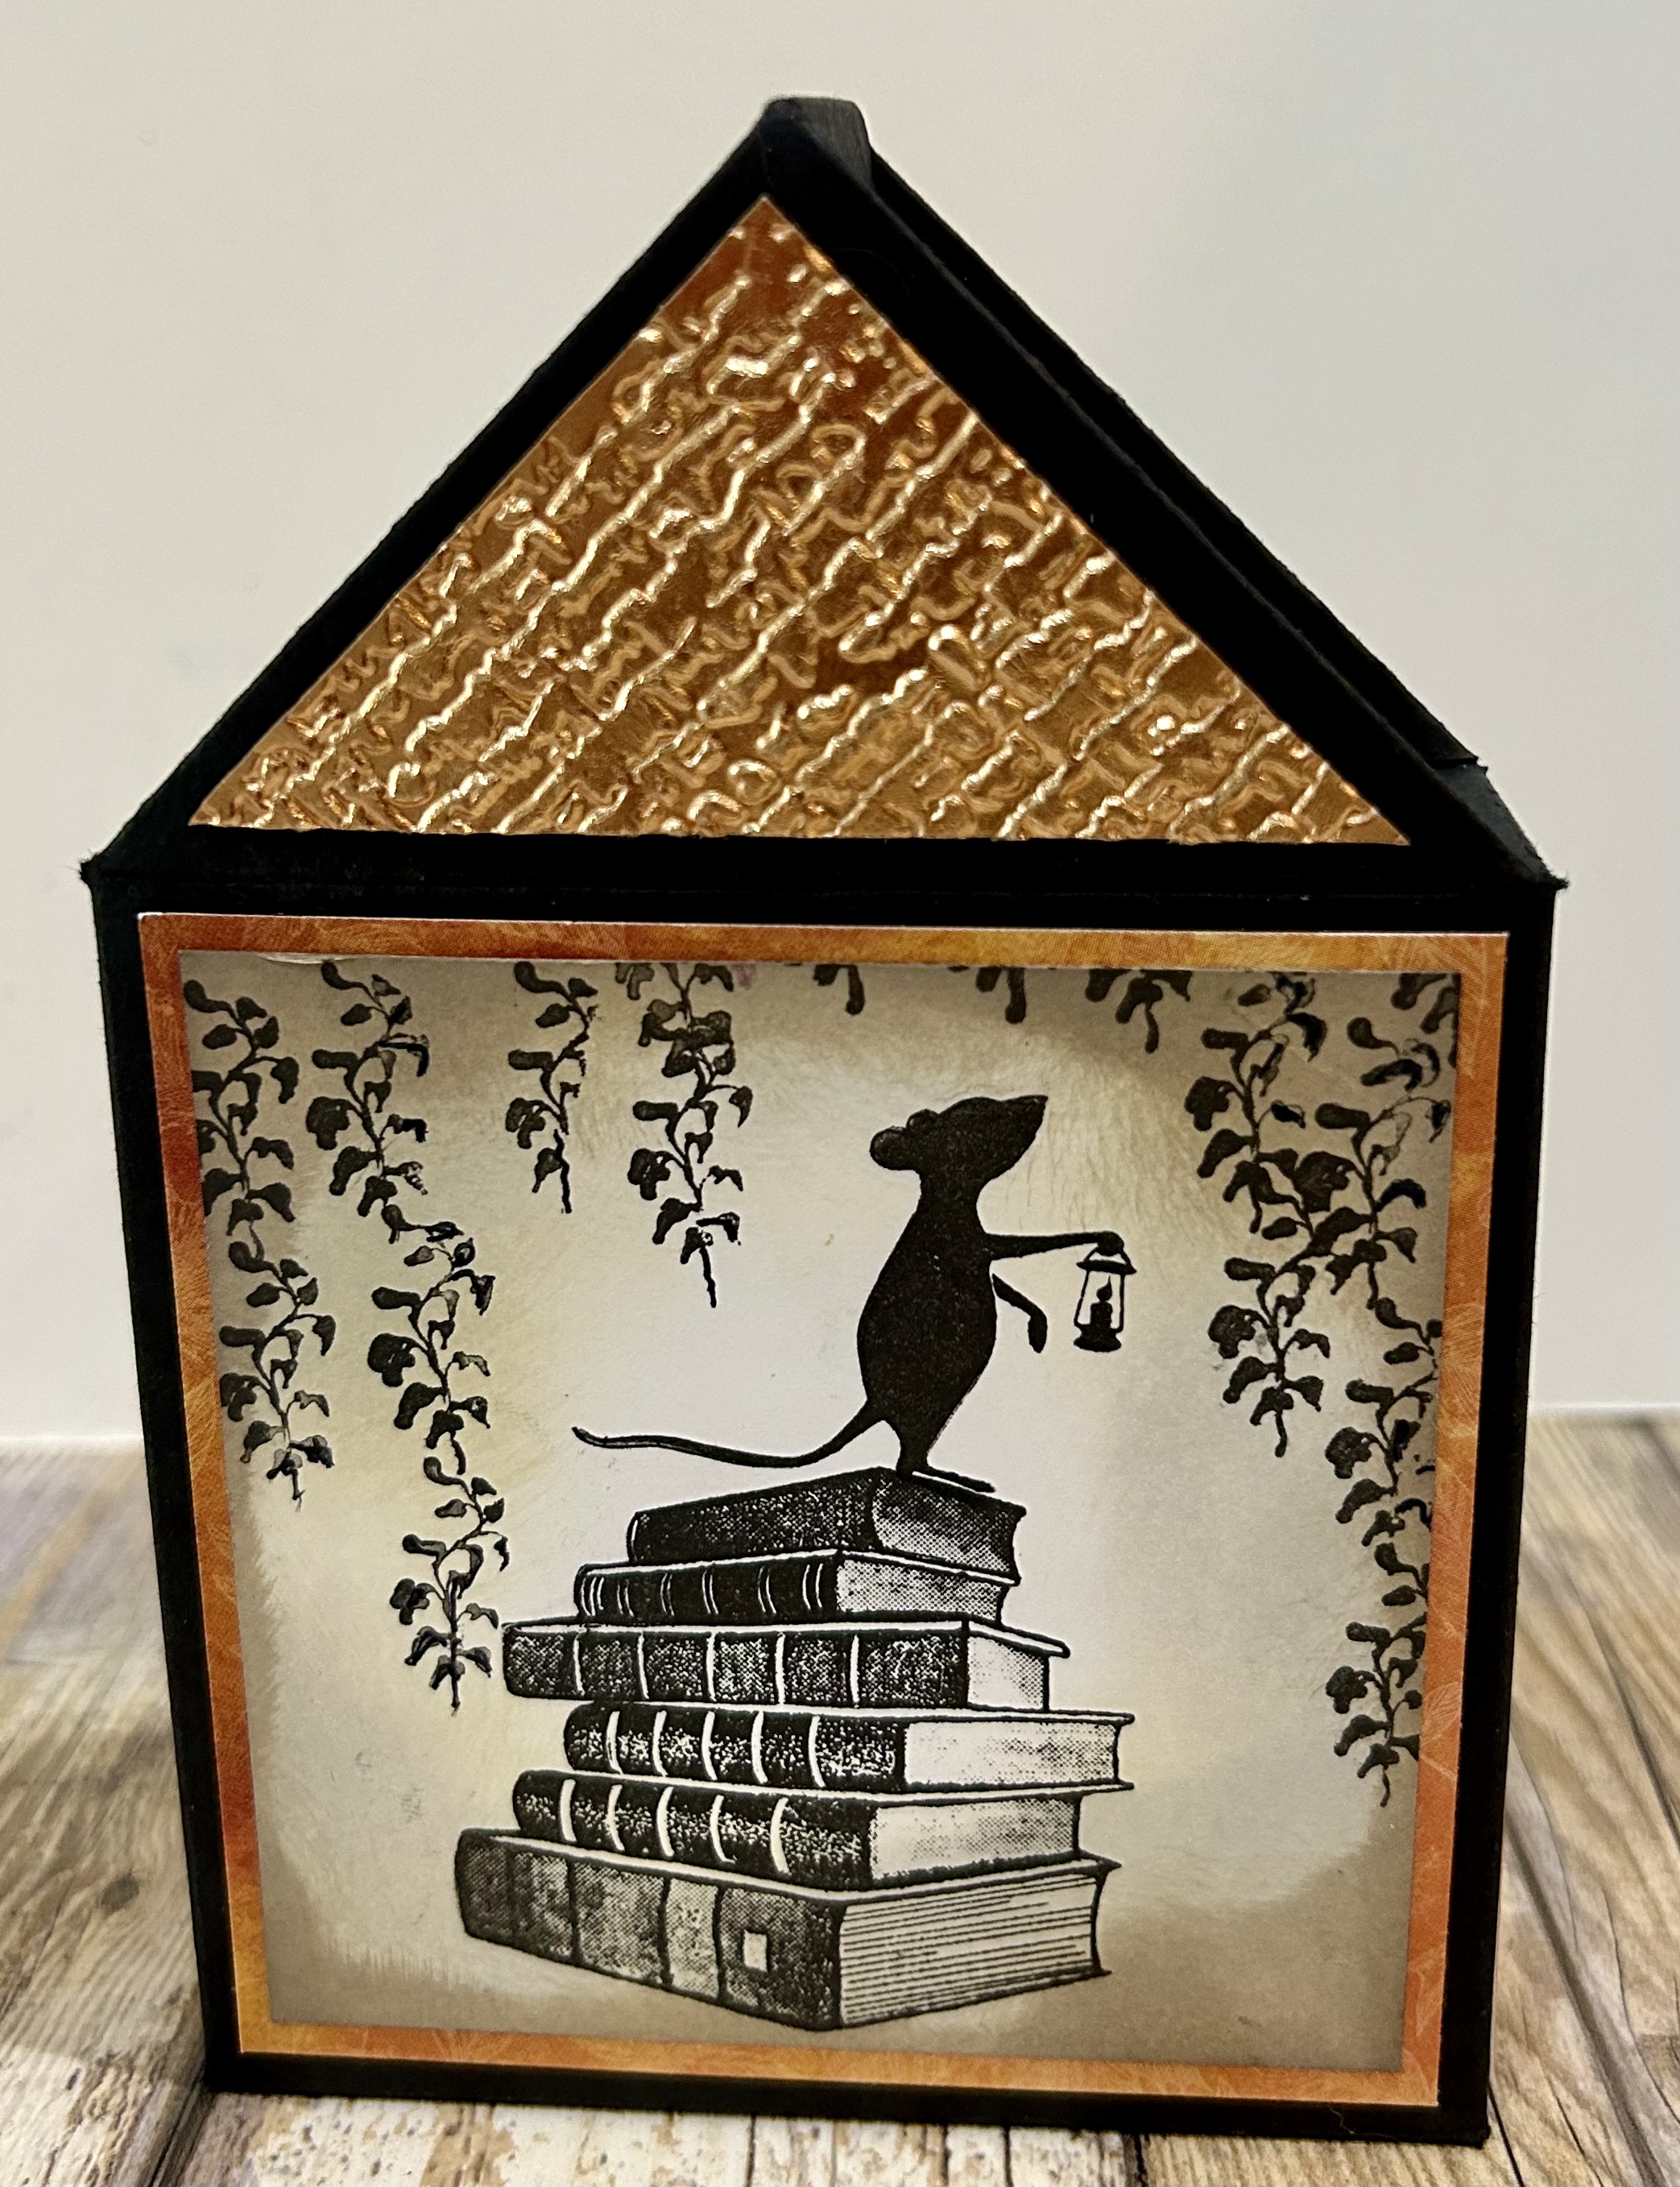
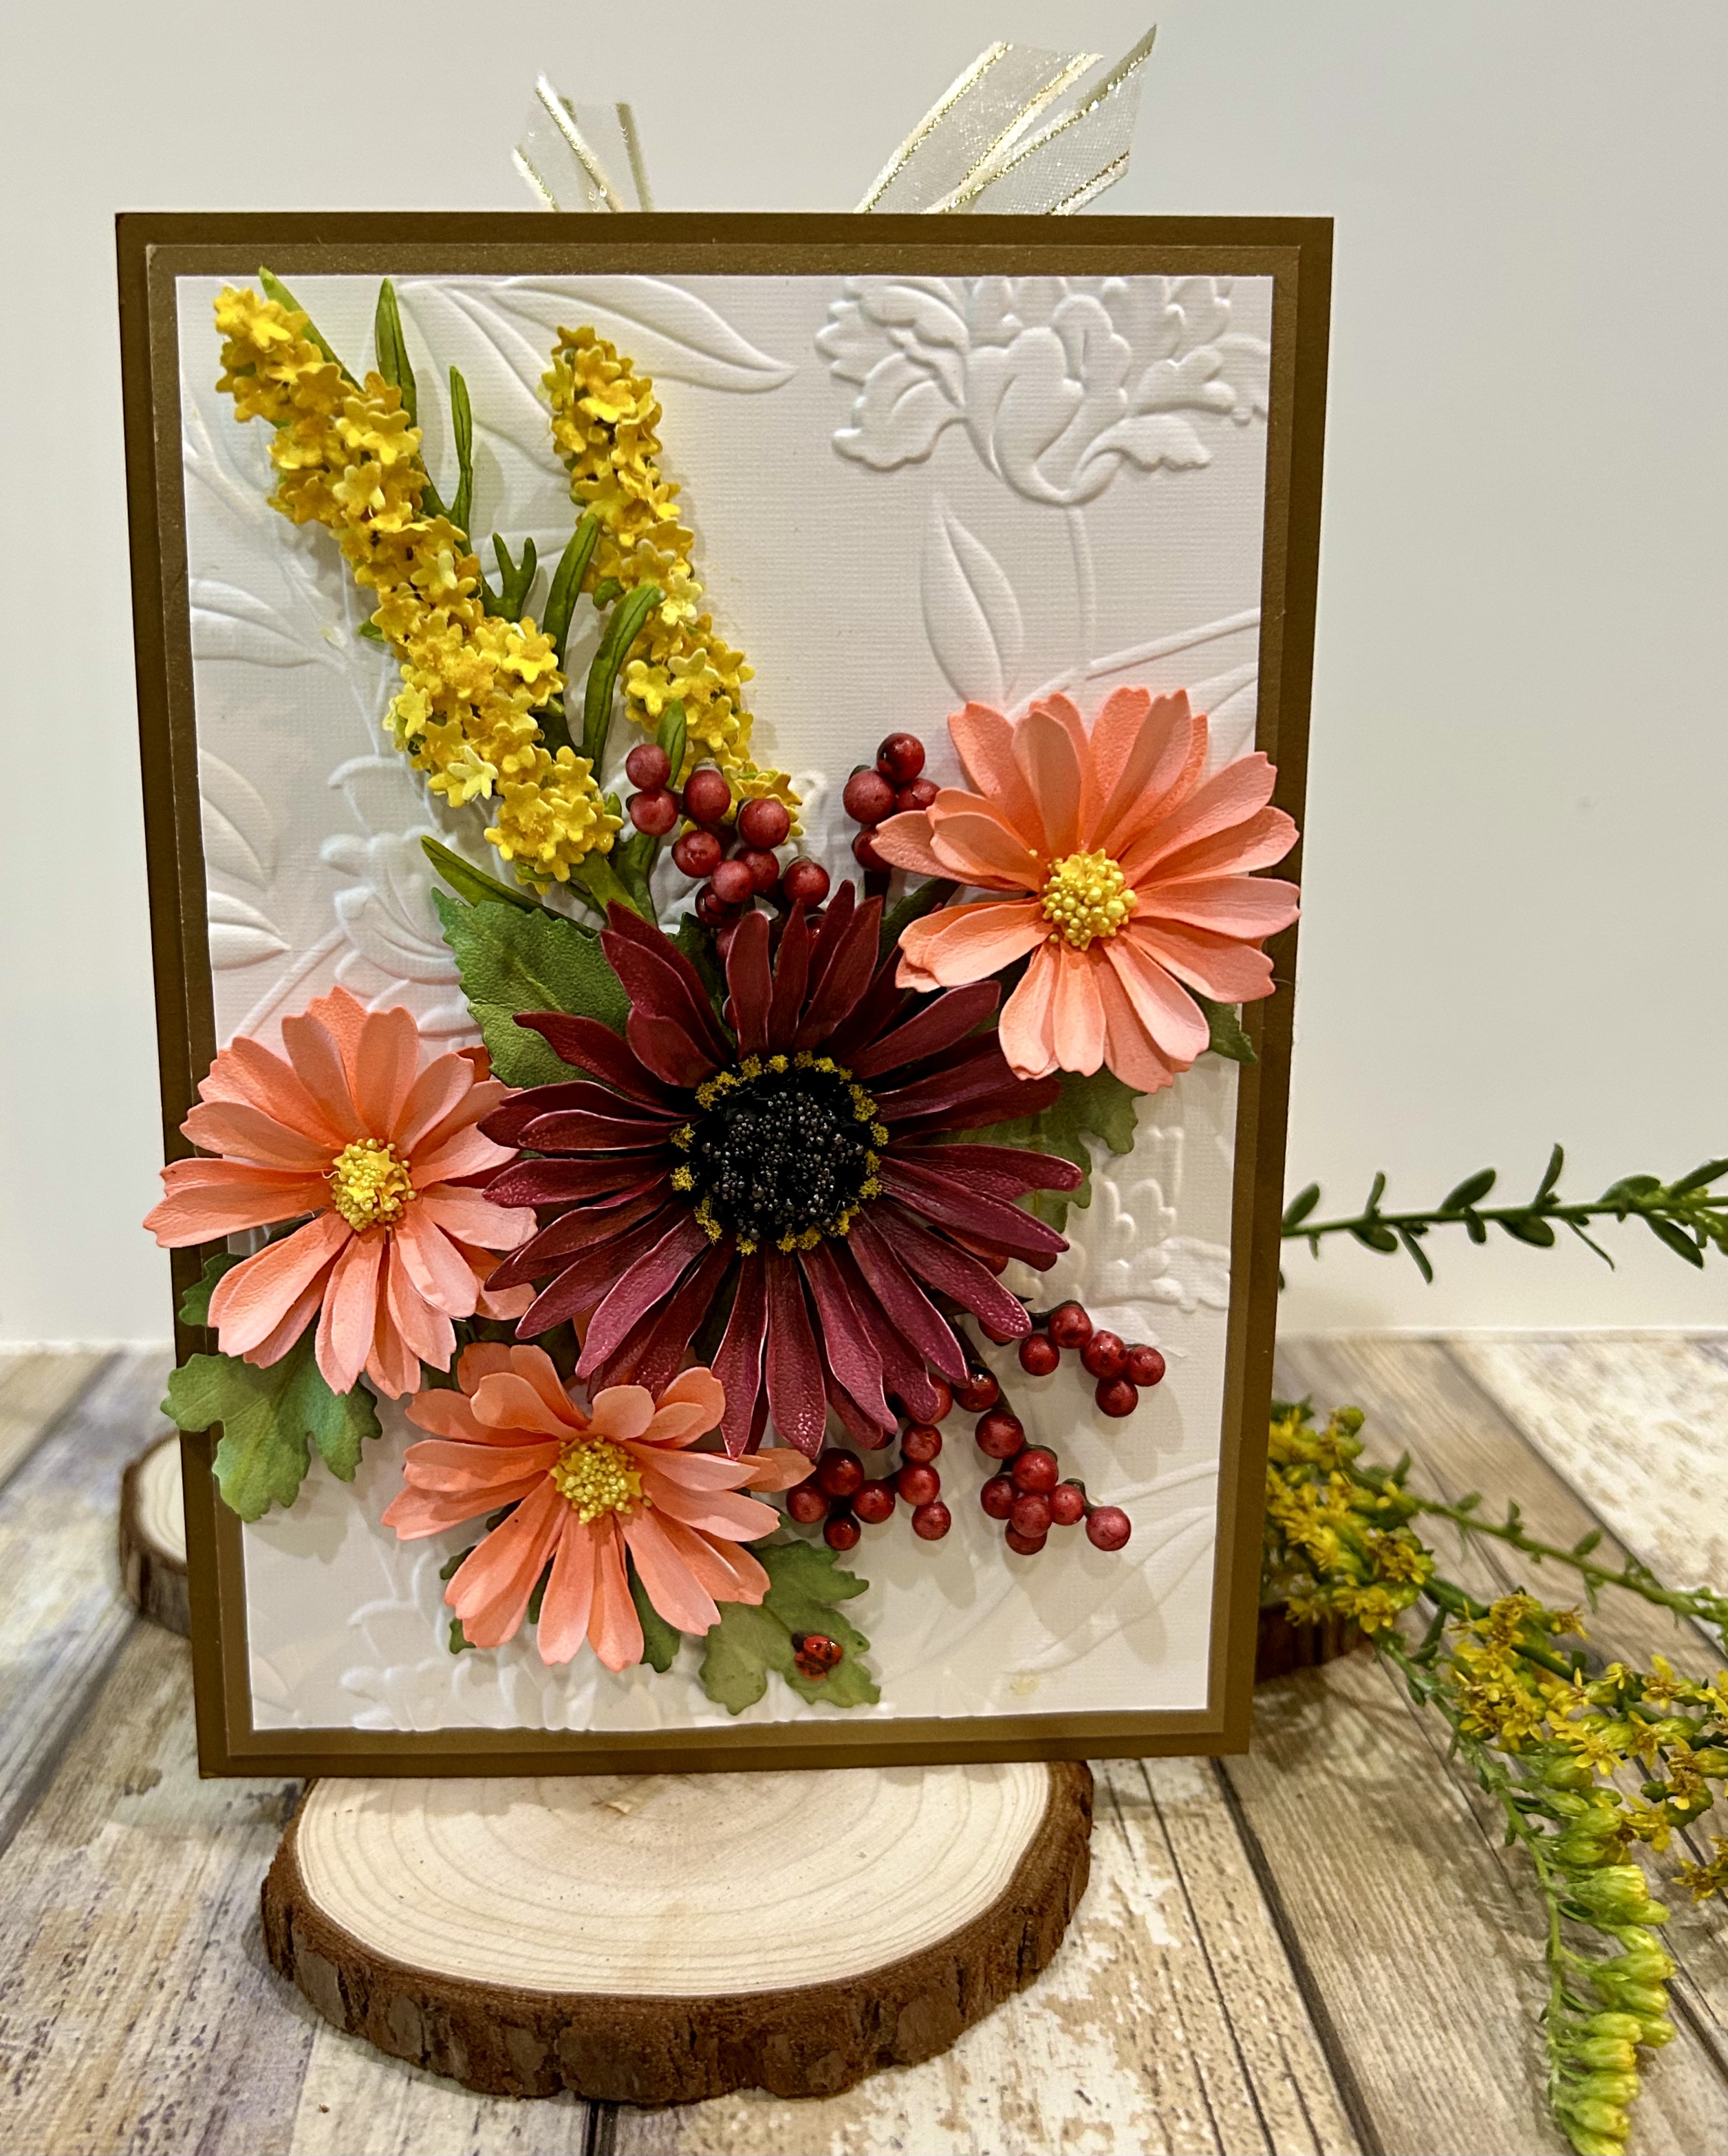
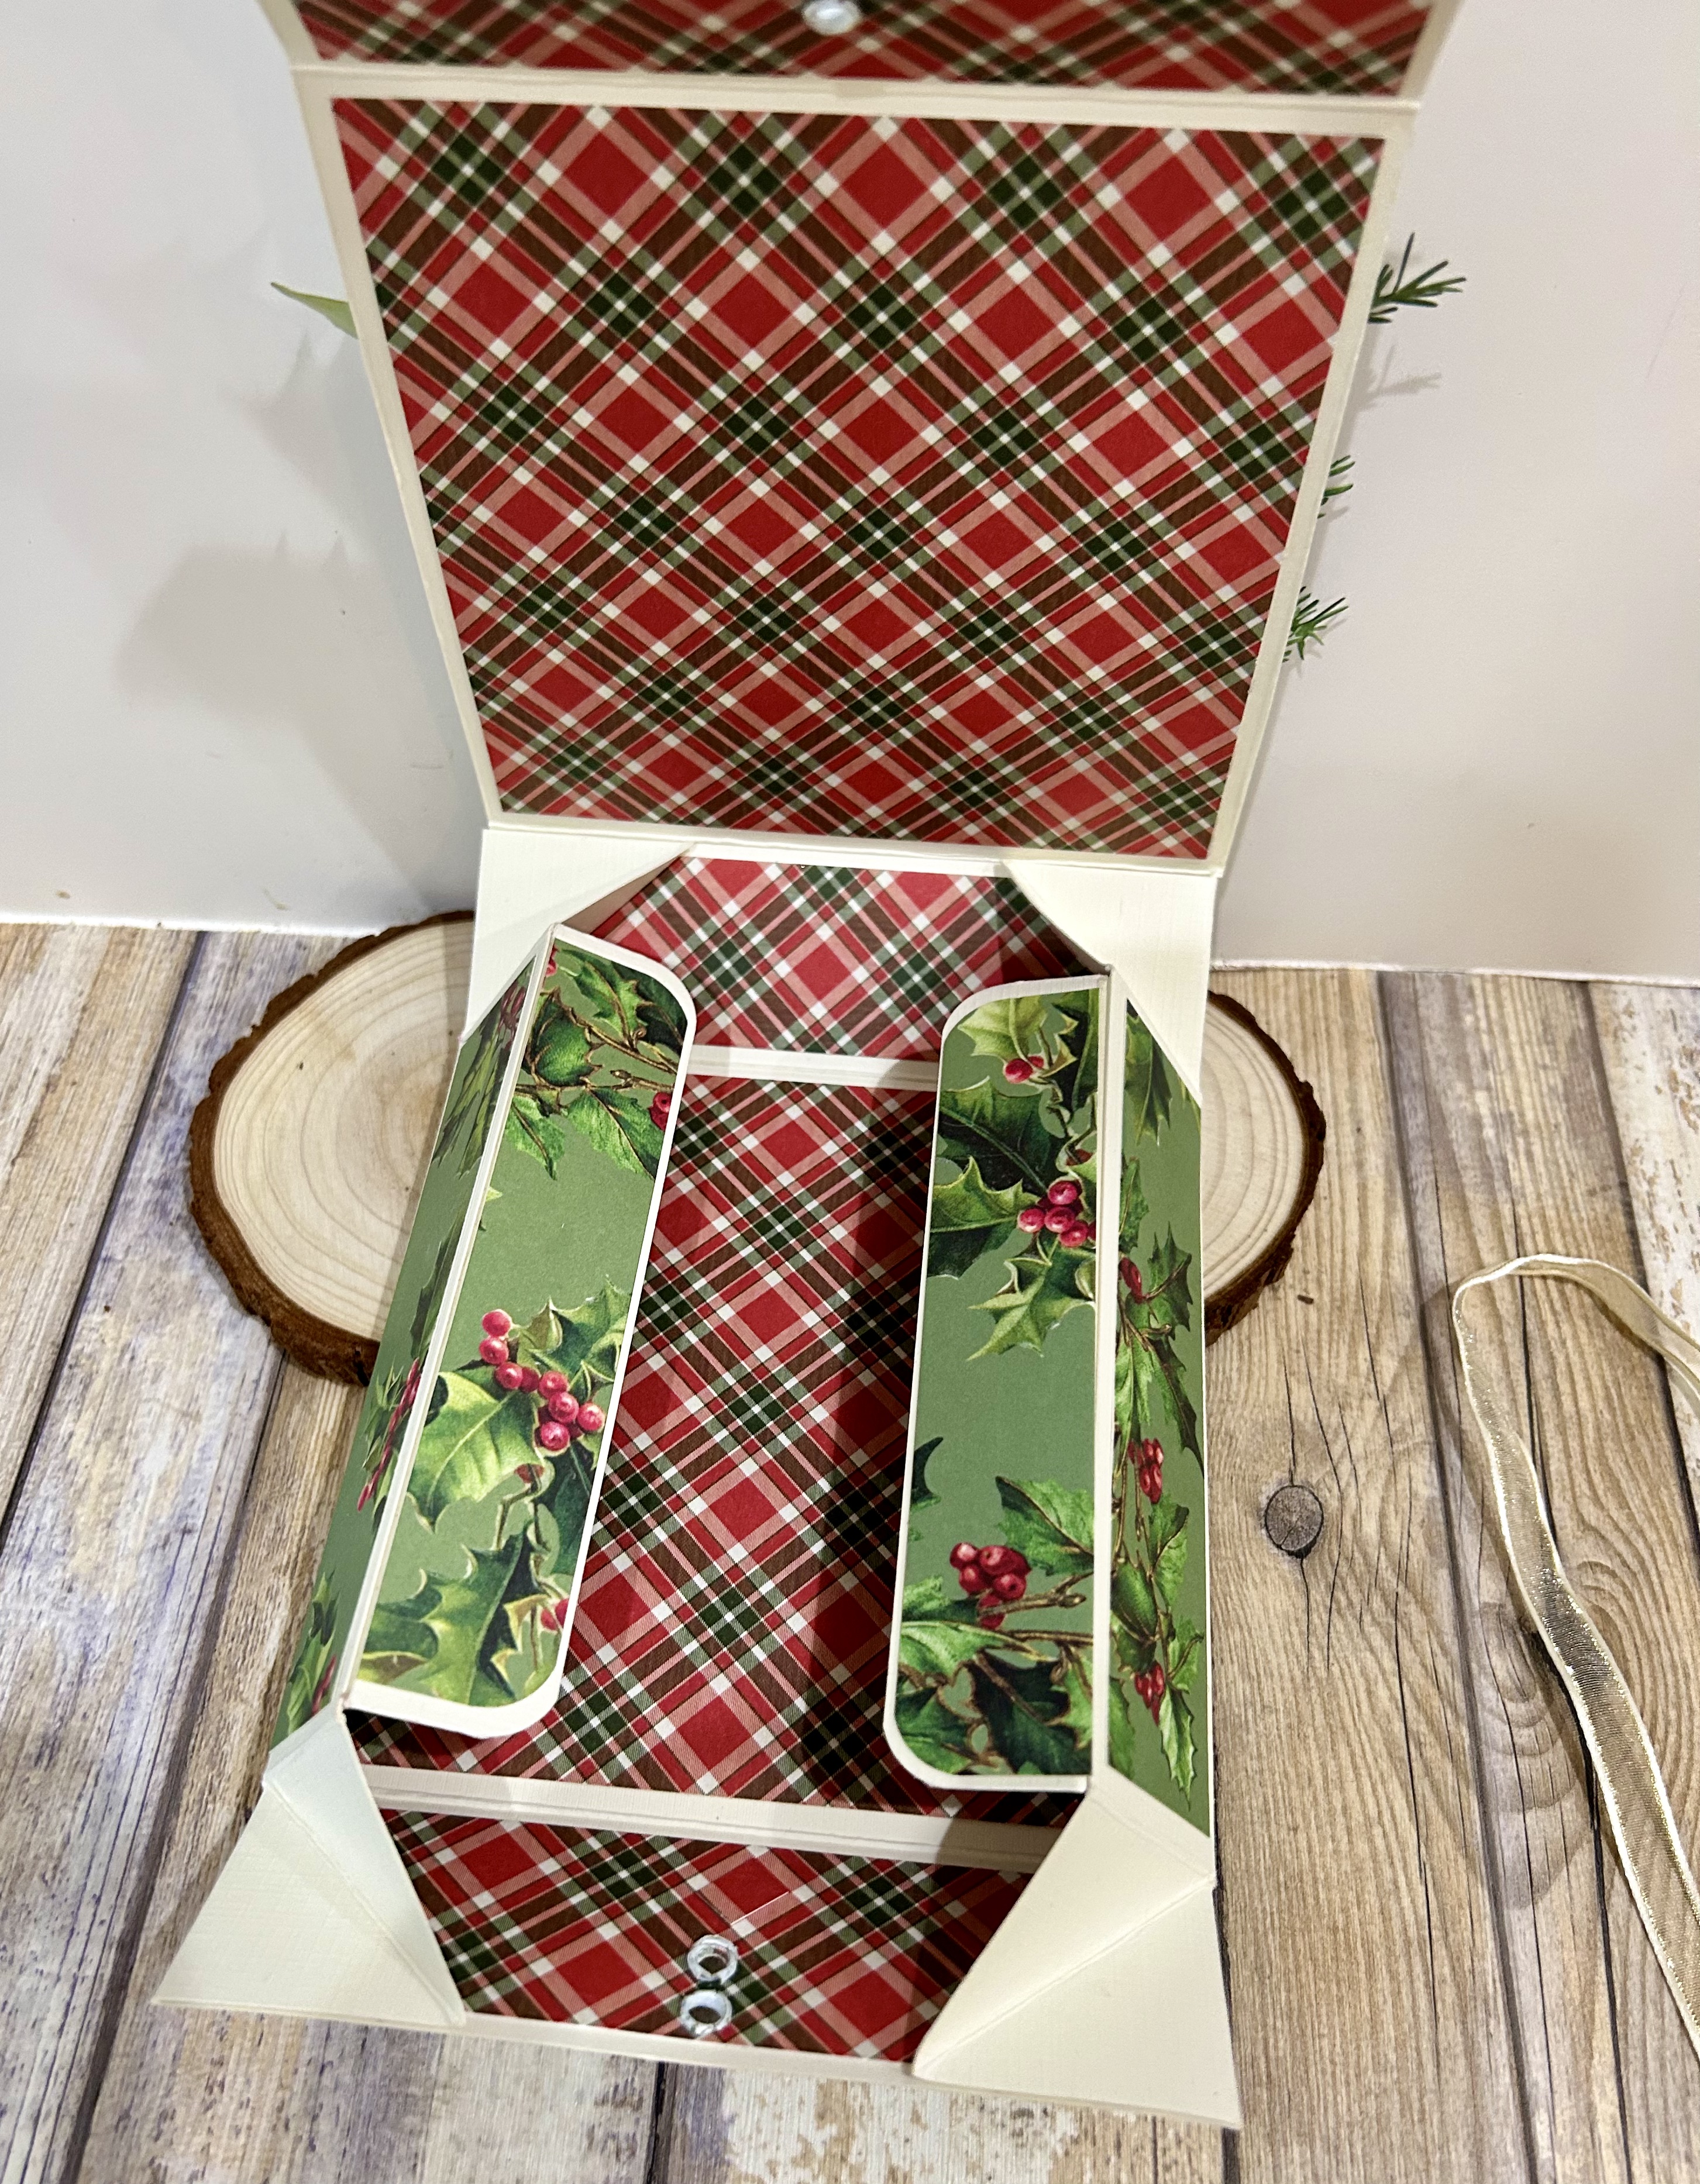
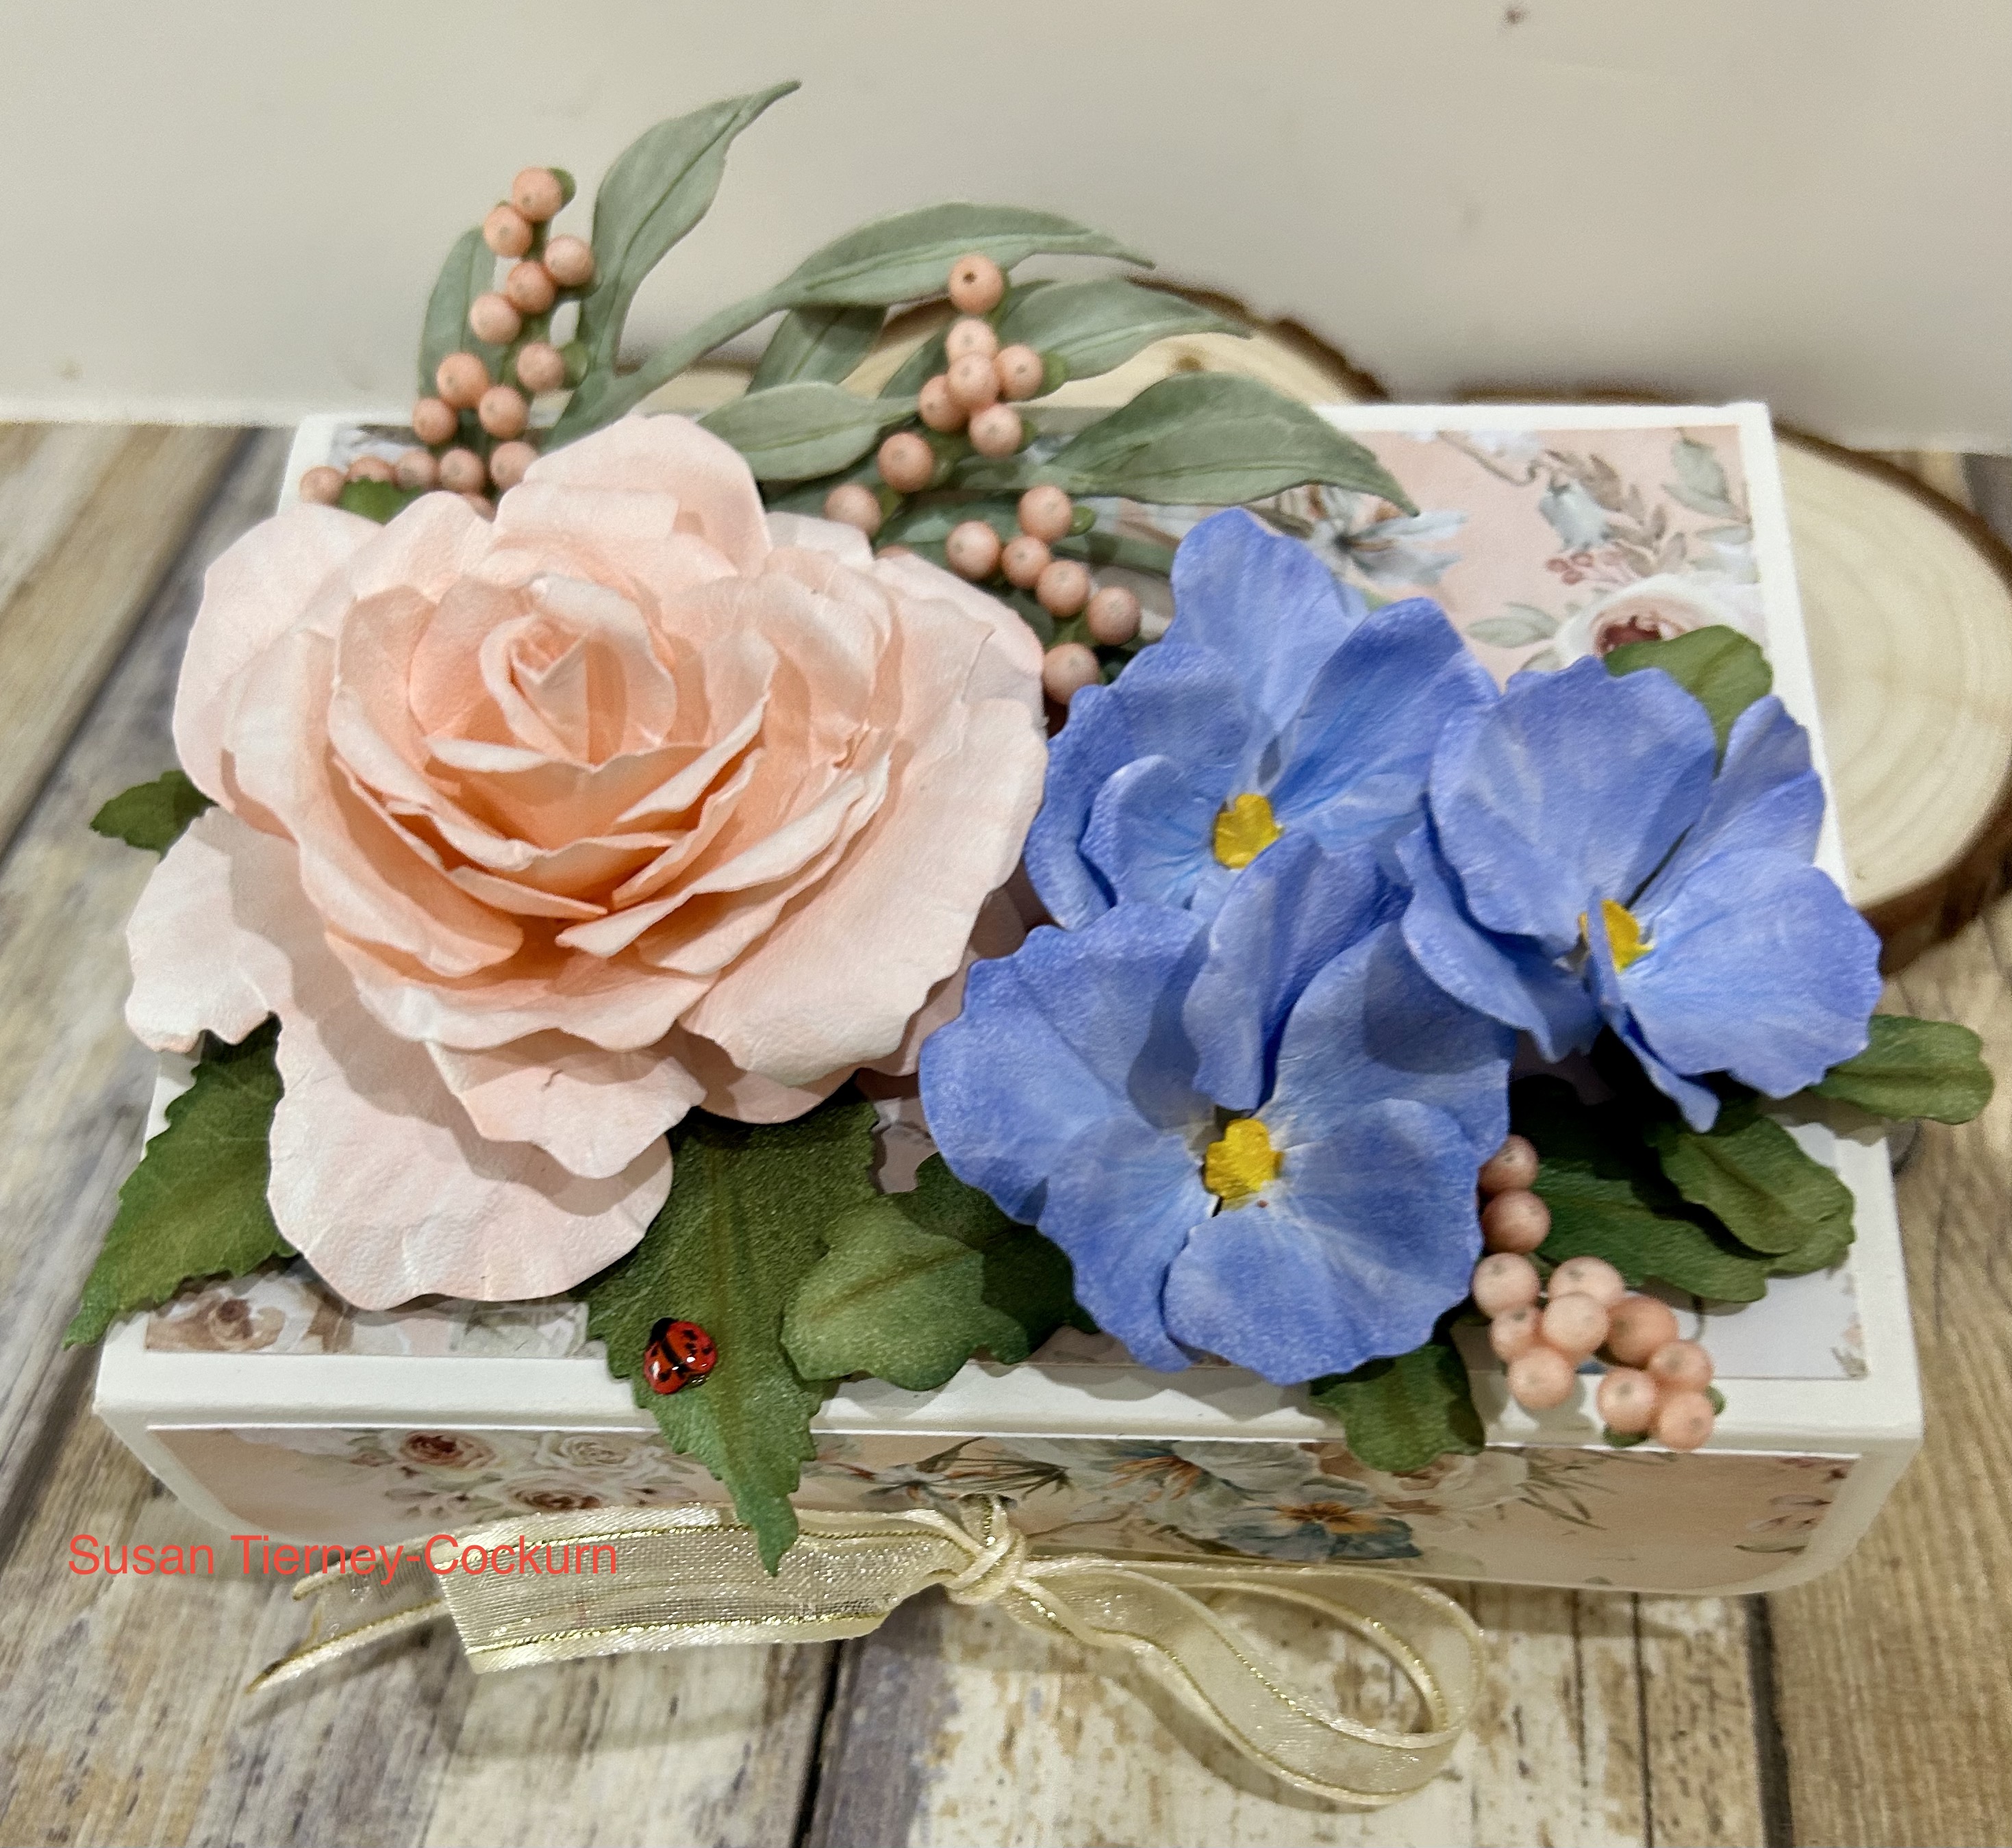
This cute little box is fun to make, decorate and give as a gift! Just some scoring, a bit of cutting, and you’ll have a gift to give.
LET’S GET STARTED
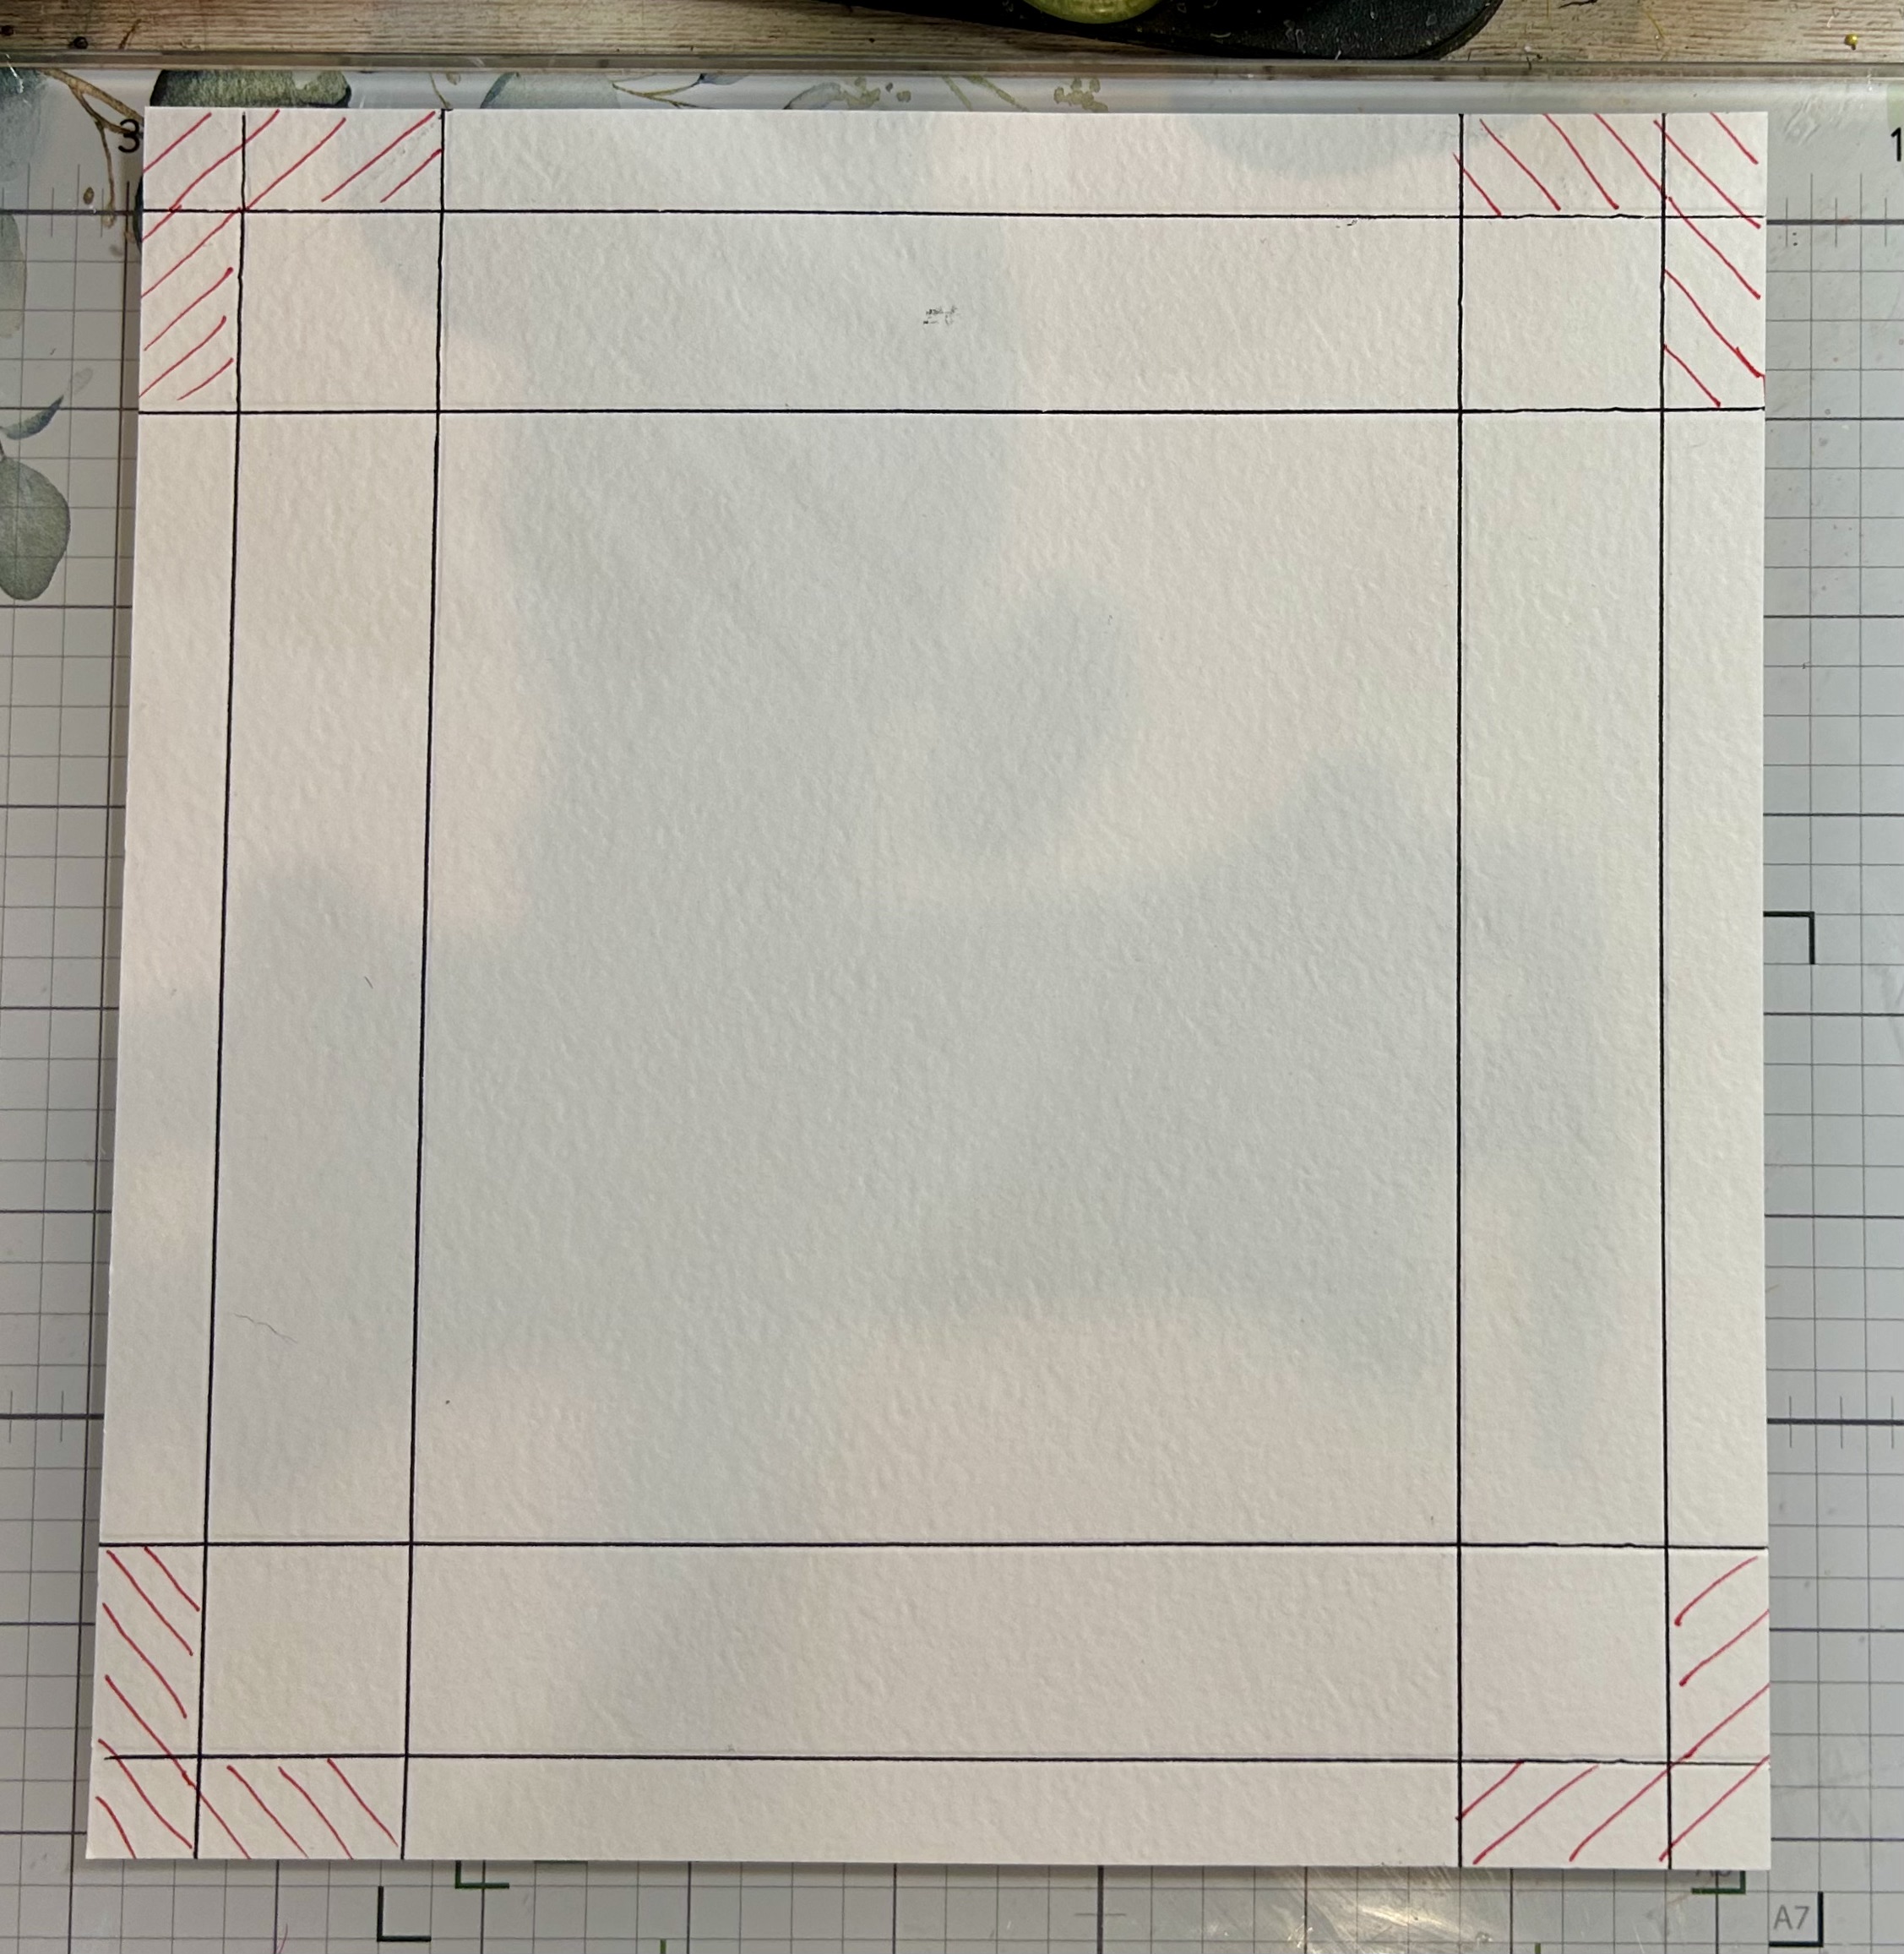
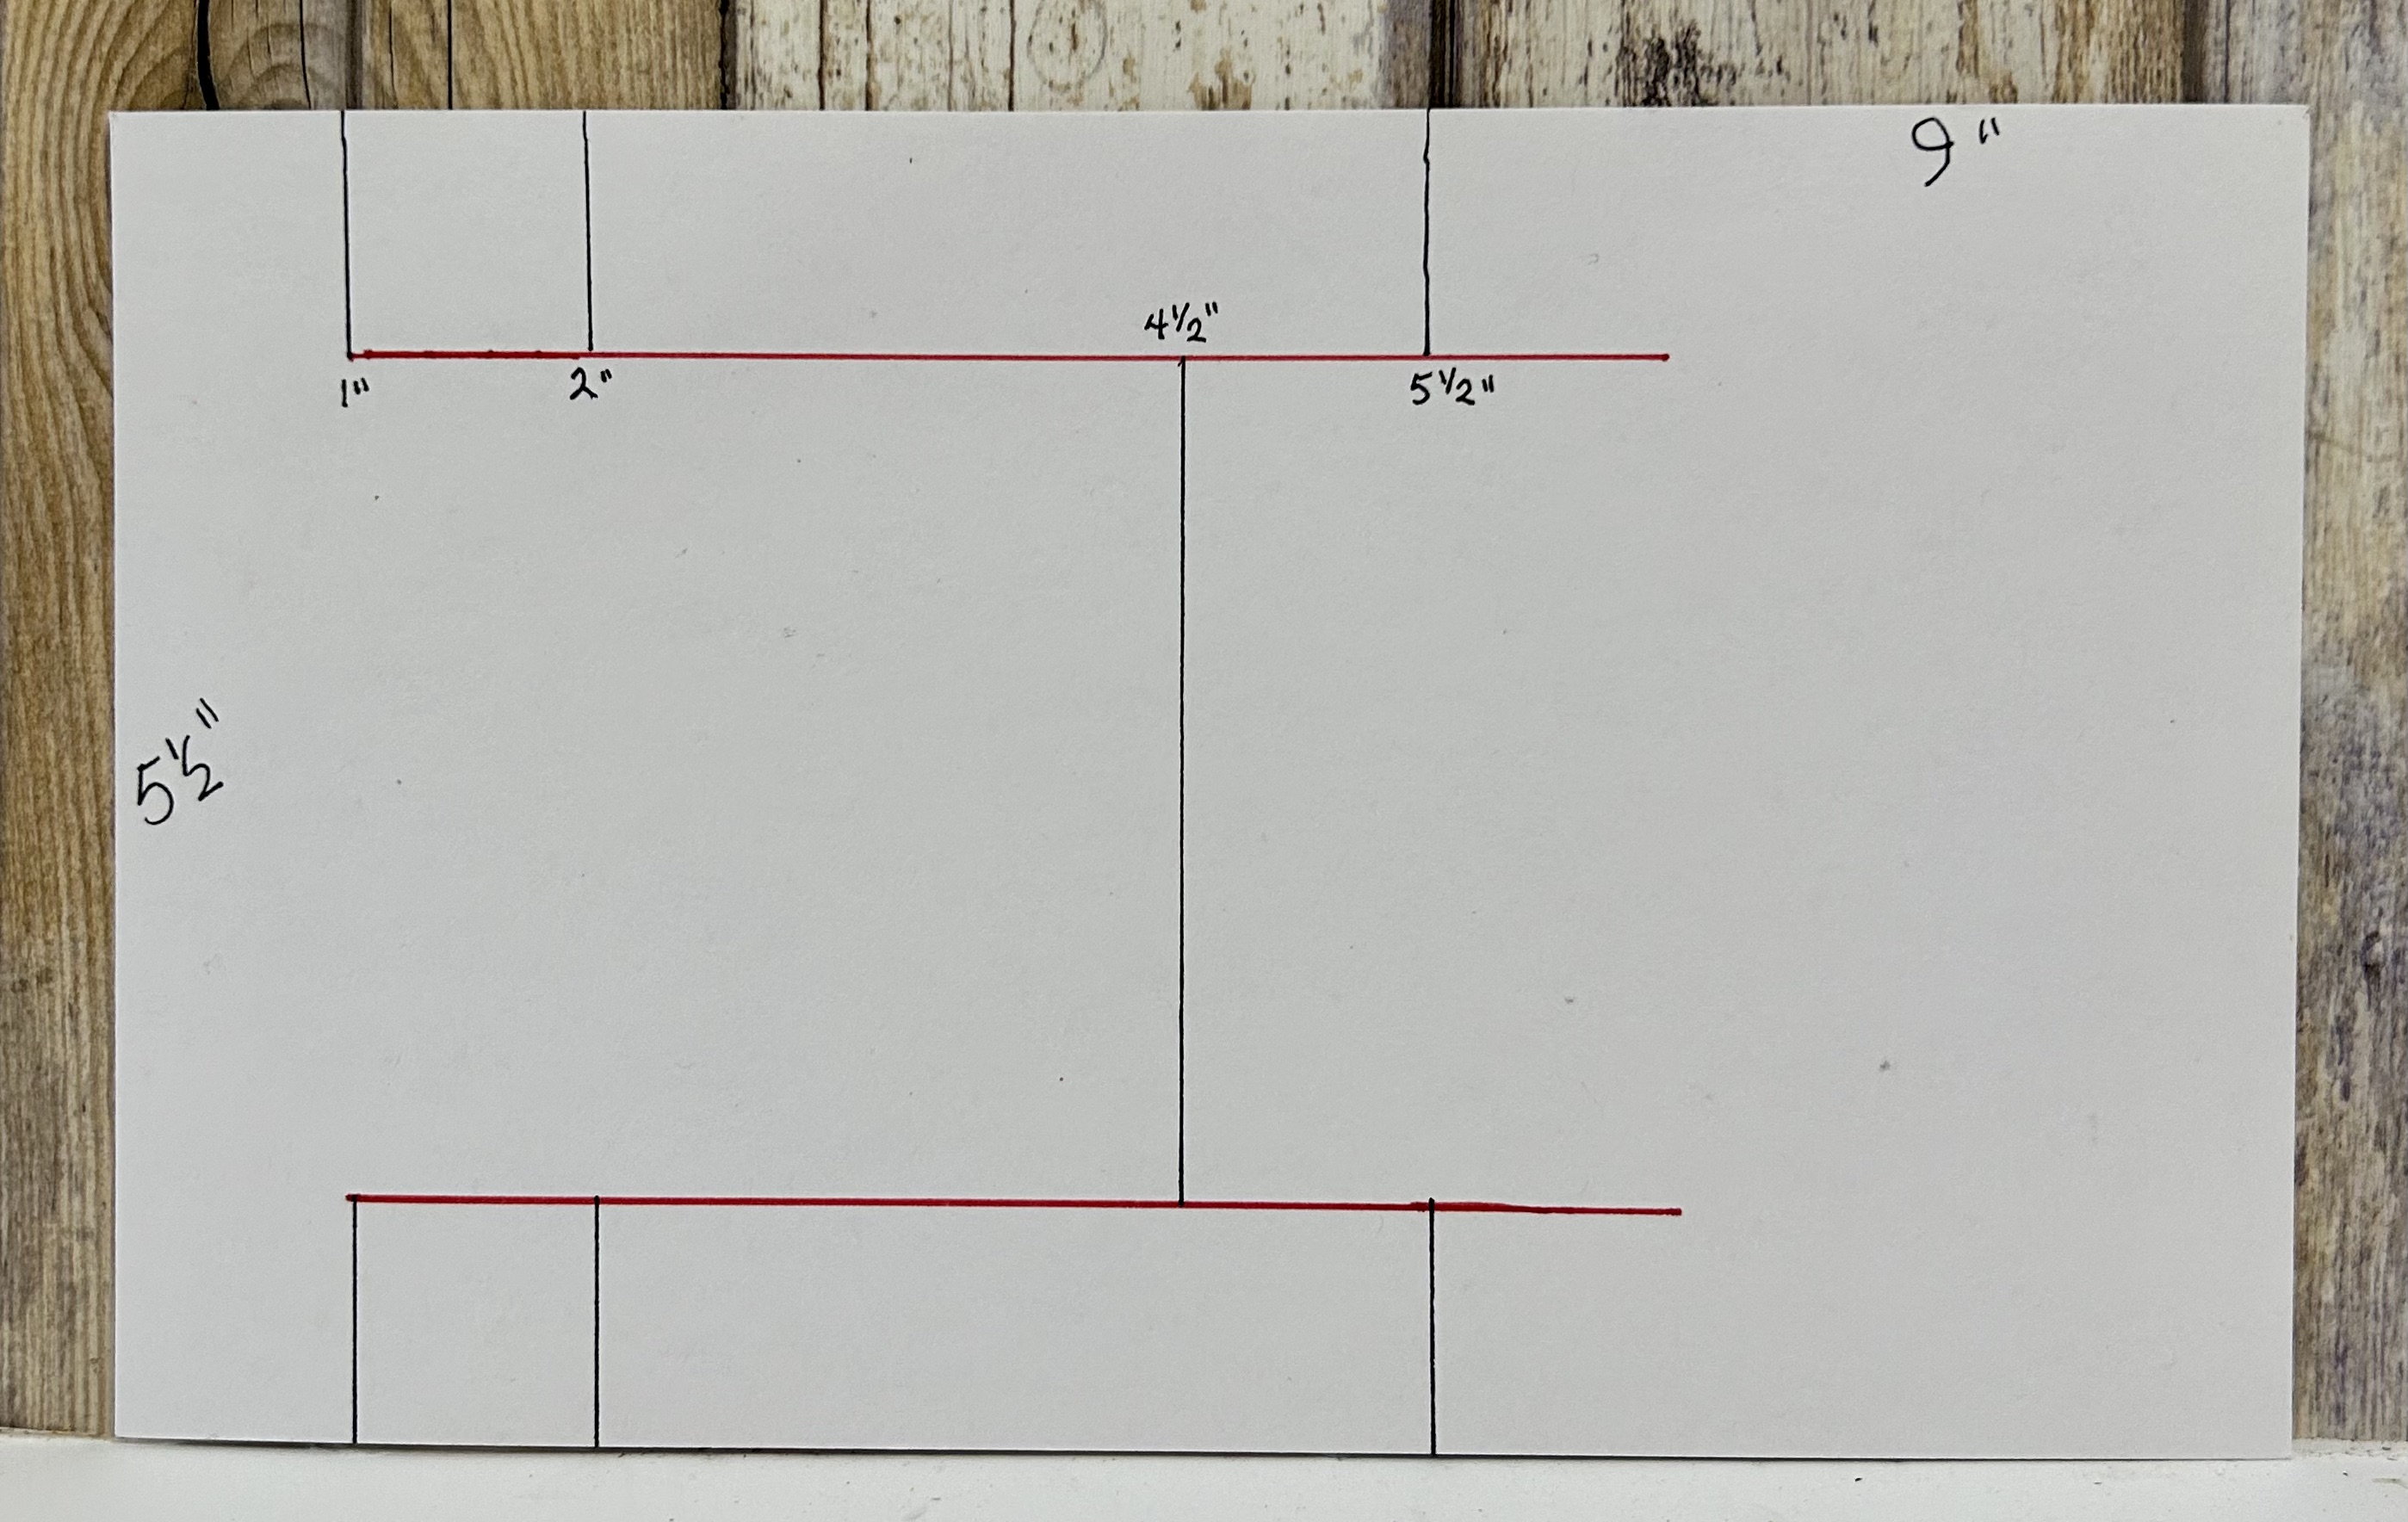
Trim a 12″ x 12″ square of cardstock (100 lb/300 gsm) to 11 1/2″ x 9 1/2″
Starting with the 11 1/2″ side up, score and going from the left to right, score at 4″ 5 1/2″ 9 1/2″ & 11″
Turn your cardstock, with the 9 1/2″ side up and the 1/2-inch scoreline at the bottom, and score at 1 1/2″ 51/2″ all the way across the paper. At the 7 1/2″ mark, score only to the first score line. Skip over the space to the 5 1/2″ mark and score to the 9 1/2-inch score line.
Go to the 9-inch mark and repeat above–score only to the first score line, skip over the space to the 5 1/2″ mark and score to the 9 1/2-inch score line.
With the cardstock in the 11 1/2-inch landscape and the last 1/2-inch scored line at the top, score at 2″ and 7 1/2″.
Using either a cork board or I used my Leaf Pad and Leaf Tool, create those diagonal score lines as shown above. Using that 2-inch score line as a “peak”, score diagonally to the next score line on both sides. Repeat at the 7 1/2″ mark to create the same peak and roof.
The cut lines are shown on this diagram in Red.
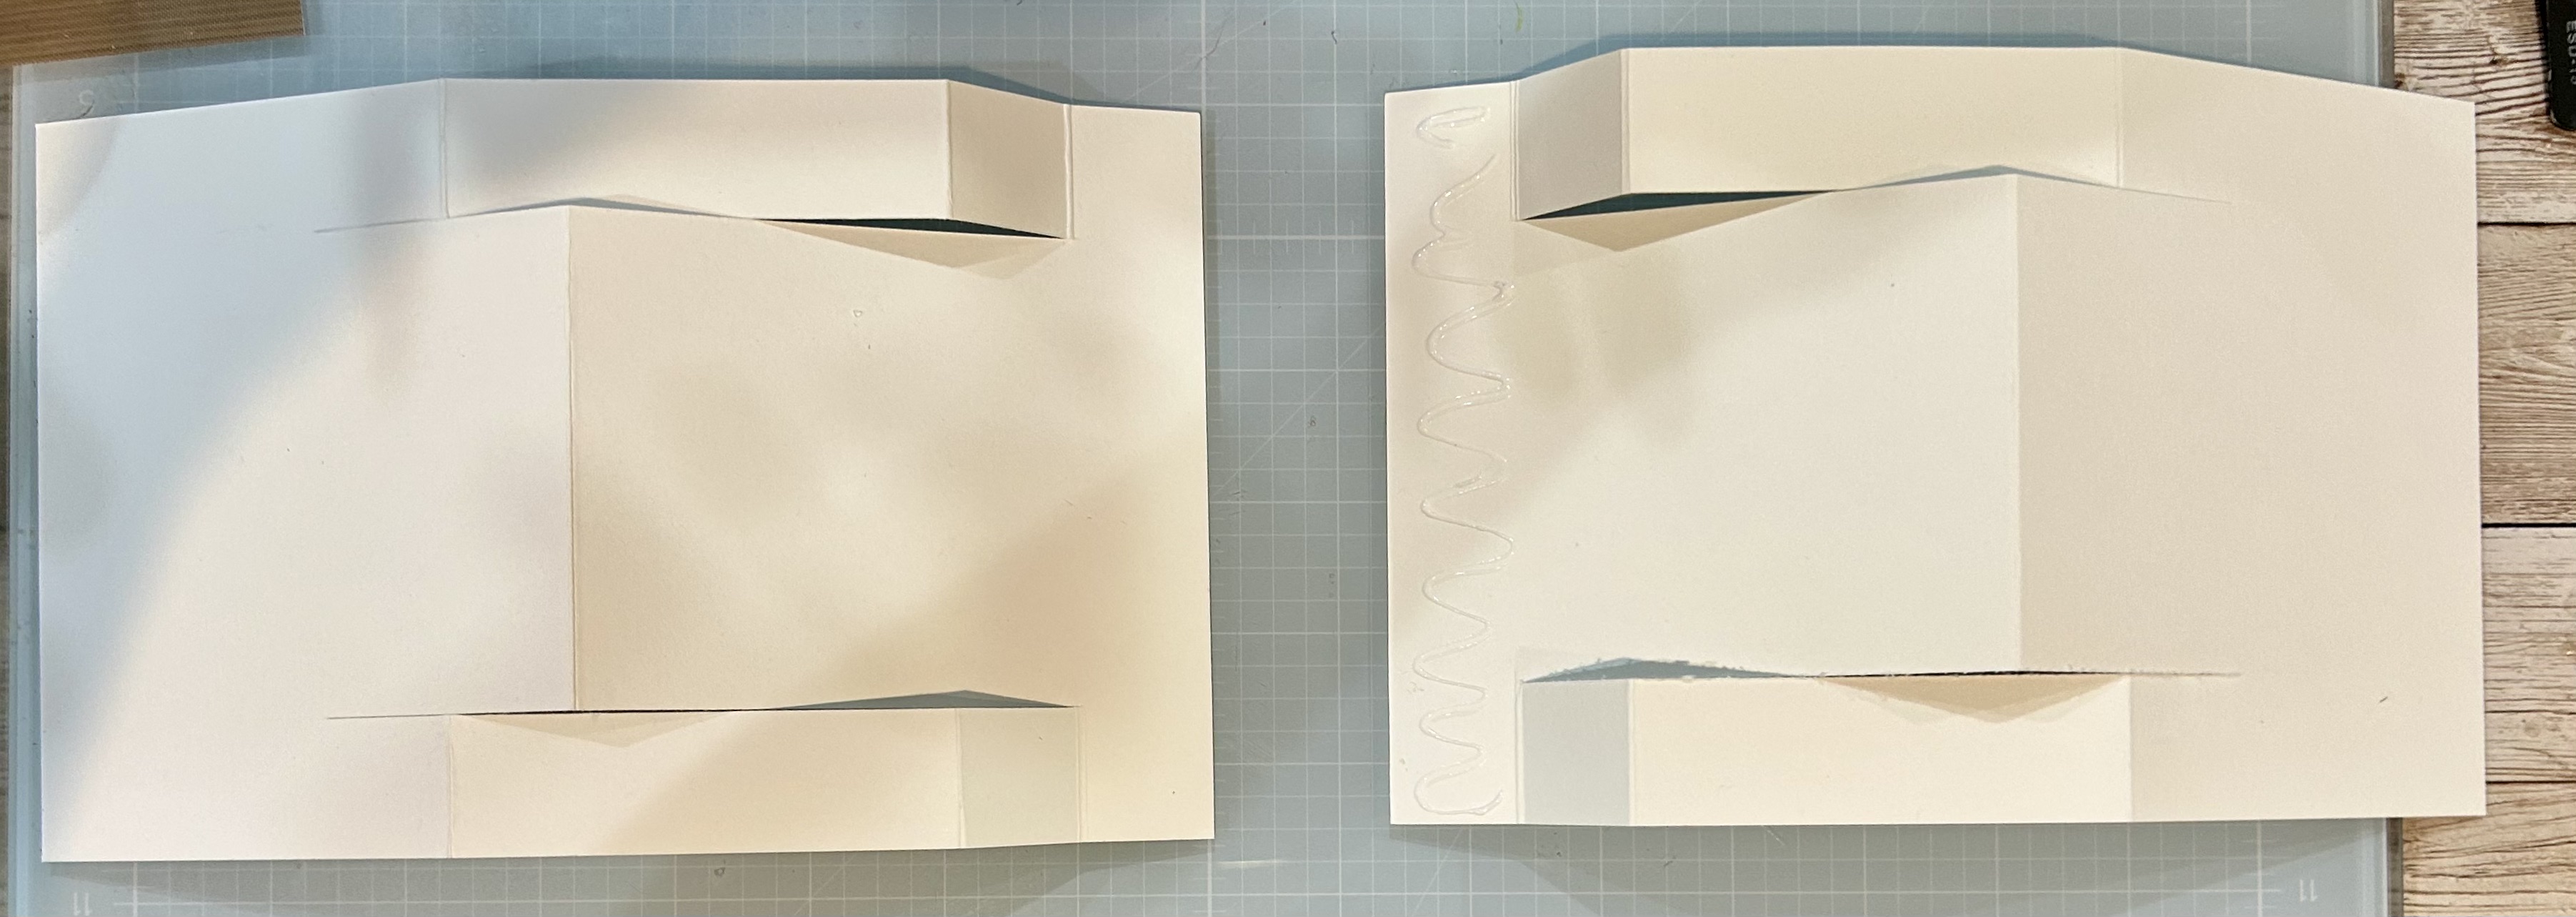
Following today’s LIVE video (on Susan’s Garden Club 2), First cut the end 1/2-inch area to create the tab. Cut up the bottom score lines, trimming the small areas to create tabs. Cut down the long lines between the roof pieces and trim away the 1/2-inch pieces as shown above.
Panels:
(2) 3 3/4″ x 3 3/4″*
(2) 1 1/4″ x 3 3/4″
(1) 2 3/8″ x 2 3/8″, then cut in half diagonally to fit the roof areas.
*If you want a second panel cut (2) 3 1/2″ x 3 1/2″
Glue all the panels down before constructing the box. Then, add glue to the side tab and bring the other side over to seal. Use a roller to make sure it’s glued securely. Close up the bottom, placing one long side over, then, adding glue to the two shorter tabs, adhere them to this piece. Turn box, right side up and use either a dowel (or ruler) to pressed down from inside to secure the glued pieces. Finally, glue the last long side to the bottom and once again with the box right side up, press down from inside to secure.
I also use a 1/2-inch round punch to take notches out of the top flaps to make it easier to open up.
I saw this card on Pinterest by a woman in Poland, Monika Jakabowska, and it gave me an idea to create one with my flowers. I also thought it would make a fun card to do on Wednesday’s LIVE on the “Susan’s Garden Club 2” as a project to do together. So here are the measurements for you to cut out prior to Wednesday if you’d like to make it along with me.
The bouquet will be your choice, but today I decided on a beautiful red Sunflower with Daisy Chrysanthemums and created some Goldenrod using my Lavender die. My Goldenrod is just starting to pop out and the Bees and Butterflies love it. (Do not confuse this with ragweed!)
Let’s Begin
You will need two sheets of 8 1/2″ x 11 100 lb./300 gsm for the card base. However, if you want larger pockets inside, you will need one sheet of 12″ x 12″ to cut them–I’ll give that measurement too. From the first sheet of 8 1/2″ x 11″ cardstock, cut two 5″ x 7″ pieces as shown below.
From the second sheet of cardstock, cut one piece 5 1/5″ x 11″. You will score this piece, with the 11-inch side up, at 2 3/4″ – 5 1/2″ – 8 1/4″. (If you want wider pockets, from the 12″ x 12″ sheet of cardstock, cut this piece 5 1/2″ x 12″ and score at 3″ – 6″ – 9″.)
You can leave this piece like this, or as I have chosen to do, create two side pockets. Will cut this in class!
PANELS:
(4) 4 3/4″ x 6 3/4″ – (2)in DSP and (2) in solid or metallic
(2) 4 1/2″ x 6 1/2″
(4) 2 3/8″ x 5 1/4″ or if you choose to make the pockets, only cut two at that size and
(2) 2 3/8″ x 5
Additionally you can cut tags to go into the pockets or only make one pocket for a gift card. My tags are 1 7/8″ x 5 1/4″. The possibilities are endless what you can do inside!
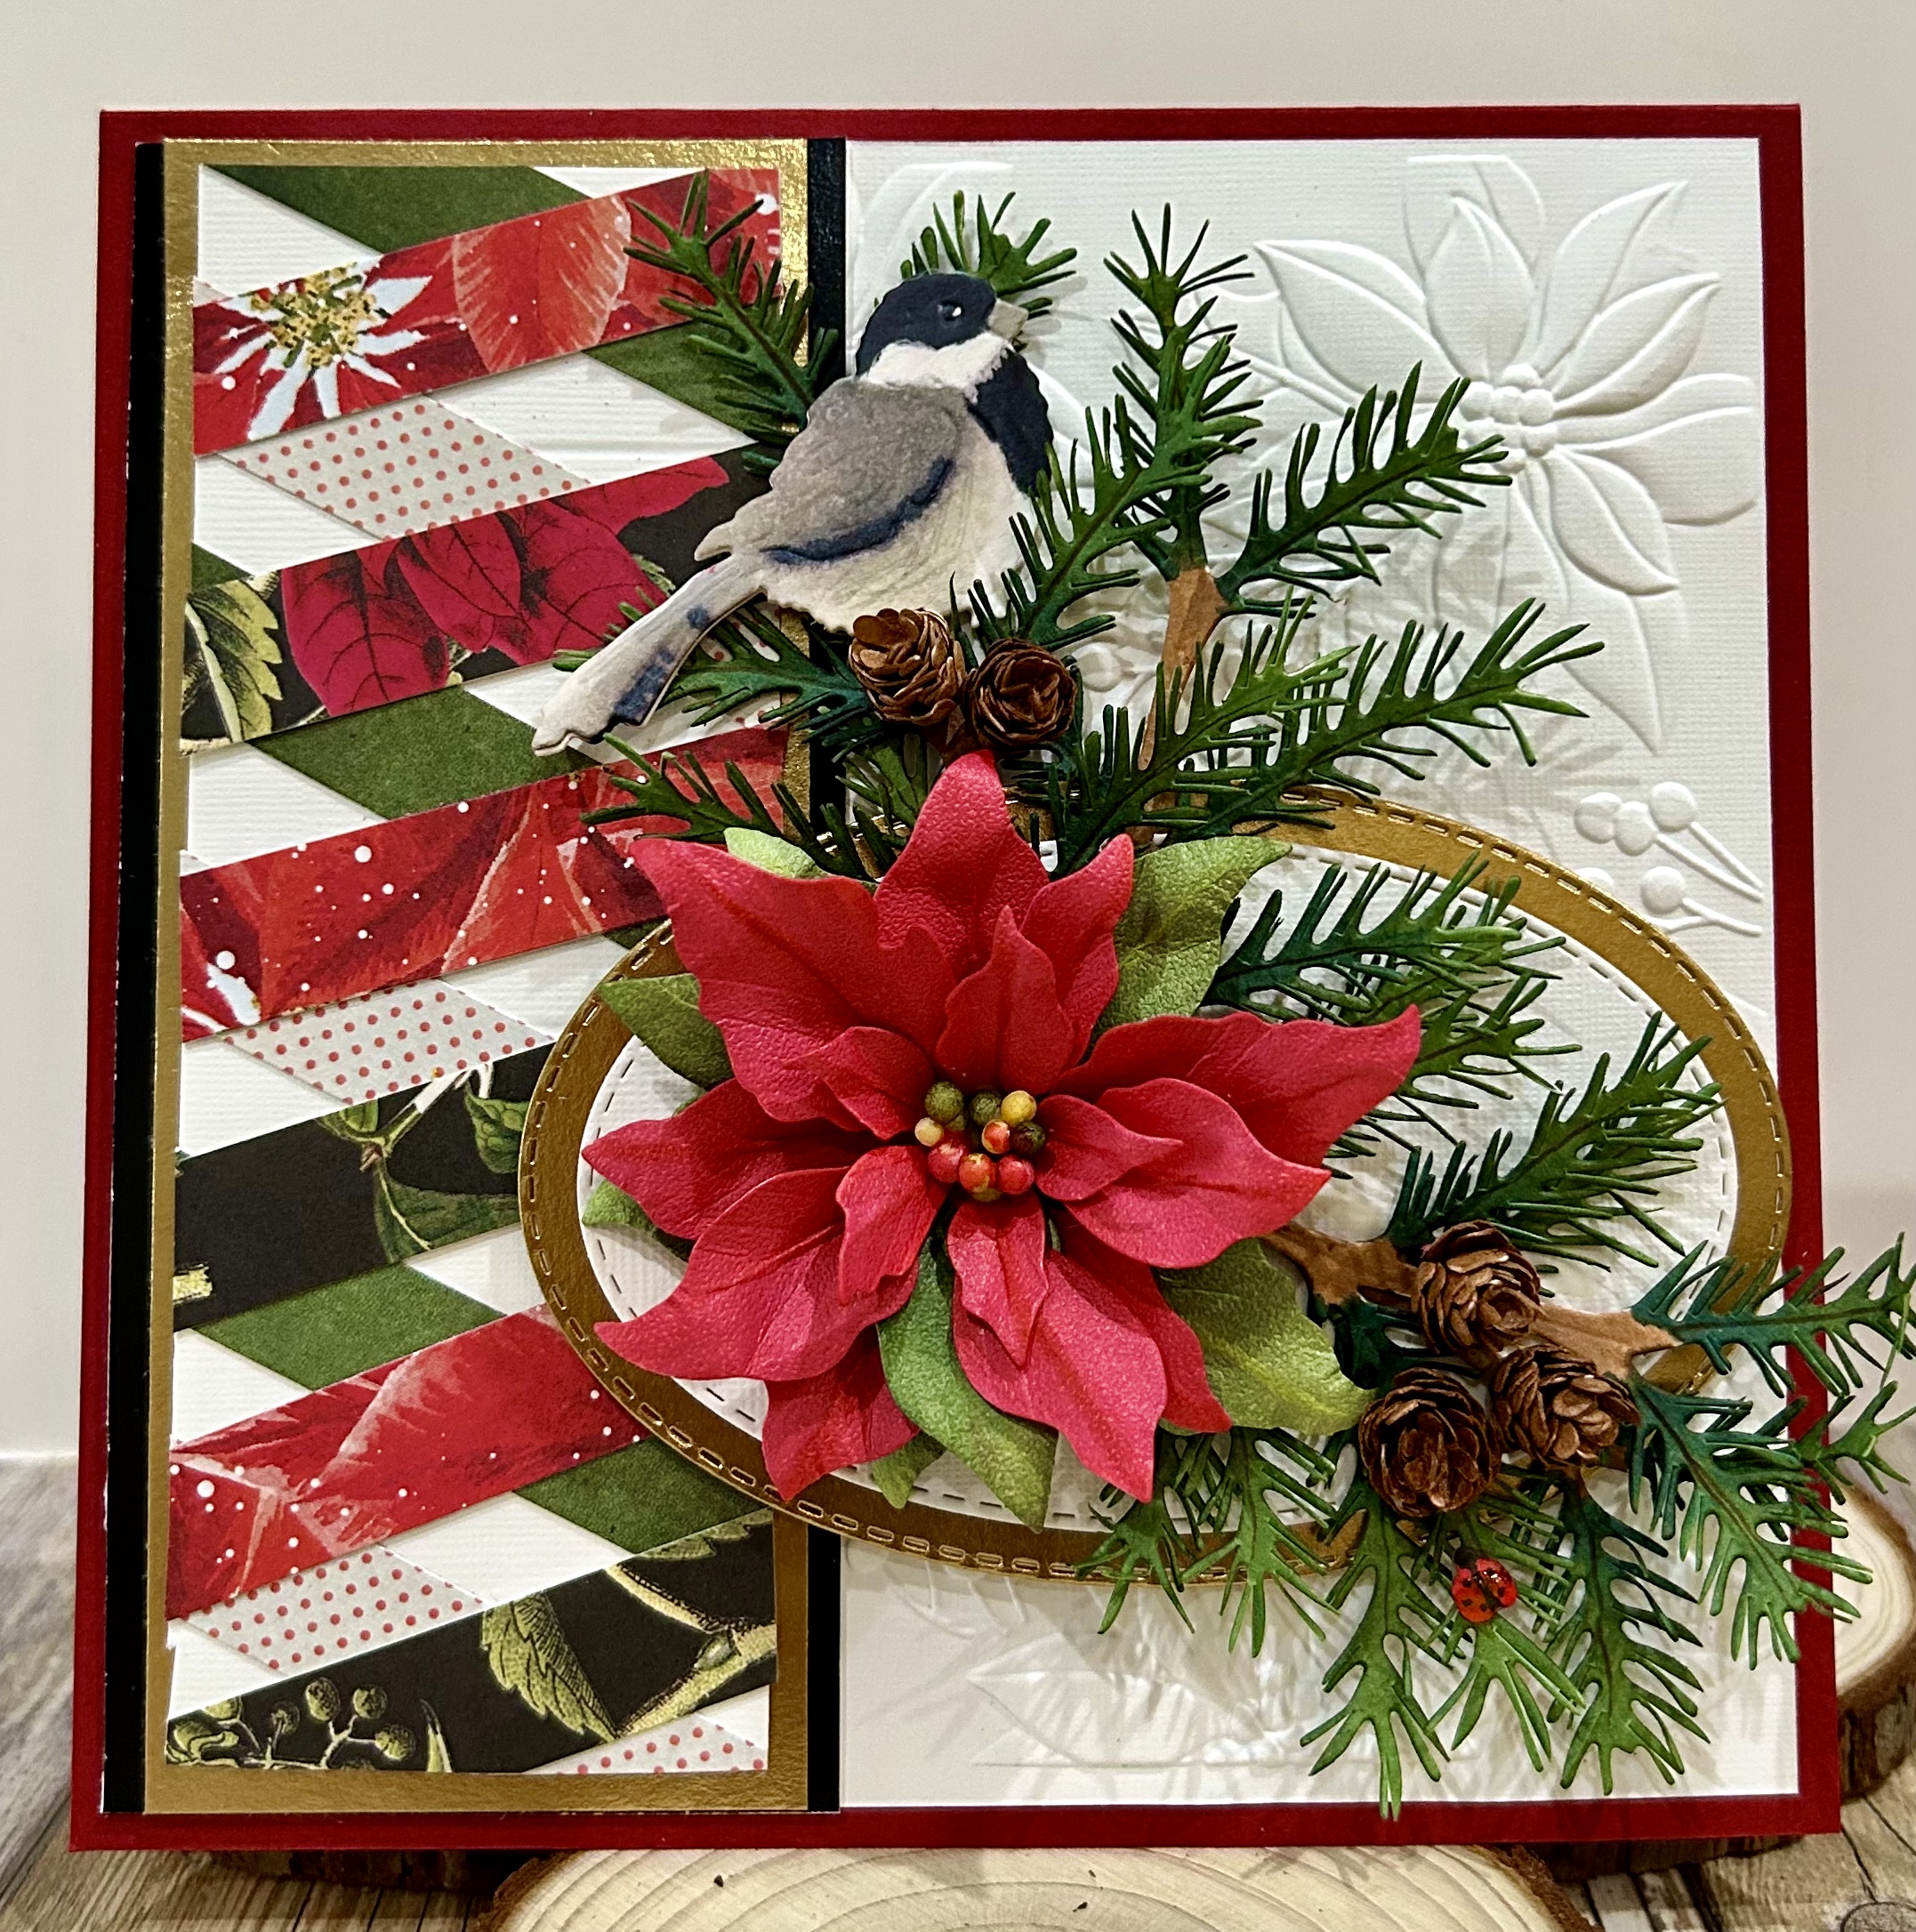
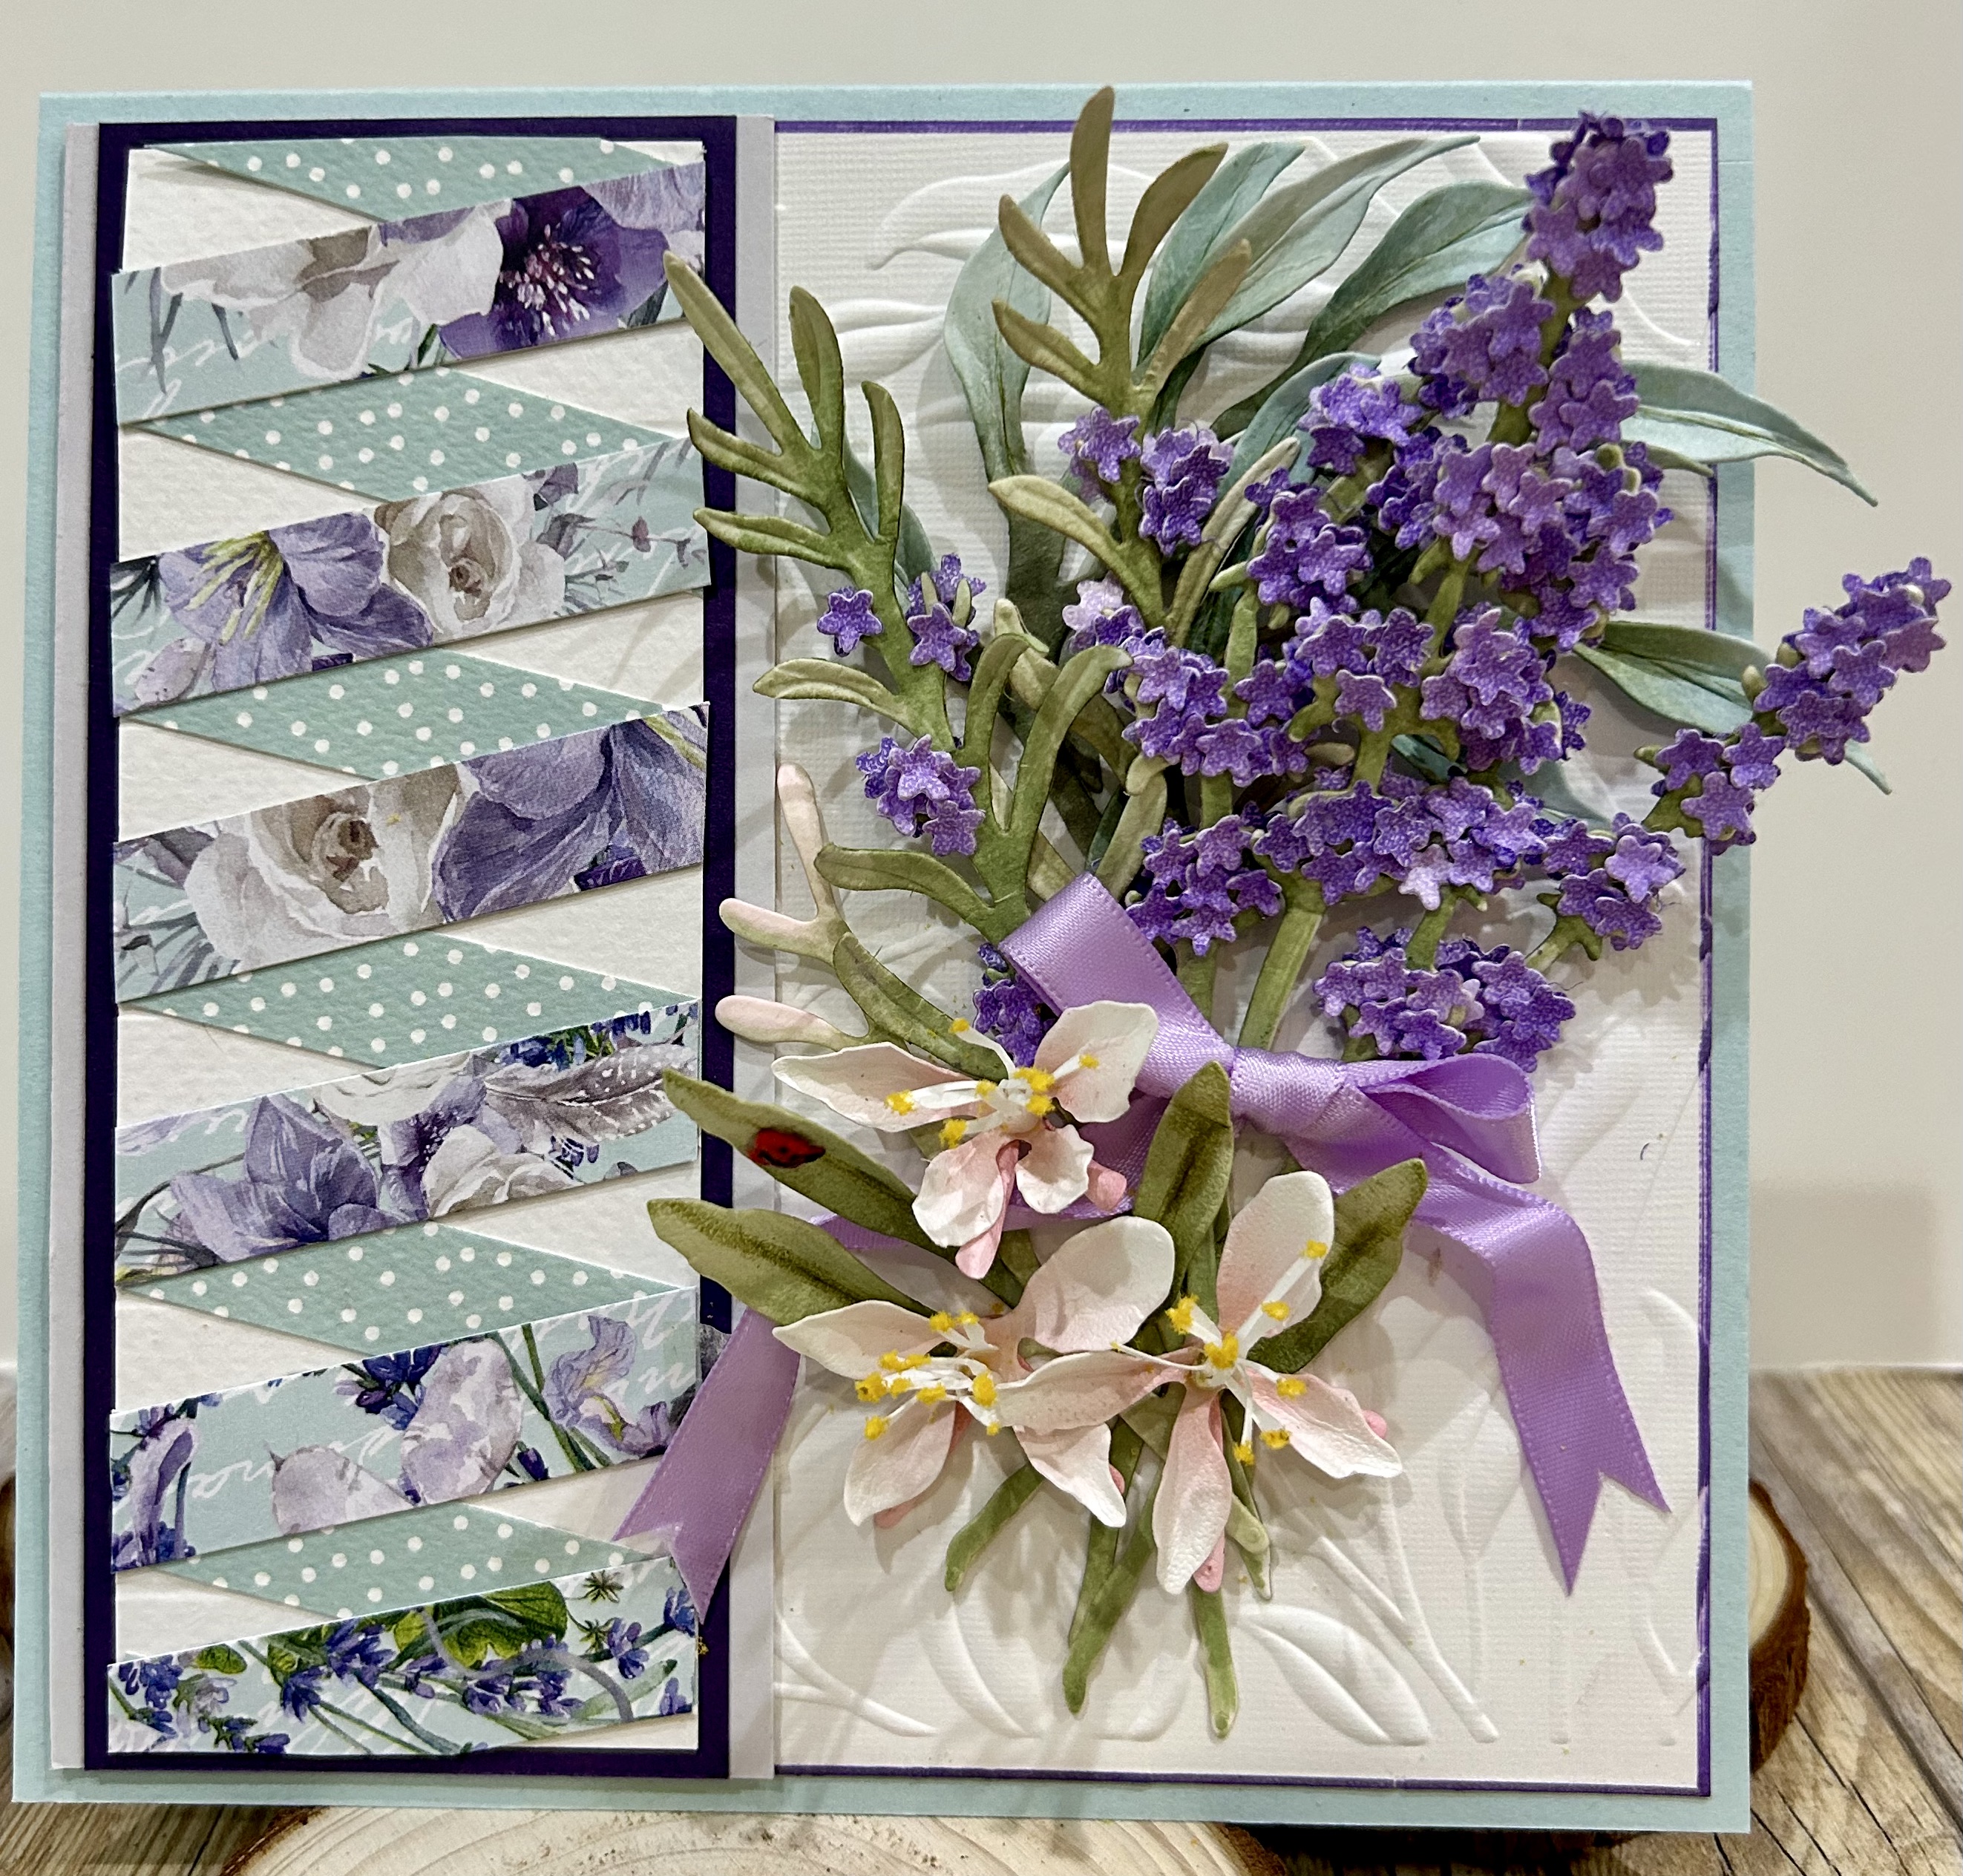
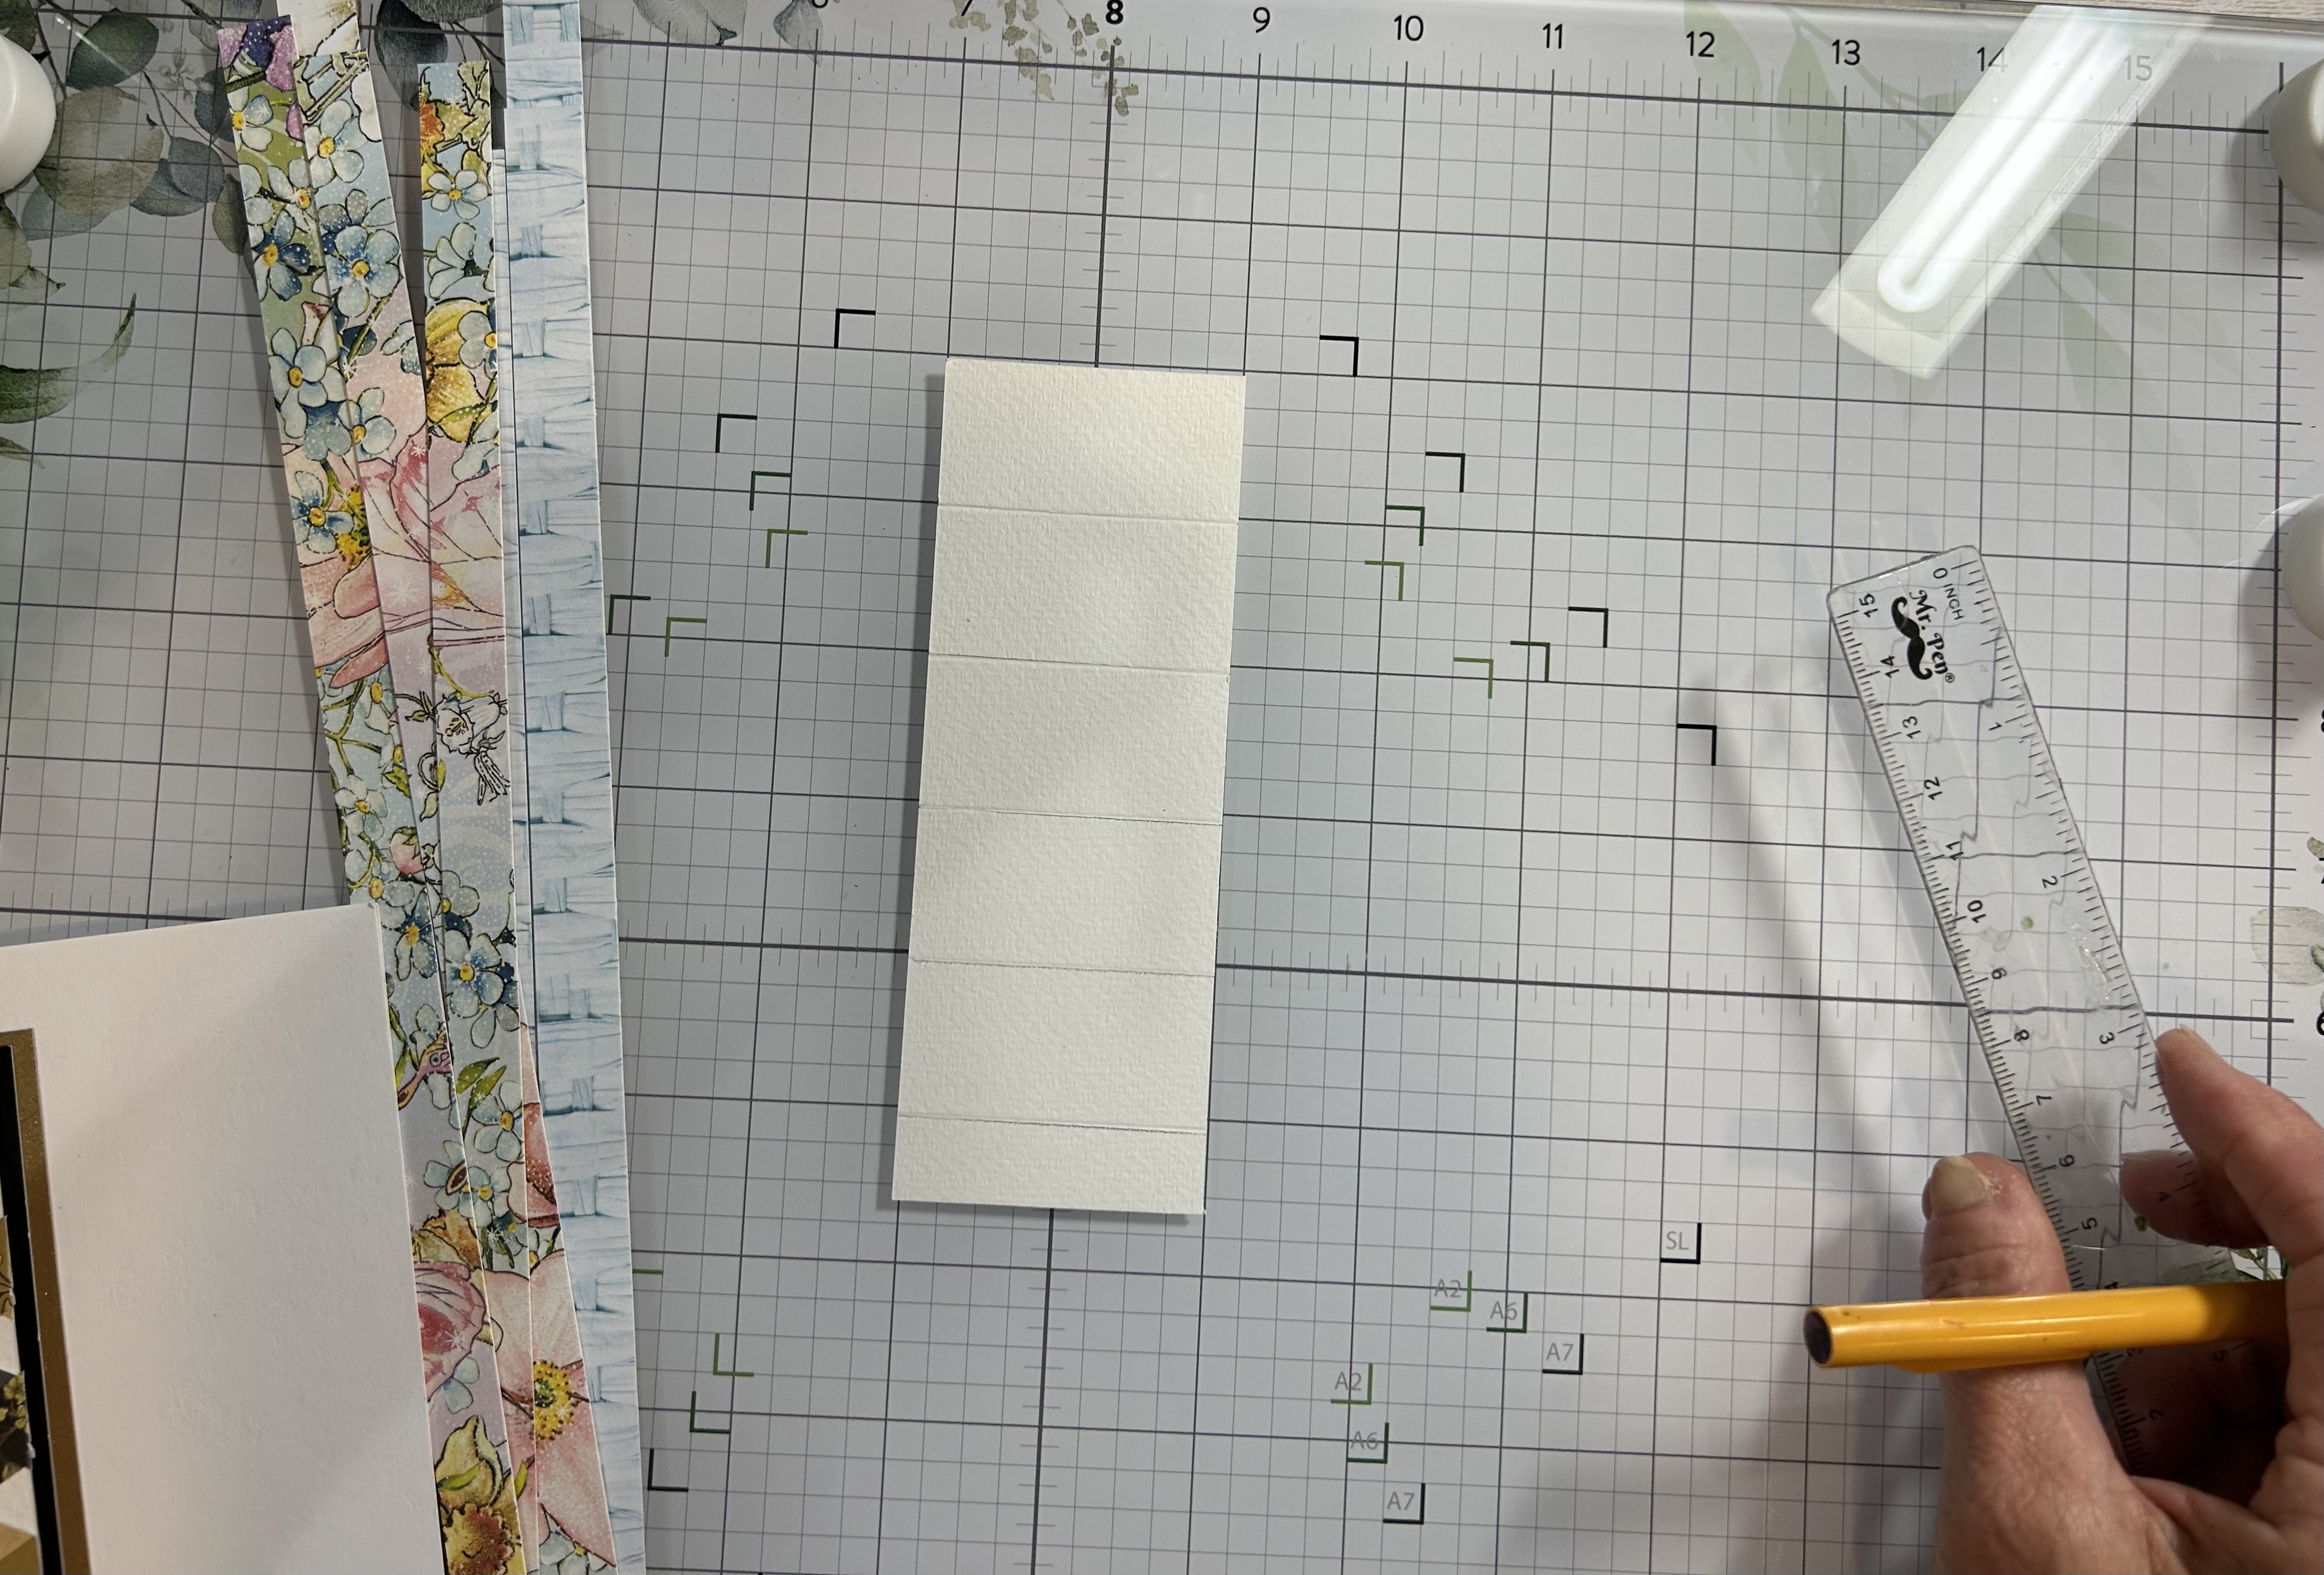
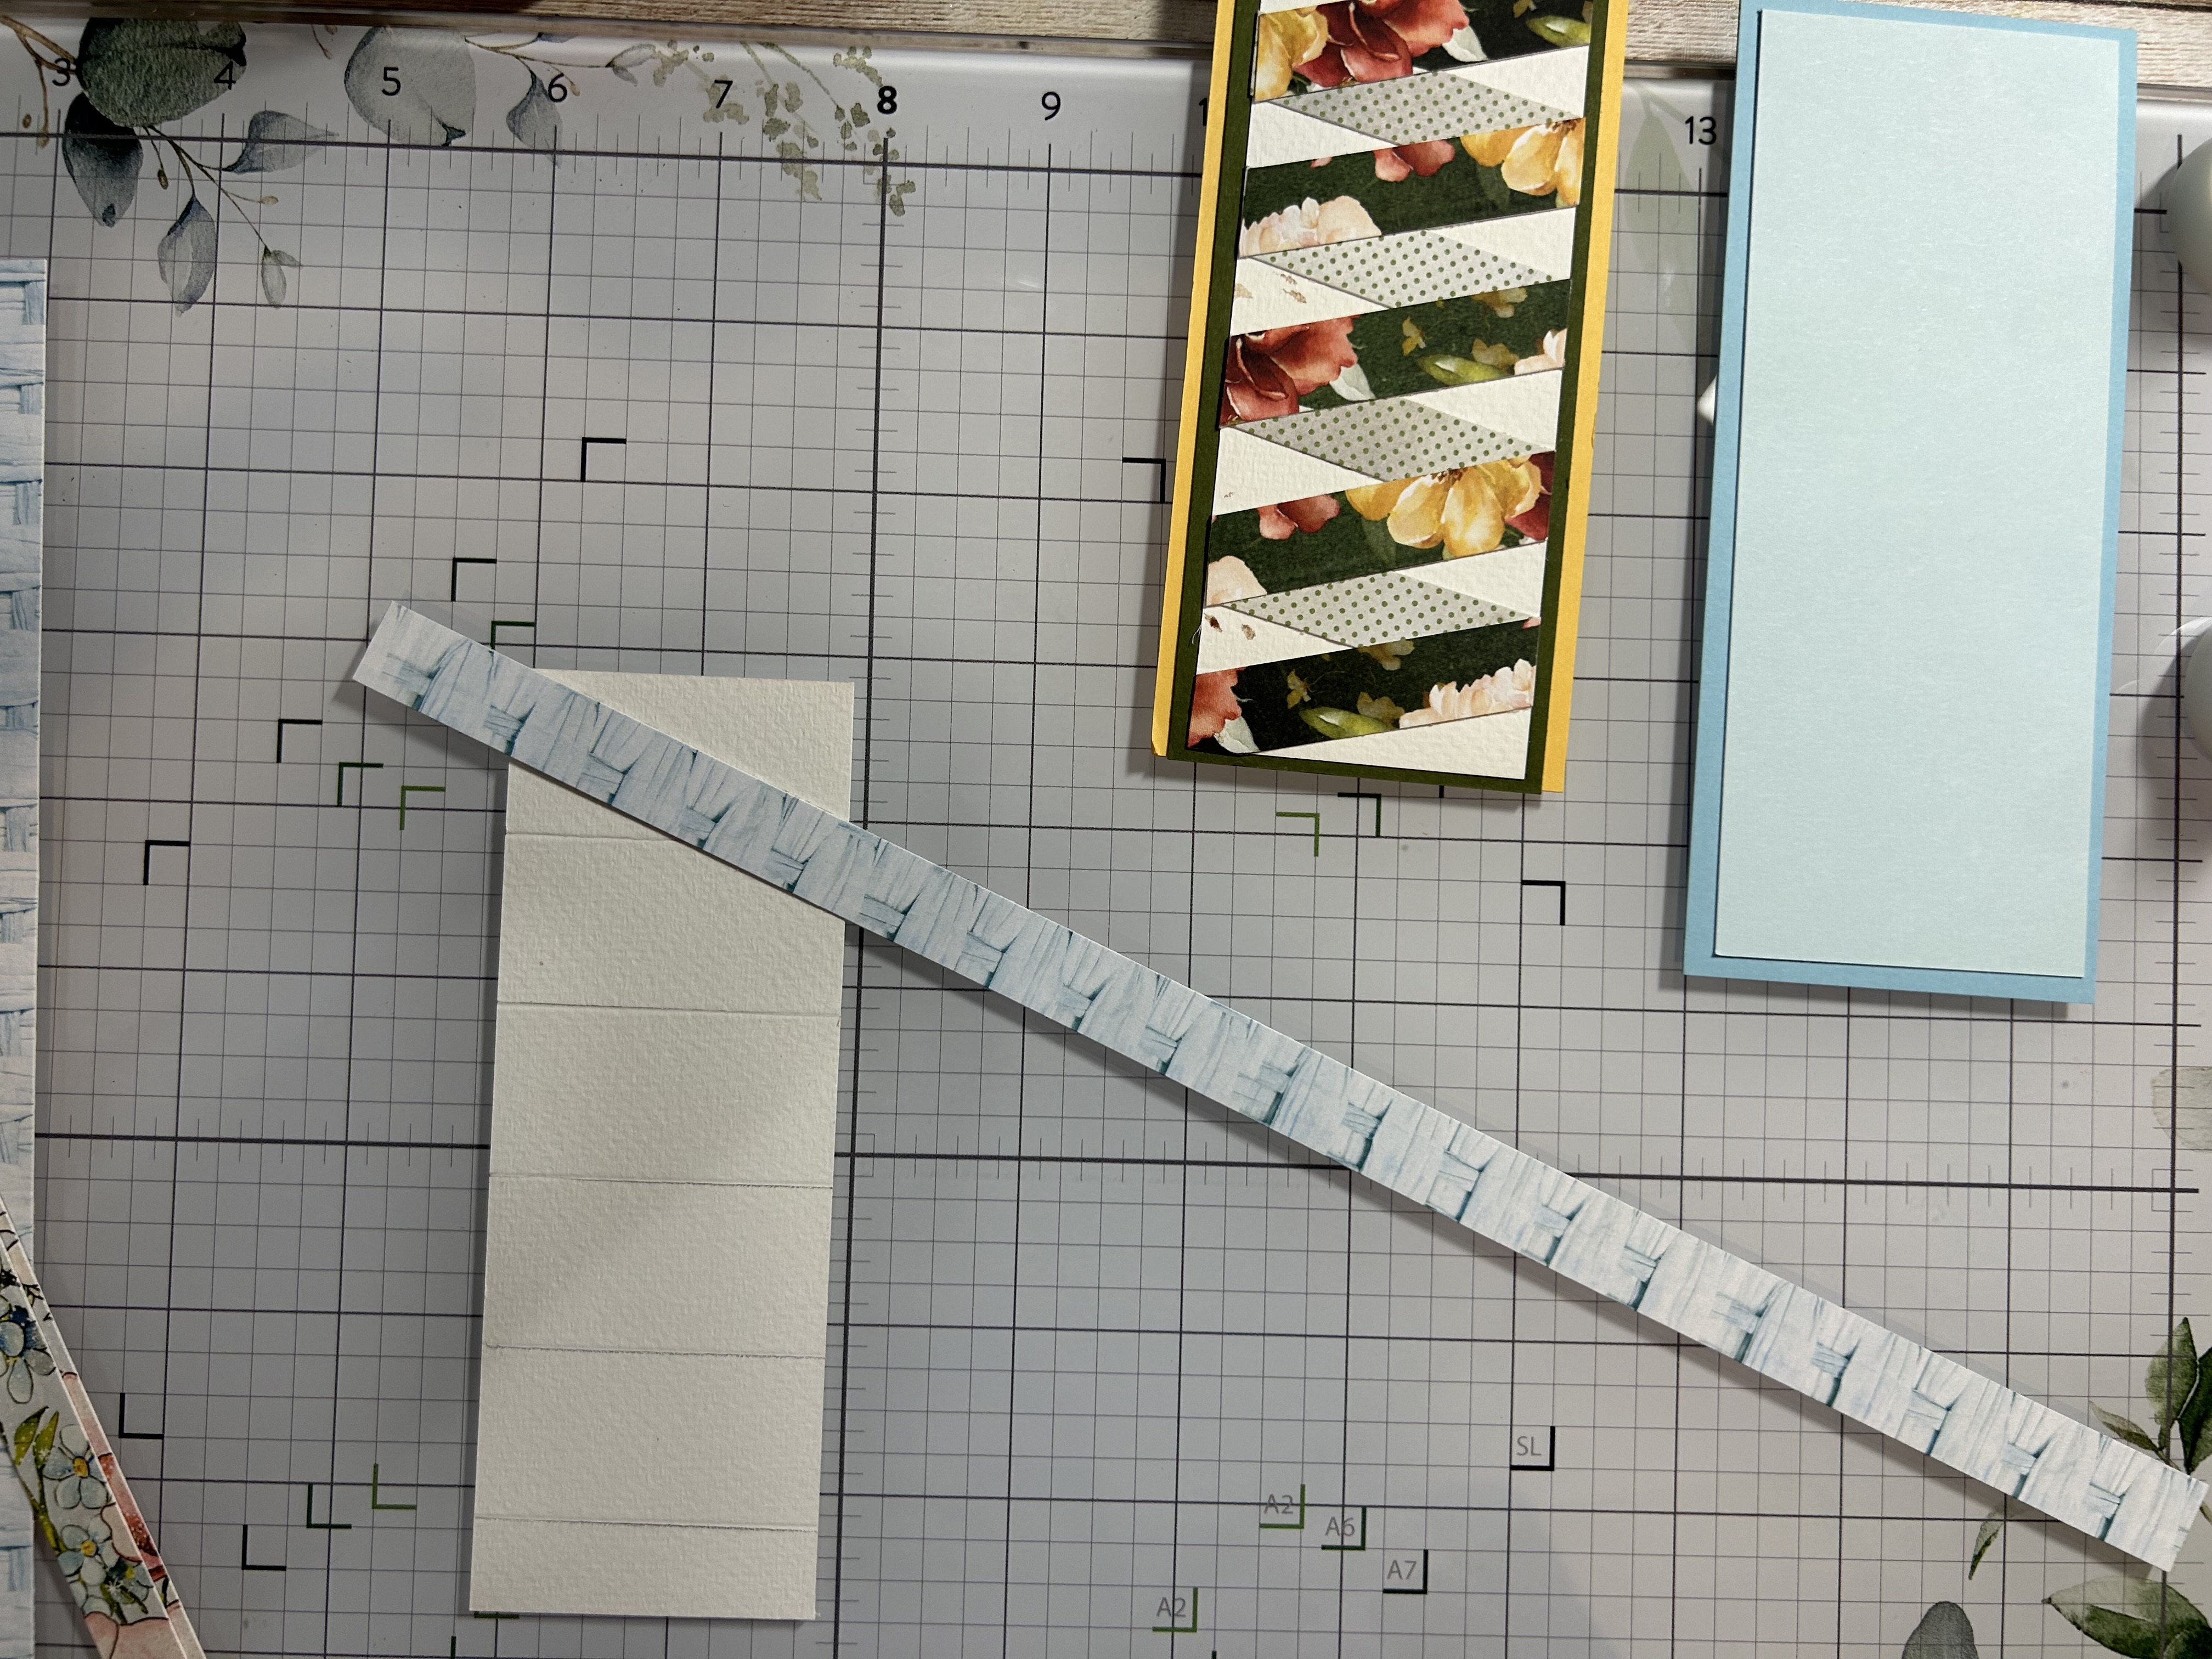
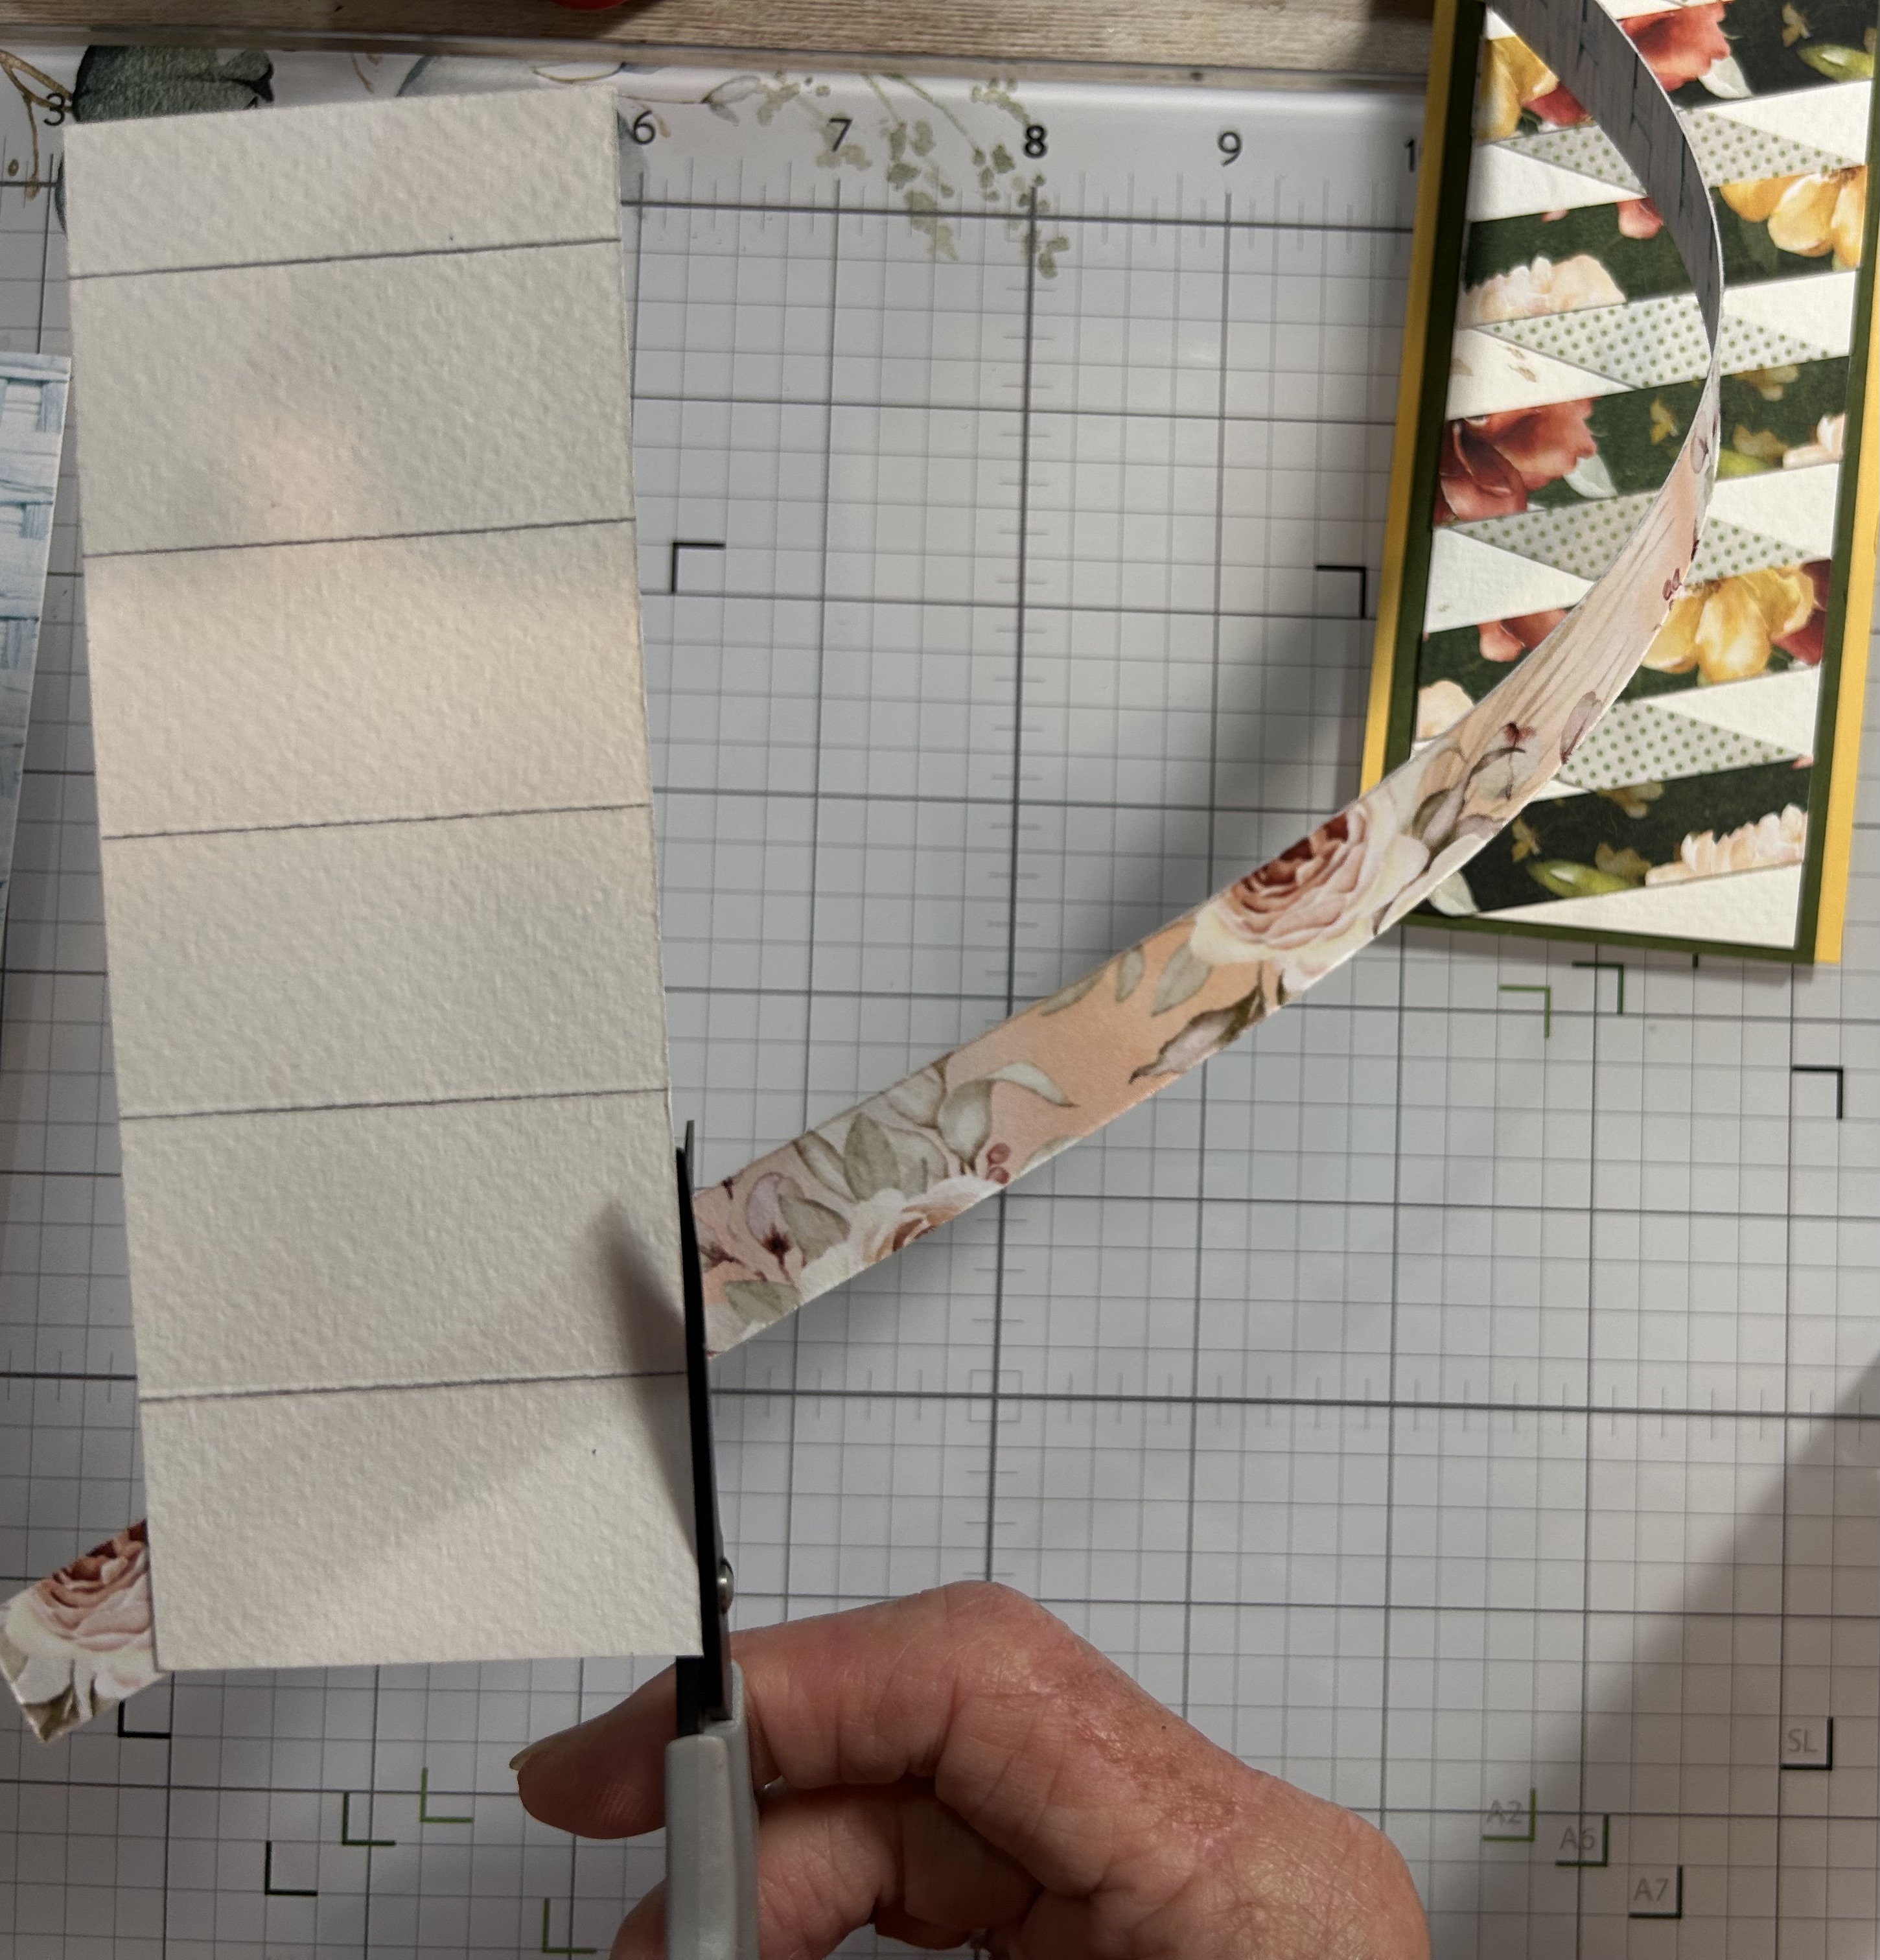
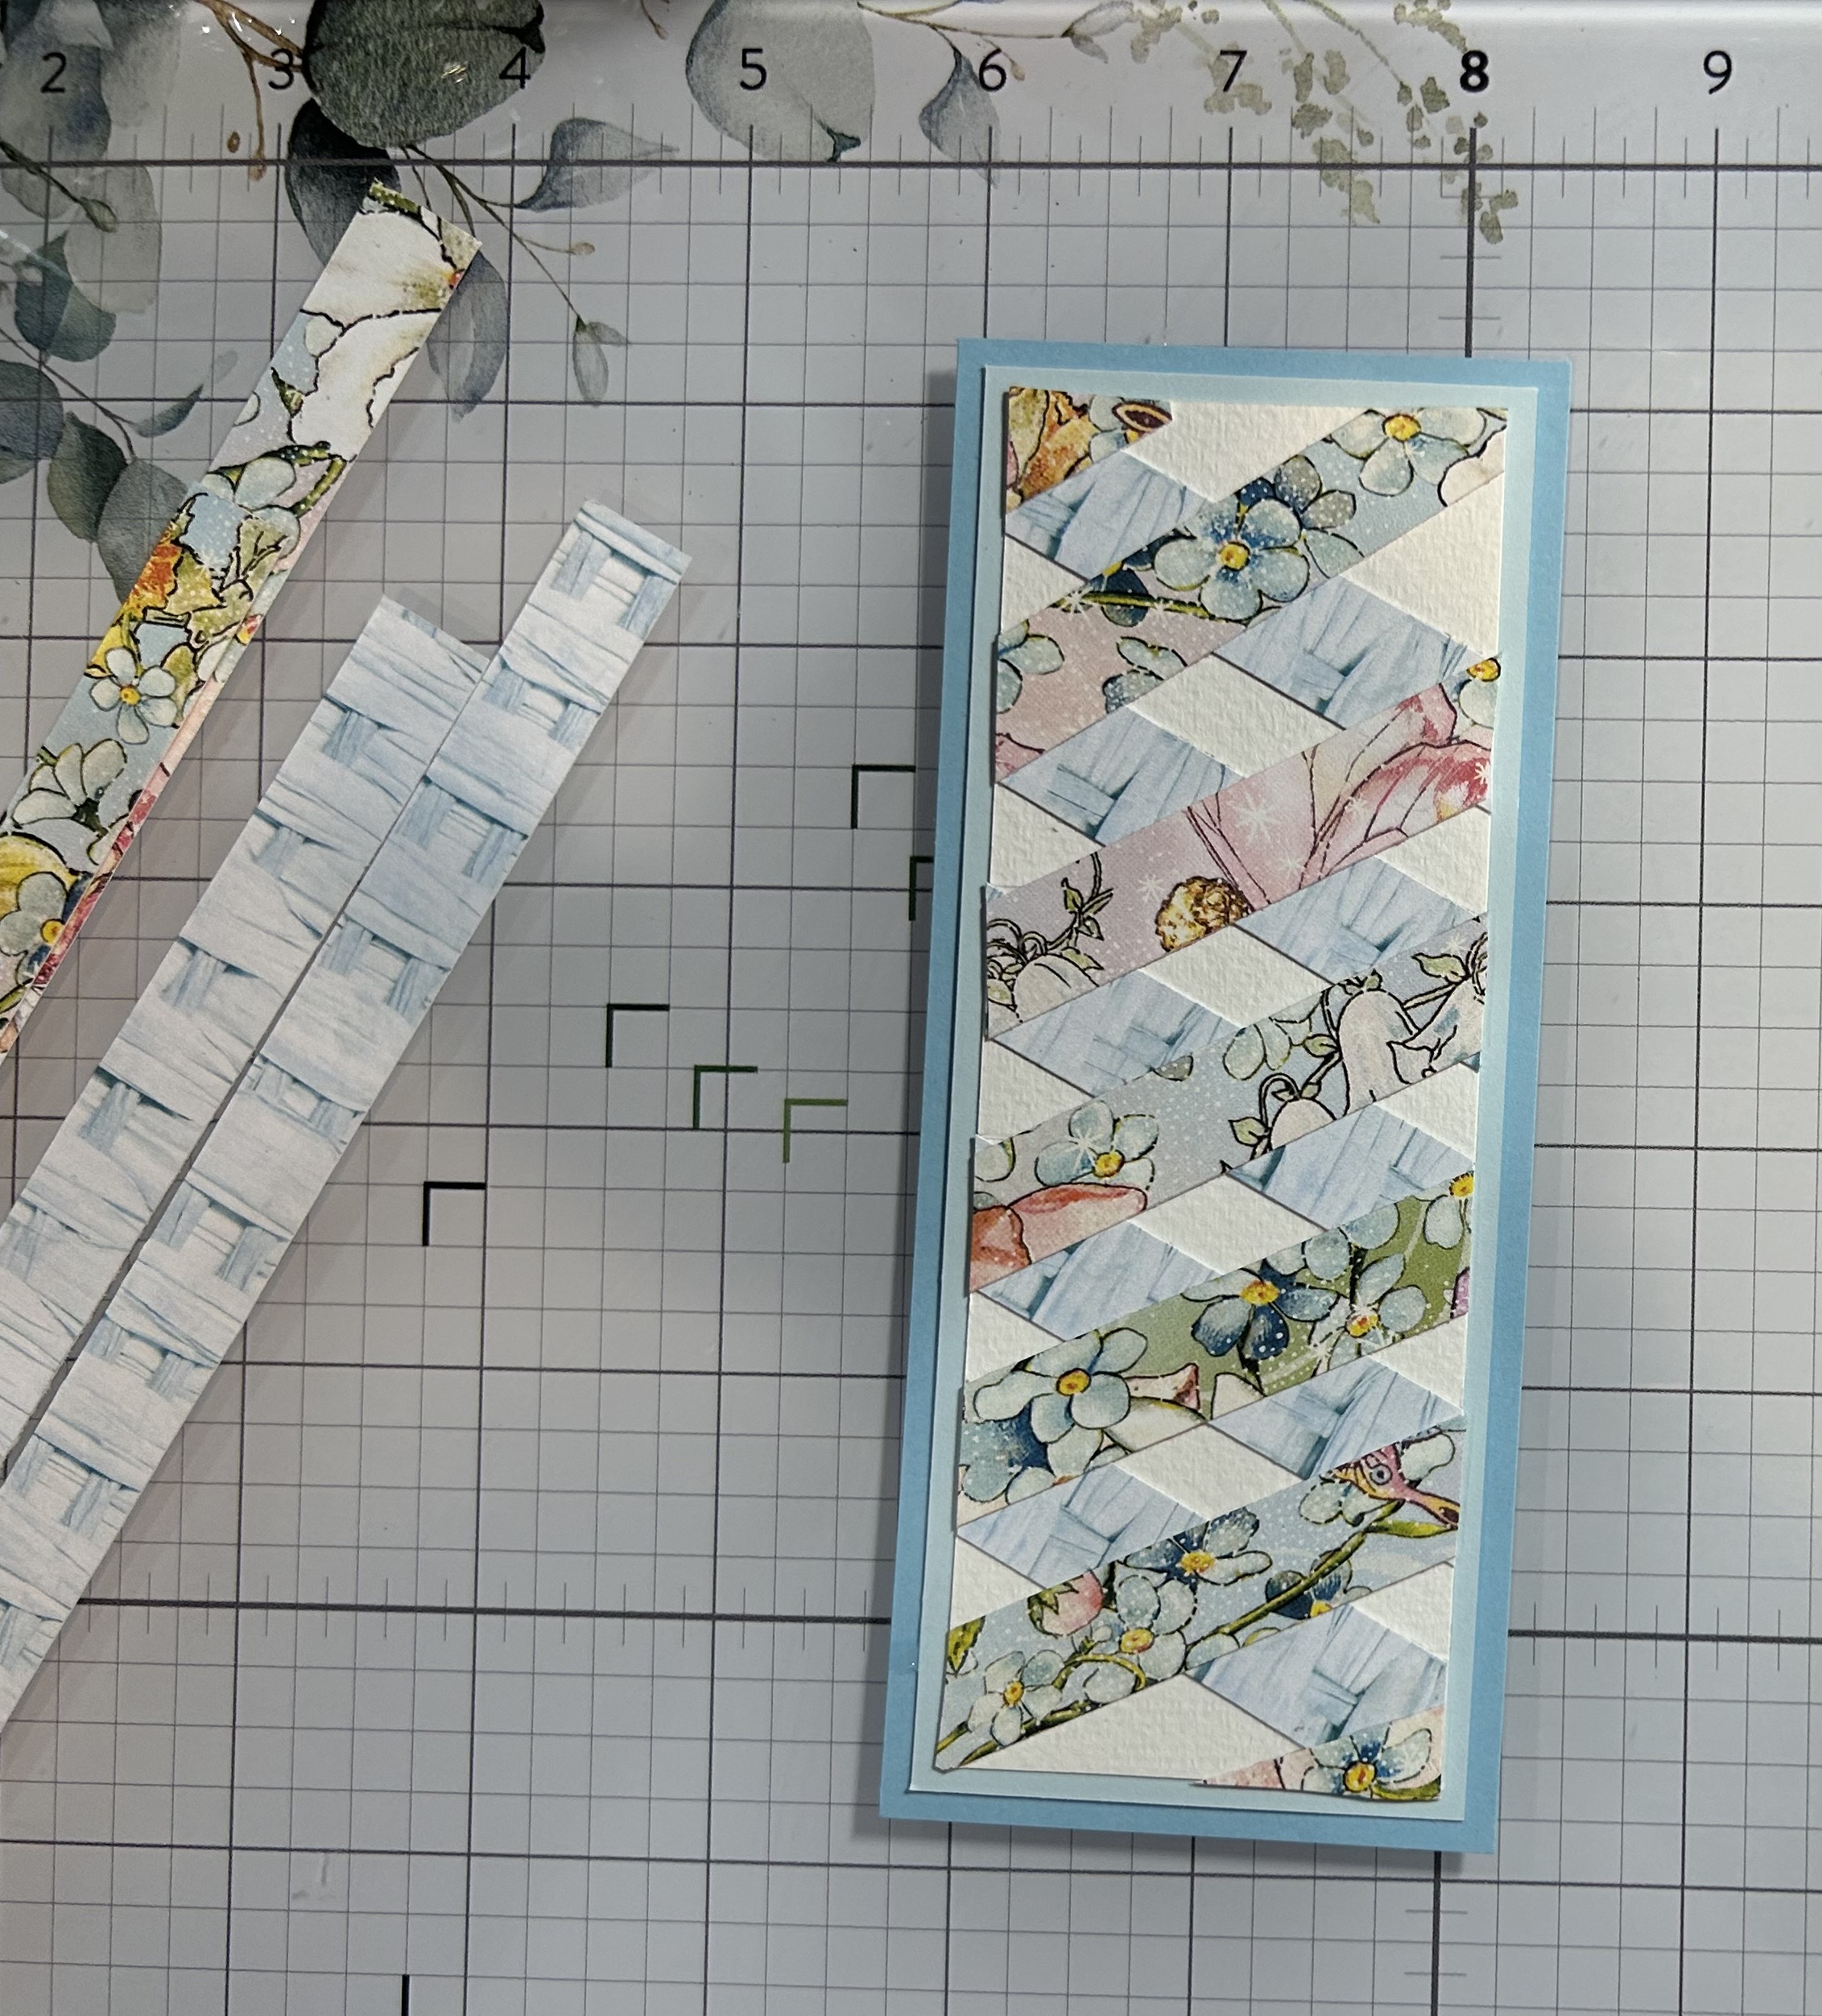
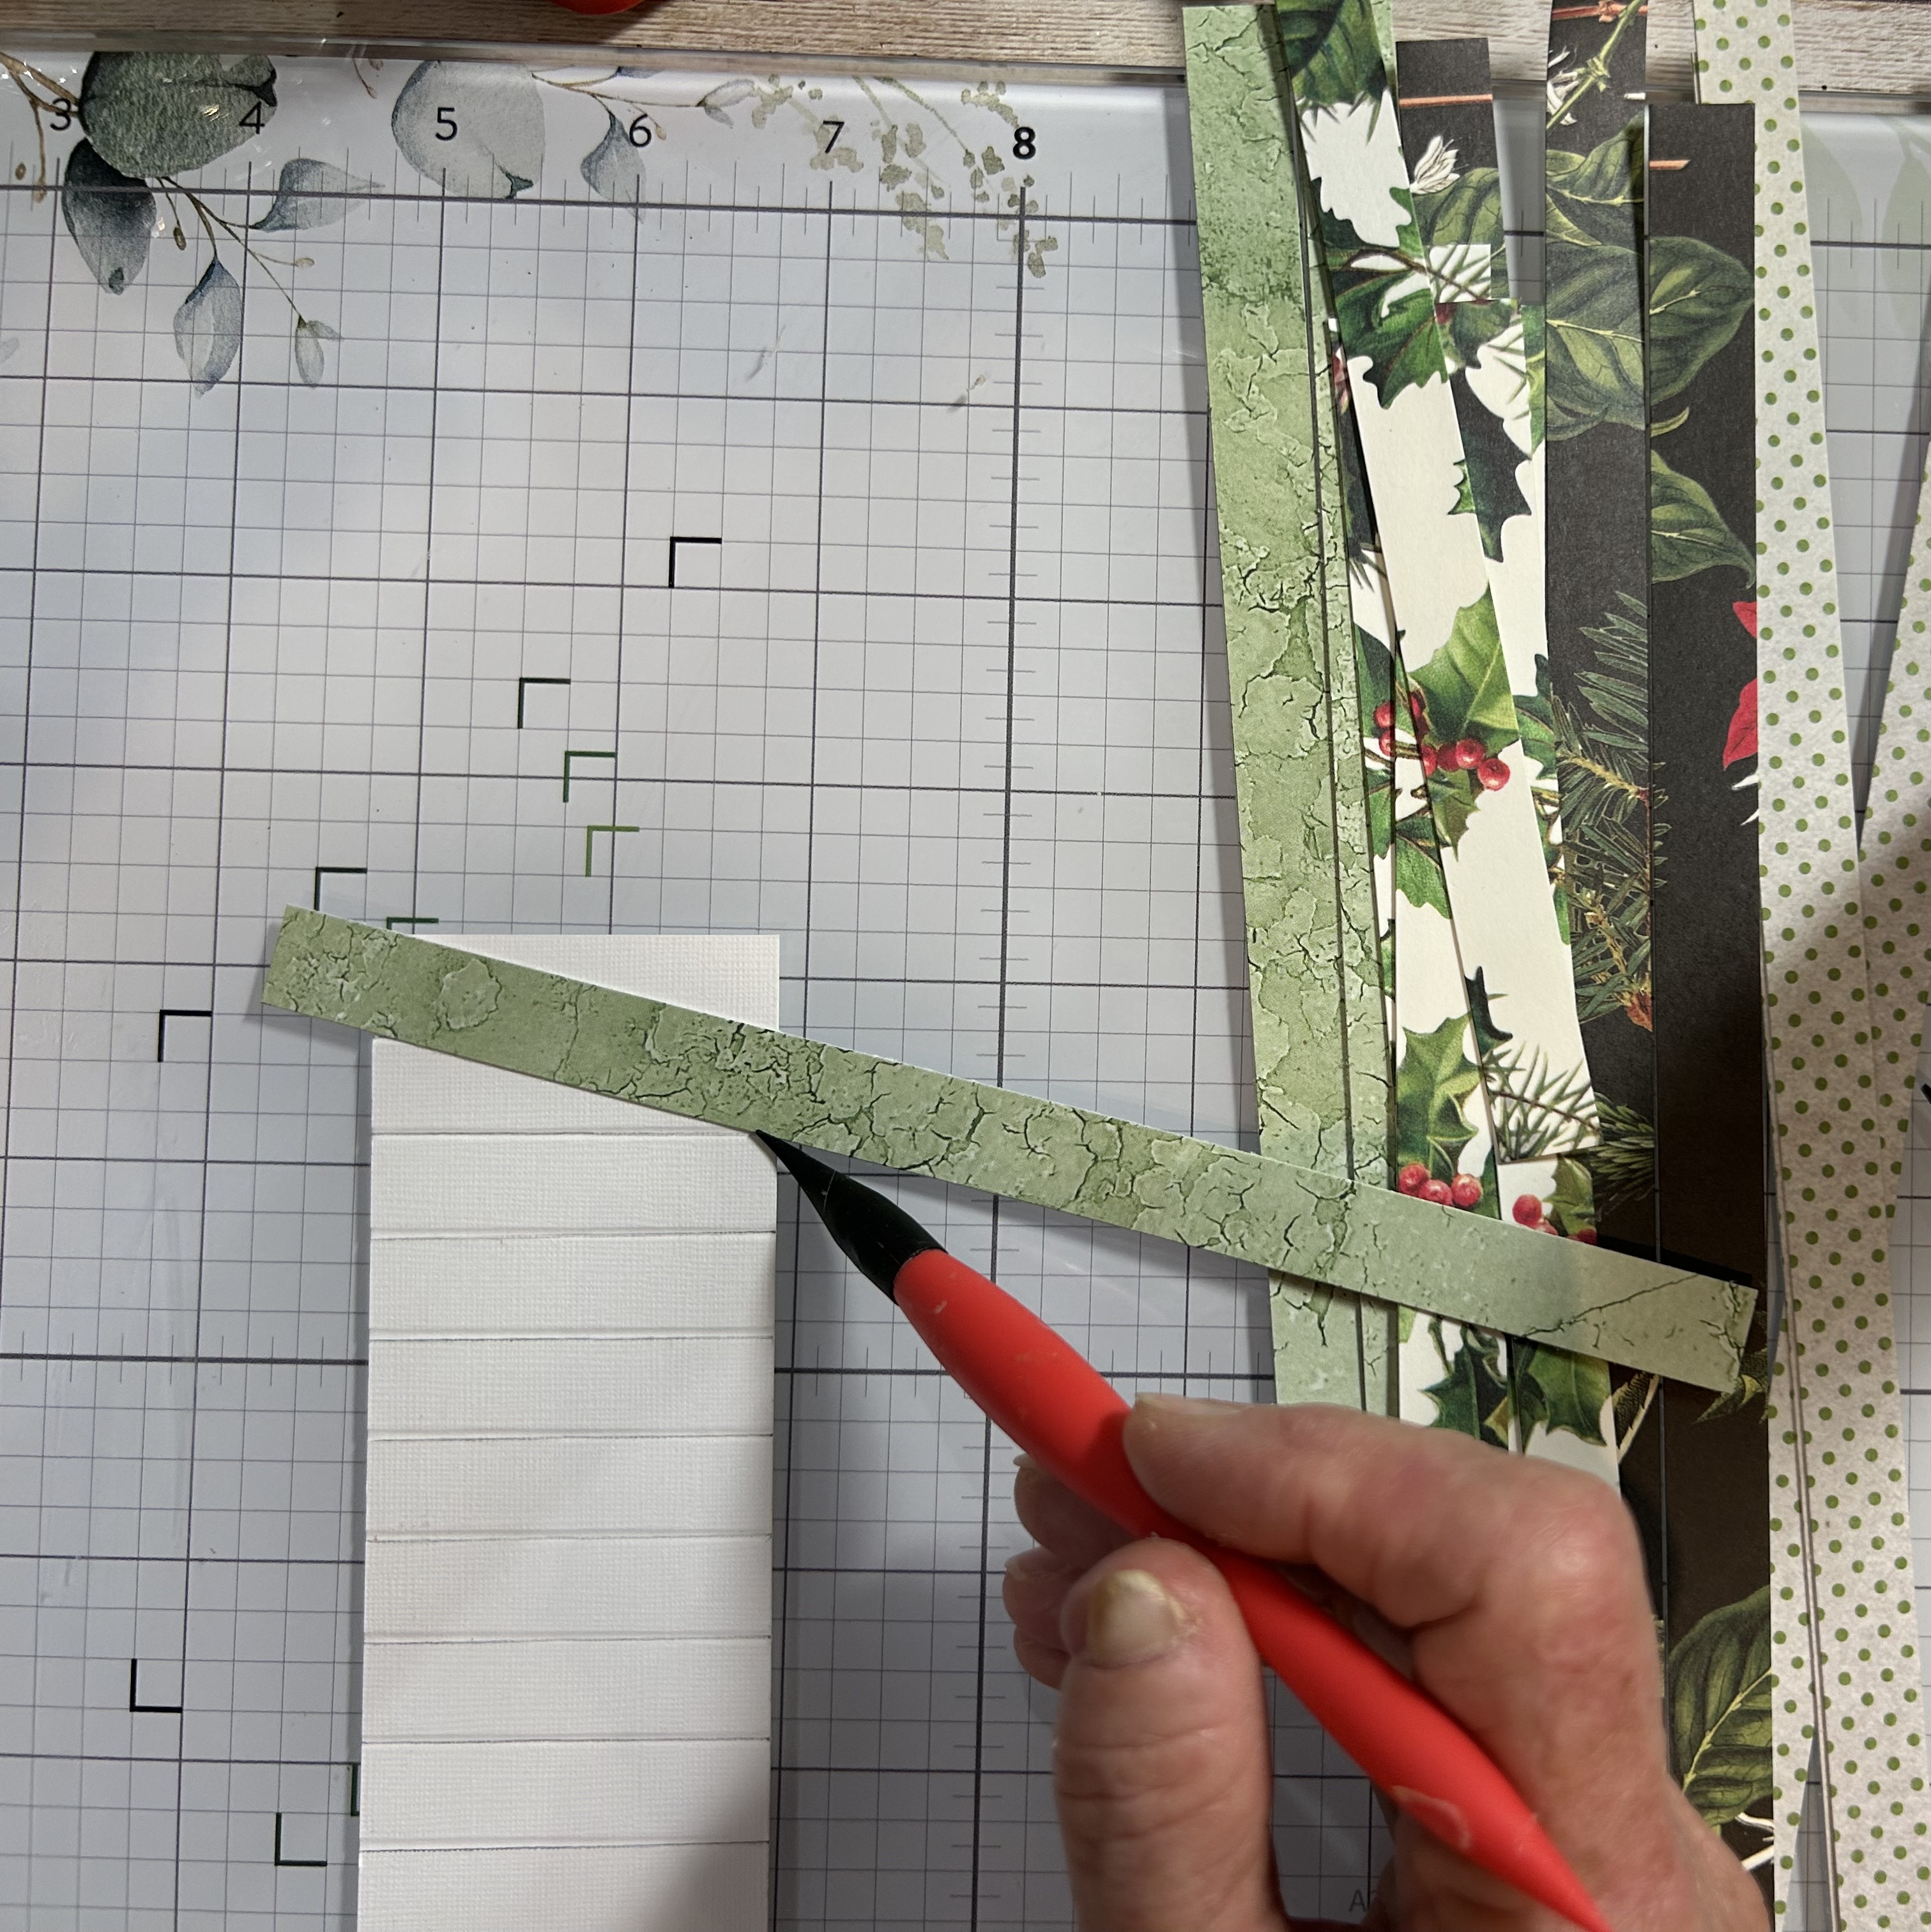
I’ve always got a stash of scrap papers and I thought this technique of creating paper ribbon panels would be a perfect way to use up some of the beautiful papers I’ve shown on other projects. The one above is a “double” ribbon, which I will show, but will start out with a “single” ribbon panel.
Let’s Get Started
For the Single, I trim a piece of cardstock, 5 1/2″ x 2″ (you can go up to 3″, if you choose). Mark off 1″ spacing with a pencil. You will have 1/2″ left at the bottom.
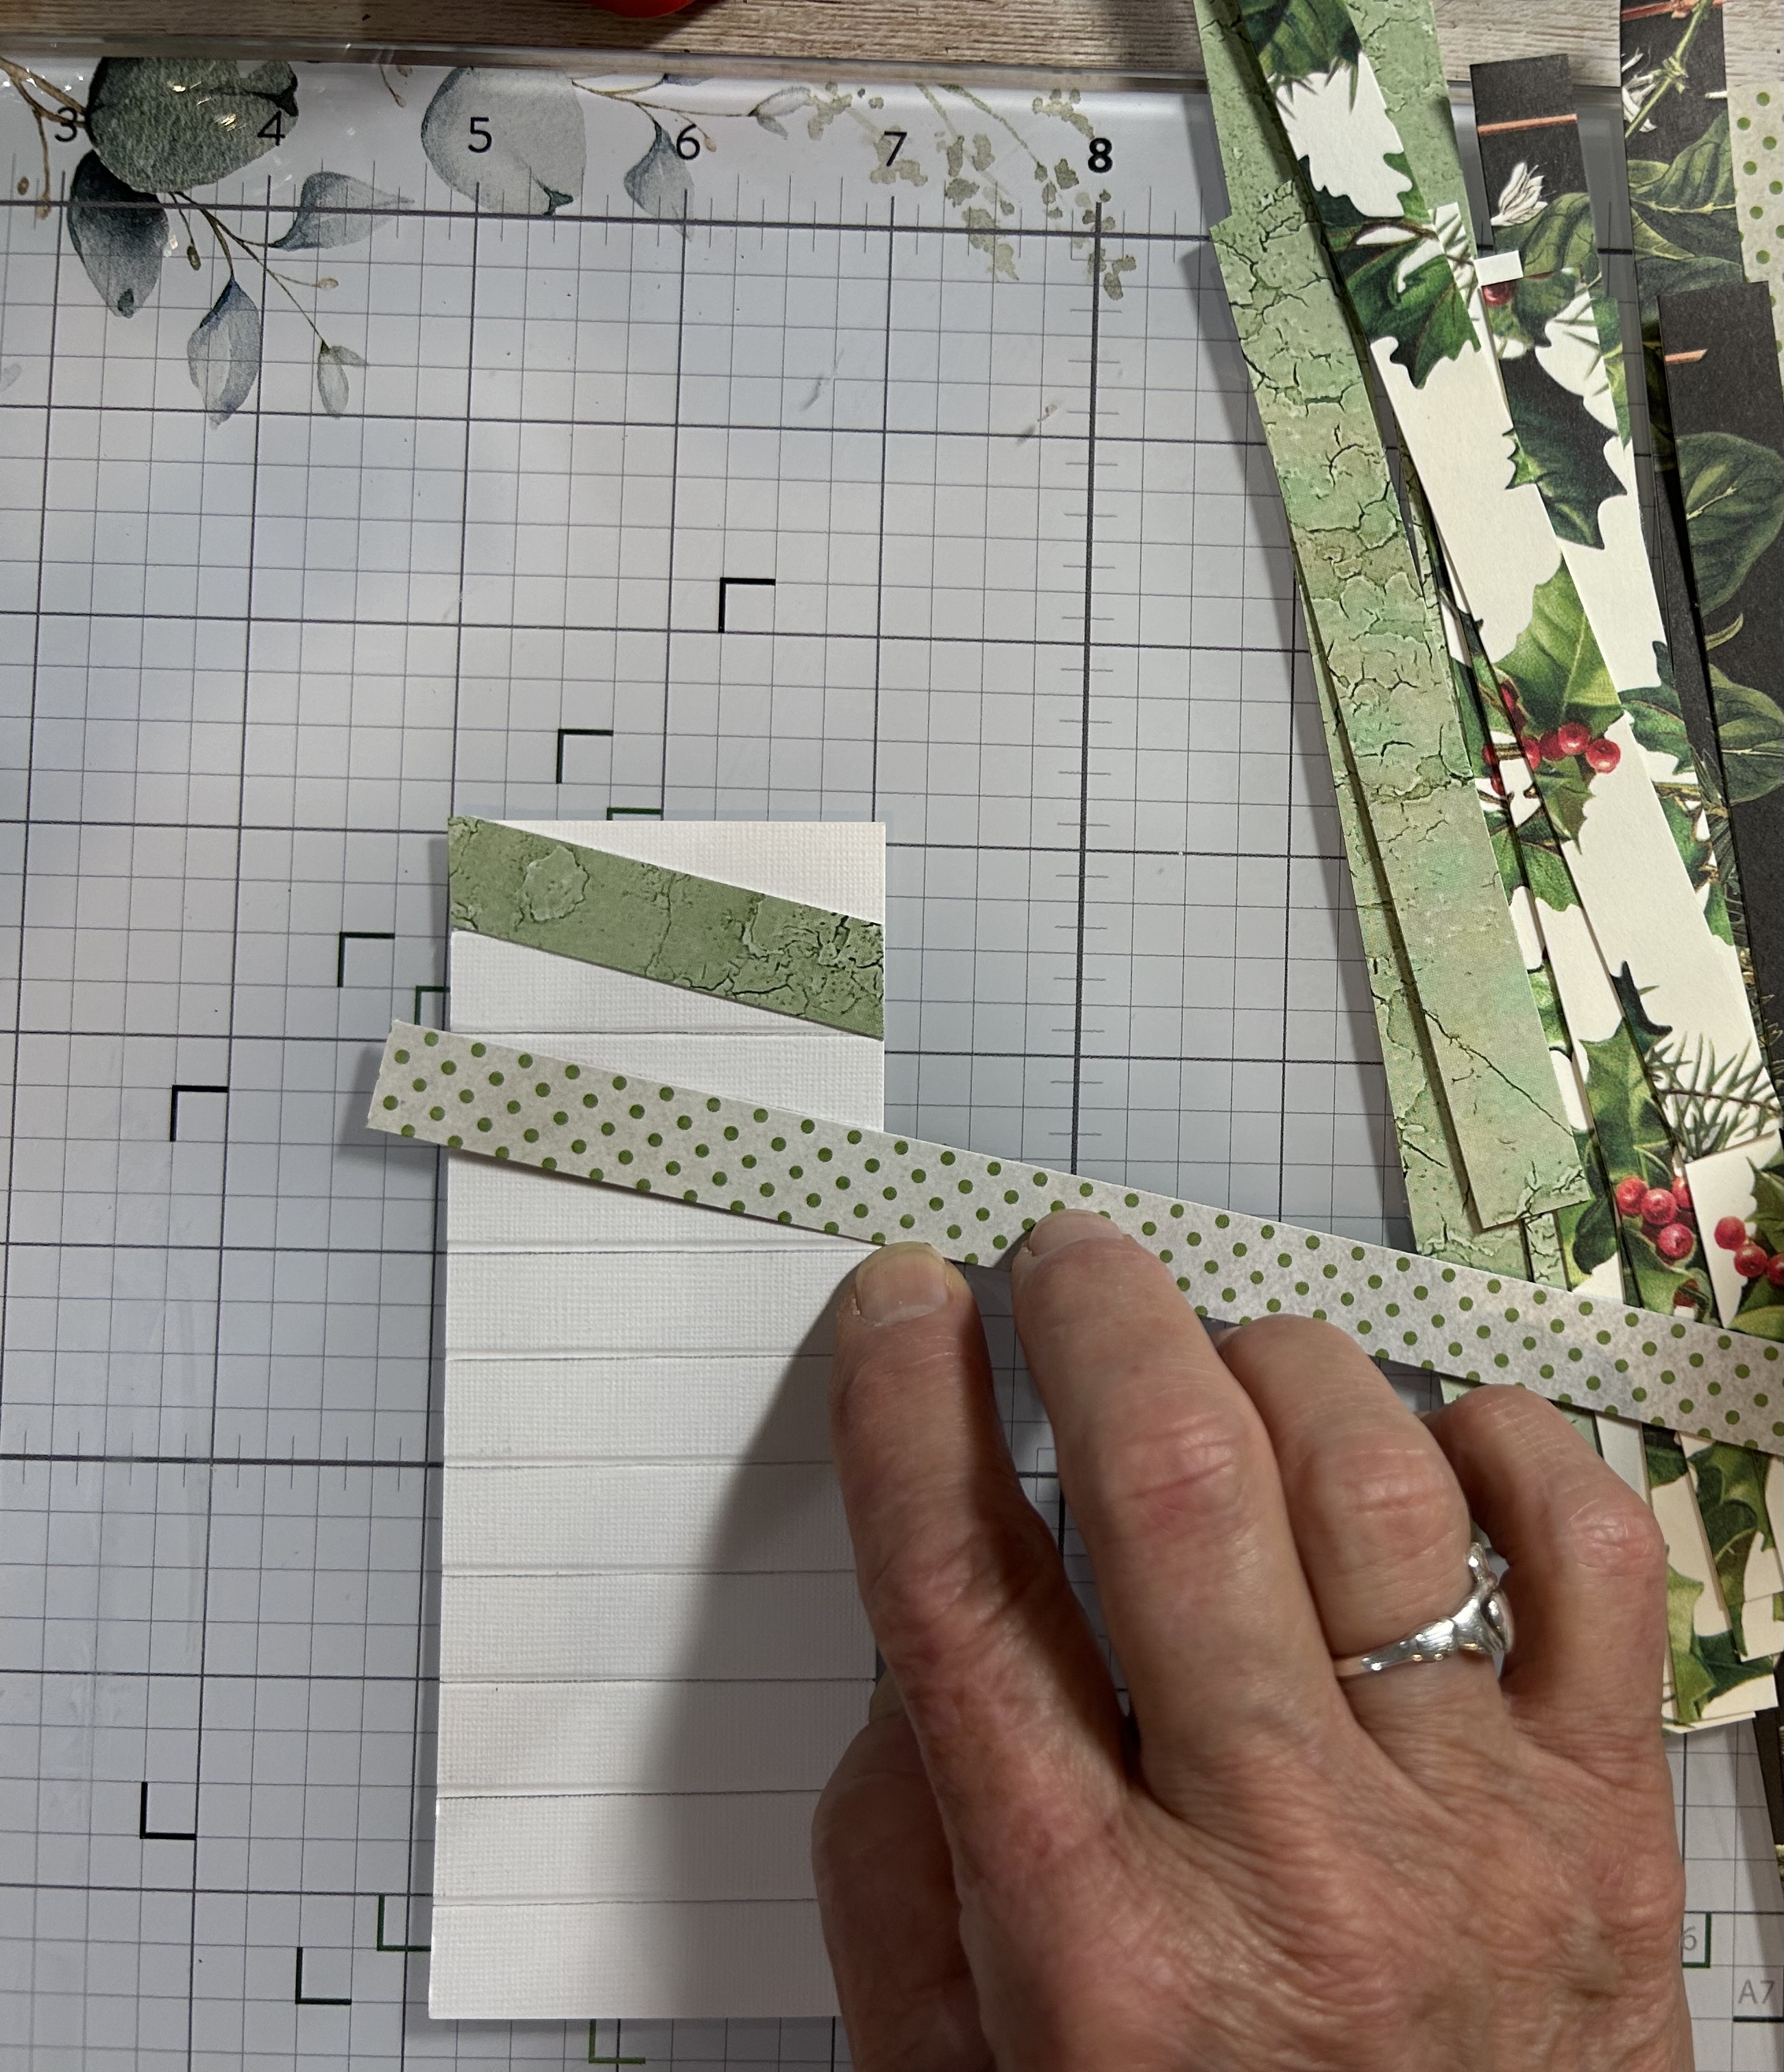
Choose your scraps–I used a pattern piece and one that was more a background piece; trim them to 1/2″ wide. Starting at the top, with the background piece, I glue this piece from the left corner, above the first 1-inch mark to the right hand, just below the 1-inch mark (as shown).
Glue or tape into place, then turn the panel over and trim off the excess strip(s).
Follow down the panel repeating this positioning.
Next, starting with your patterned paper, lay the first strip with the bottom touching the right corner and lay it across to the left side of the second background strip as shown above. Glue this down, turn it over and trim. Continue adding patterned strips coming down the panel.
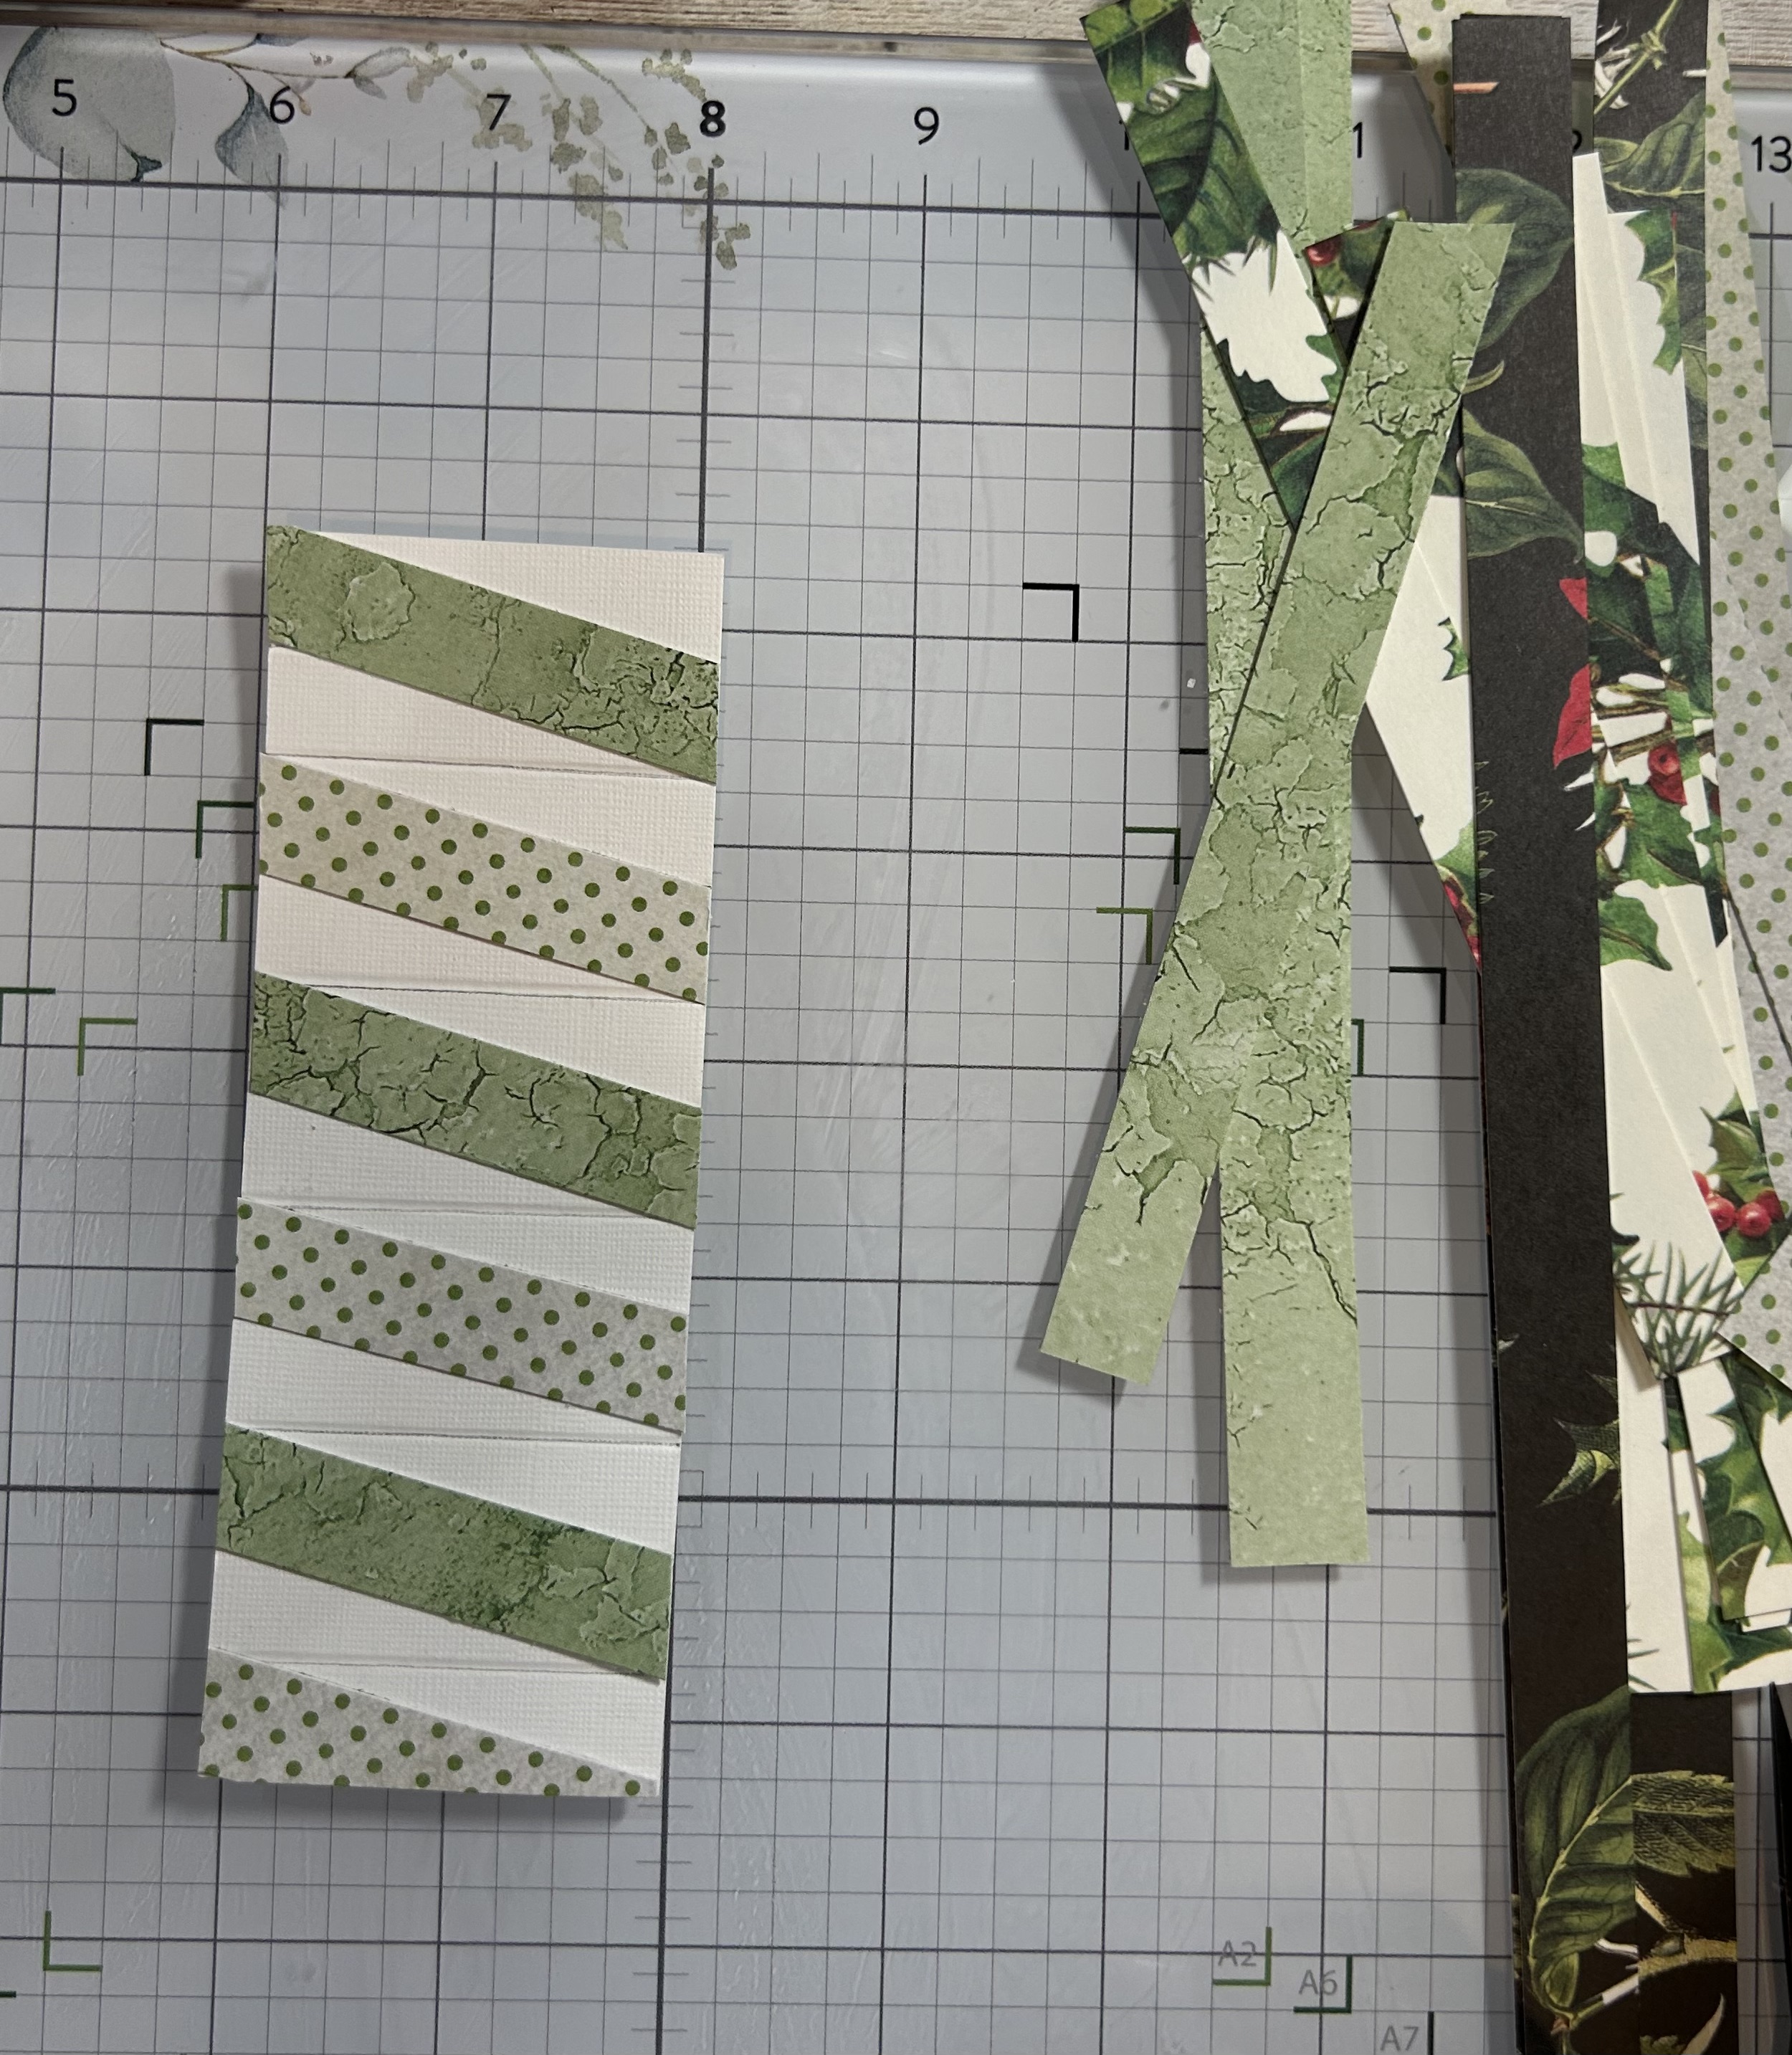
Finish off by spacing any small strips as I have done at the top and bottom, keeping to the spacing.
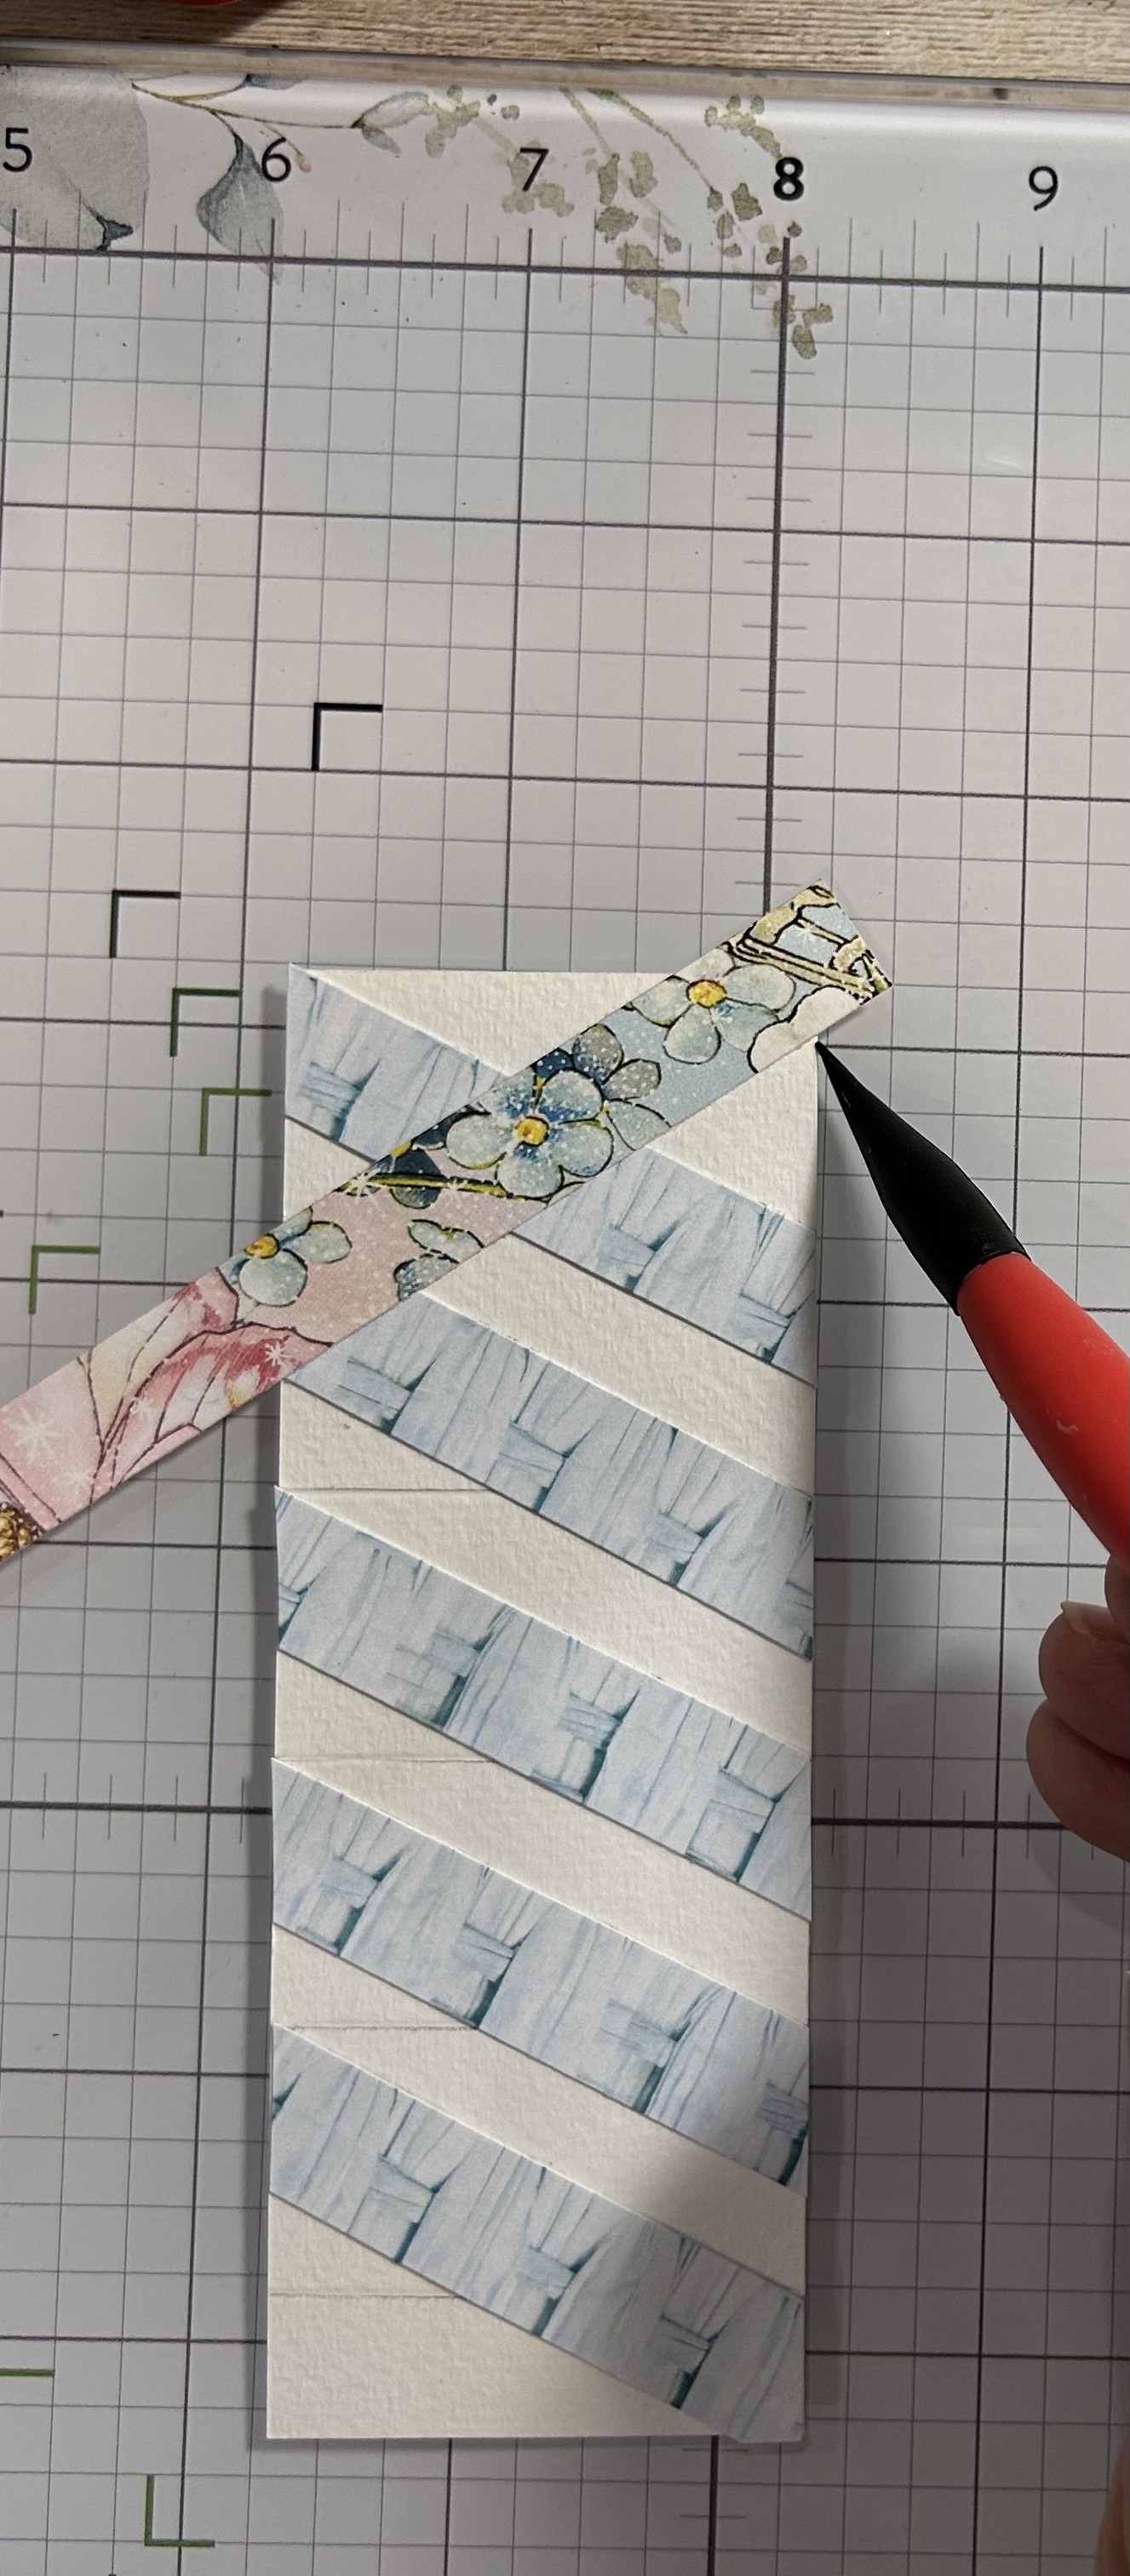
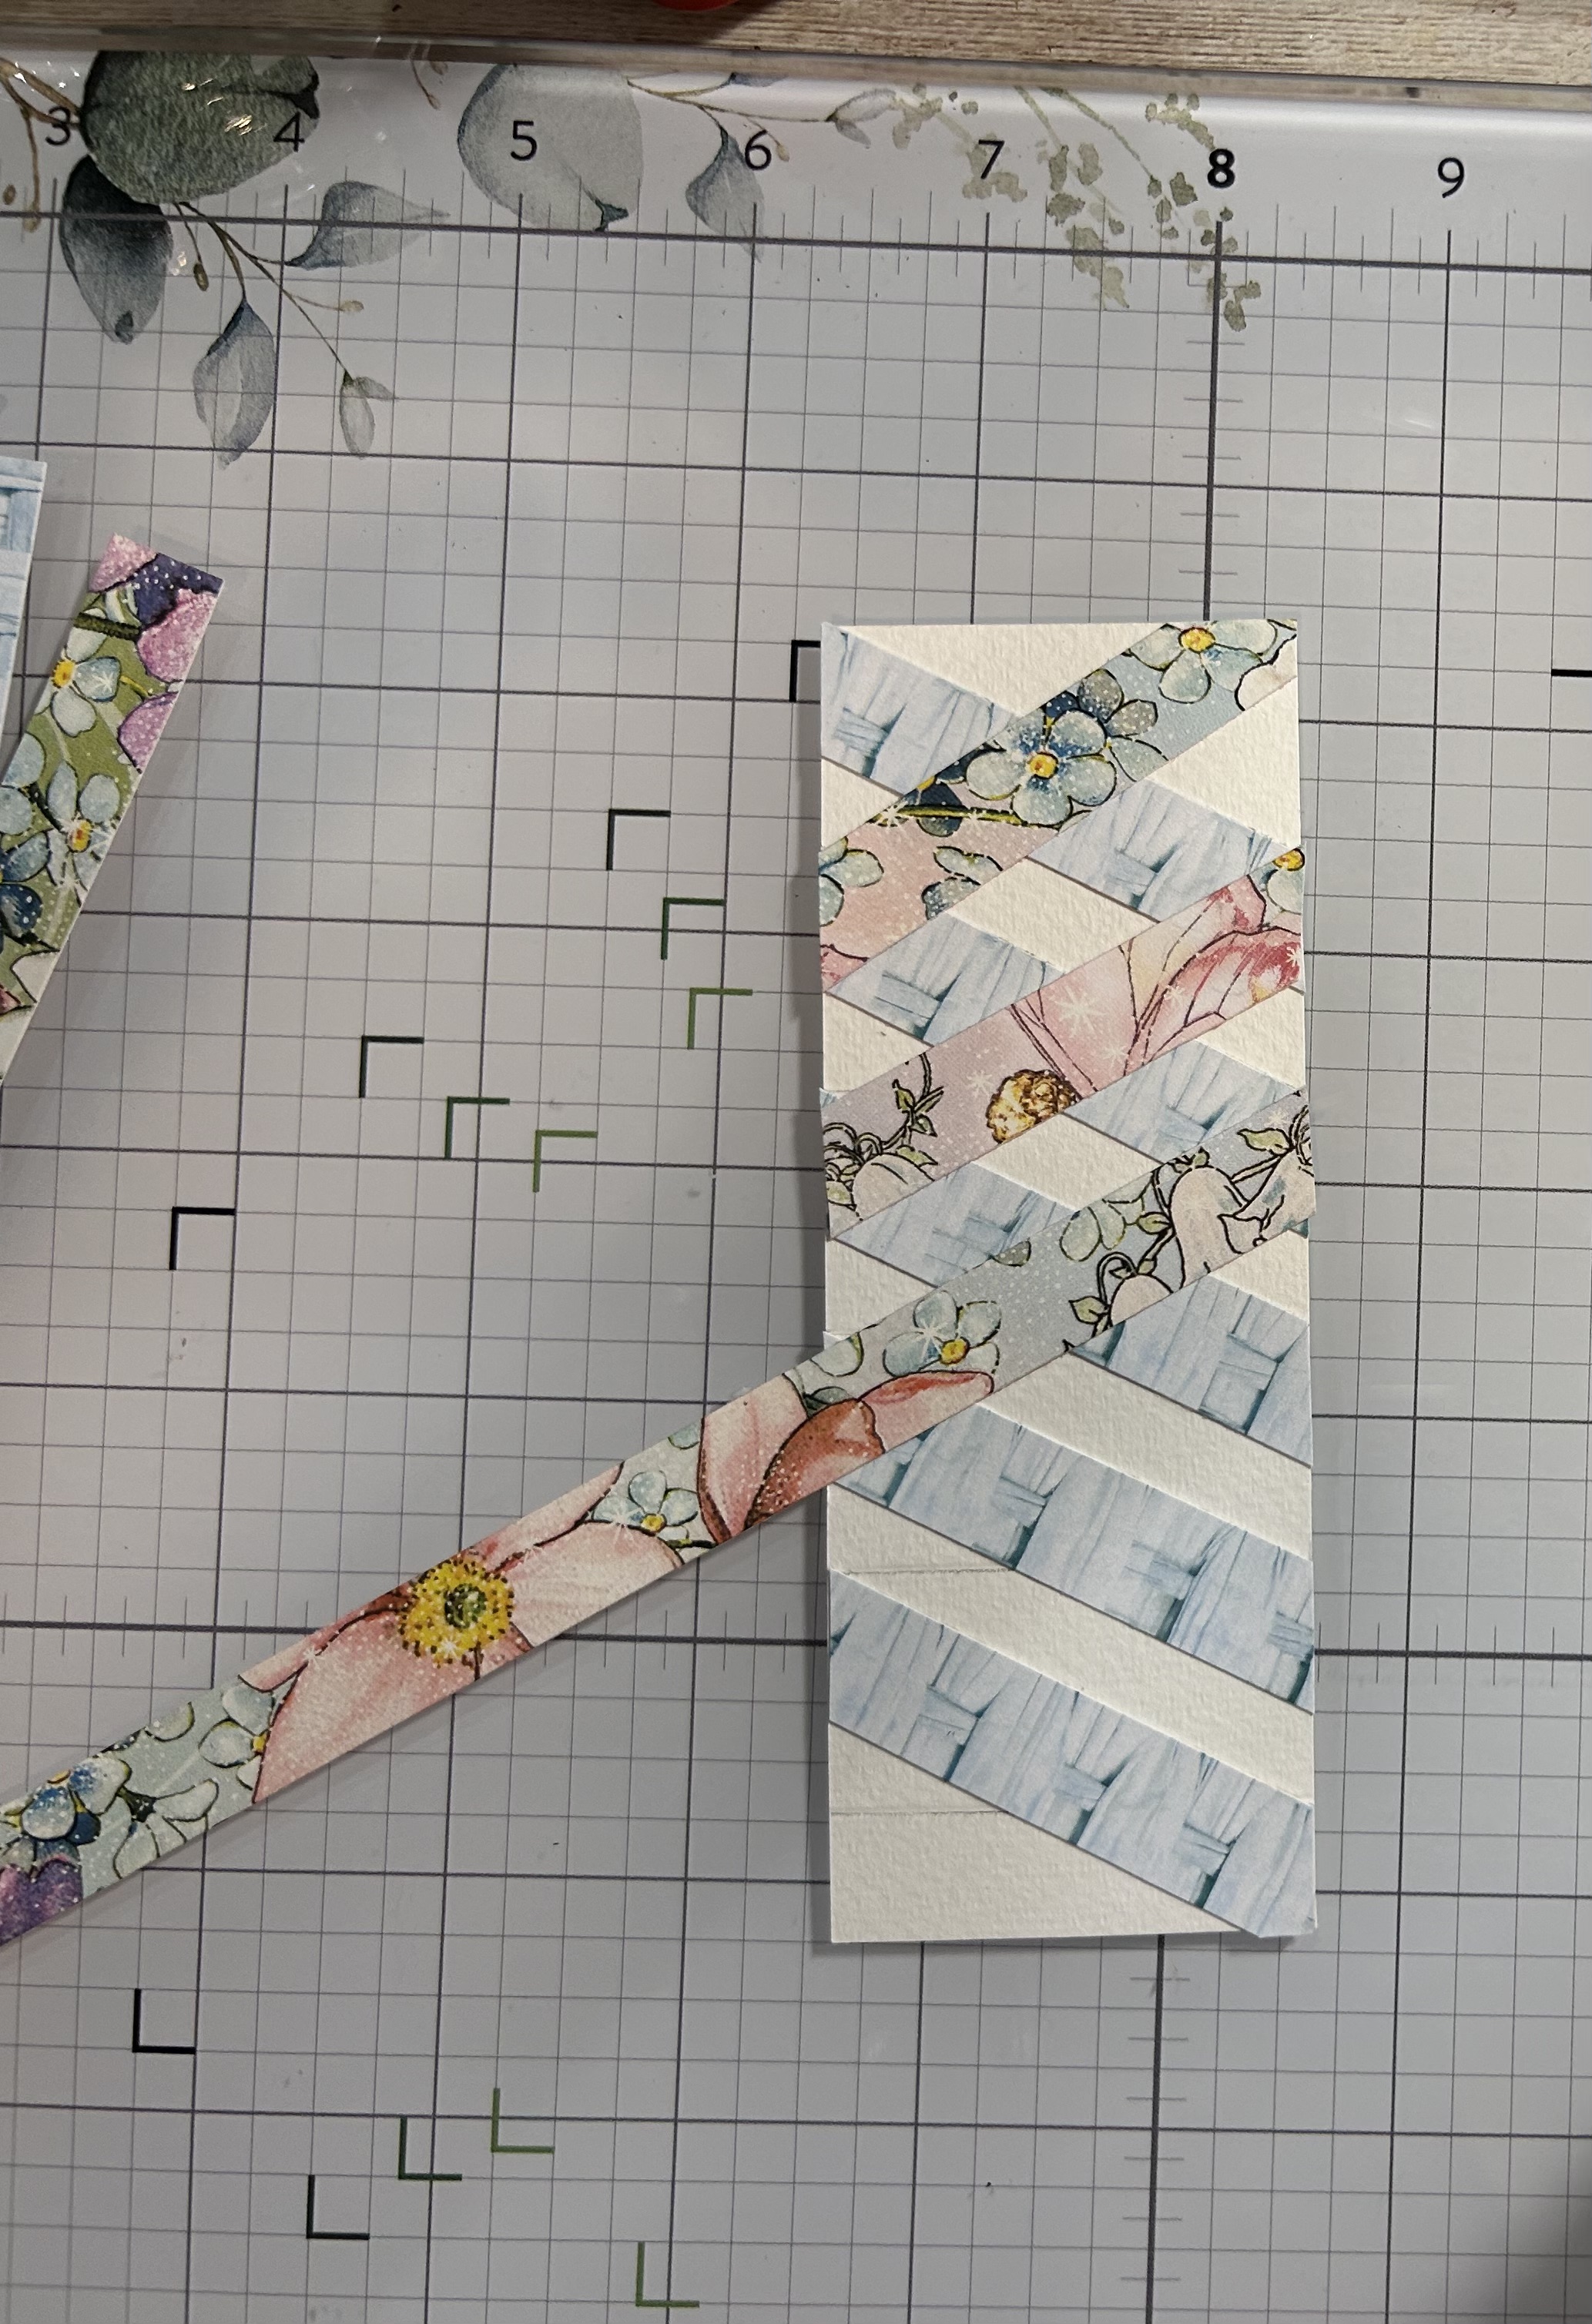
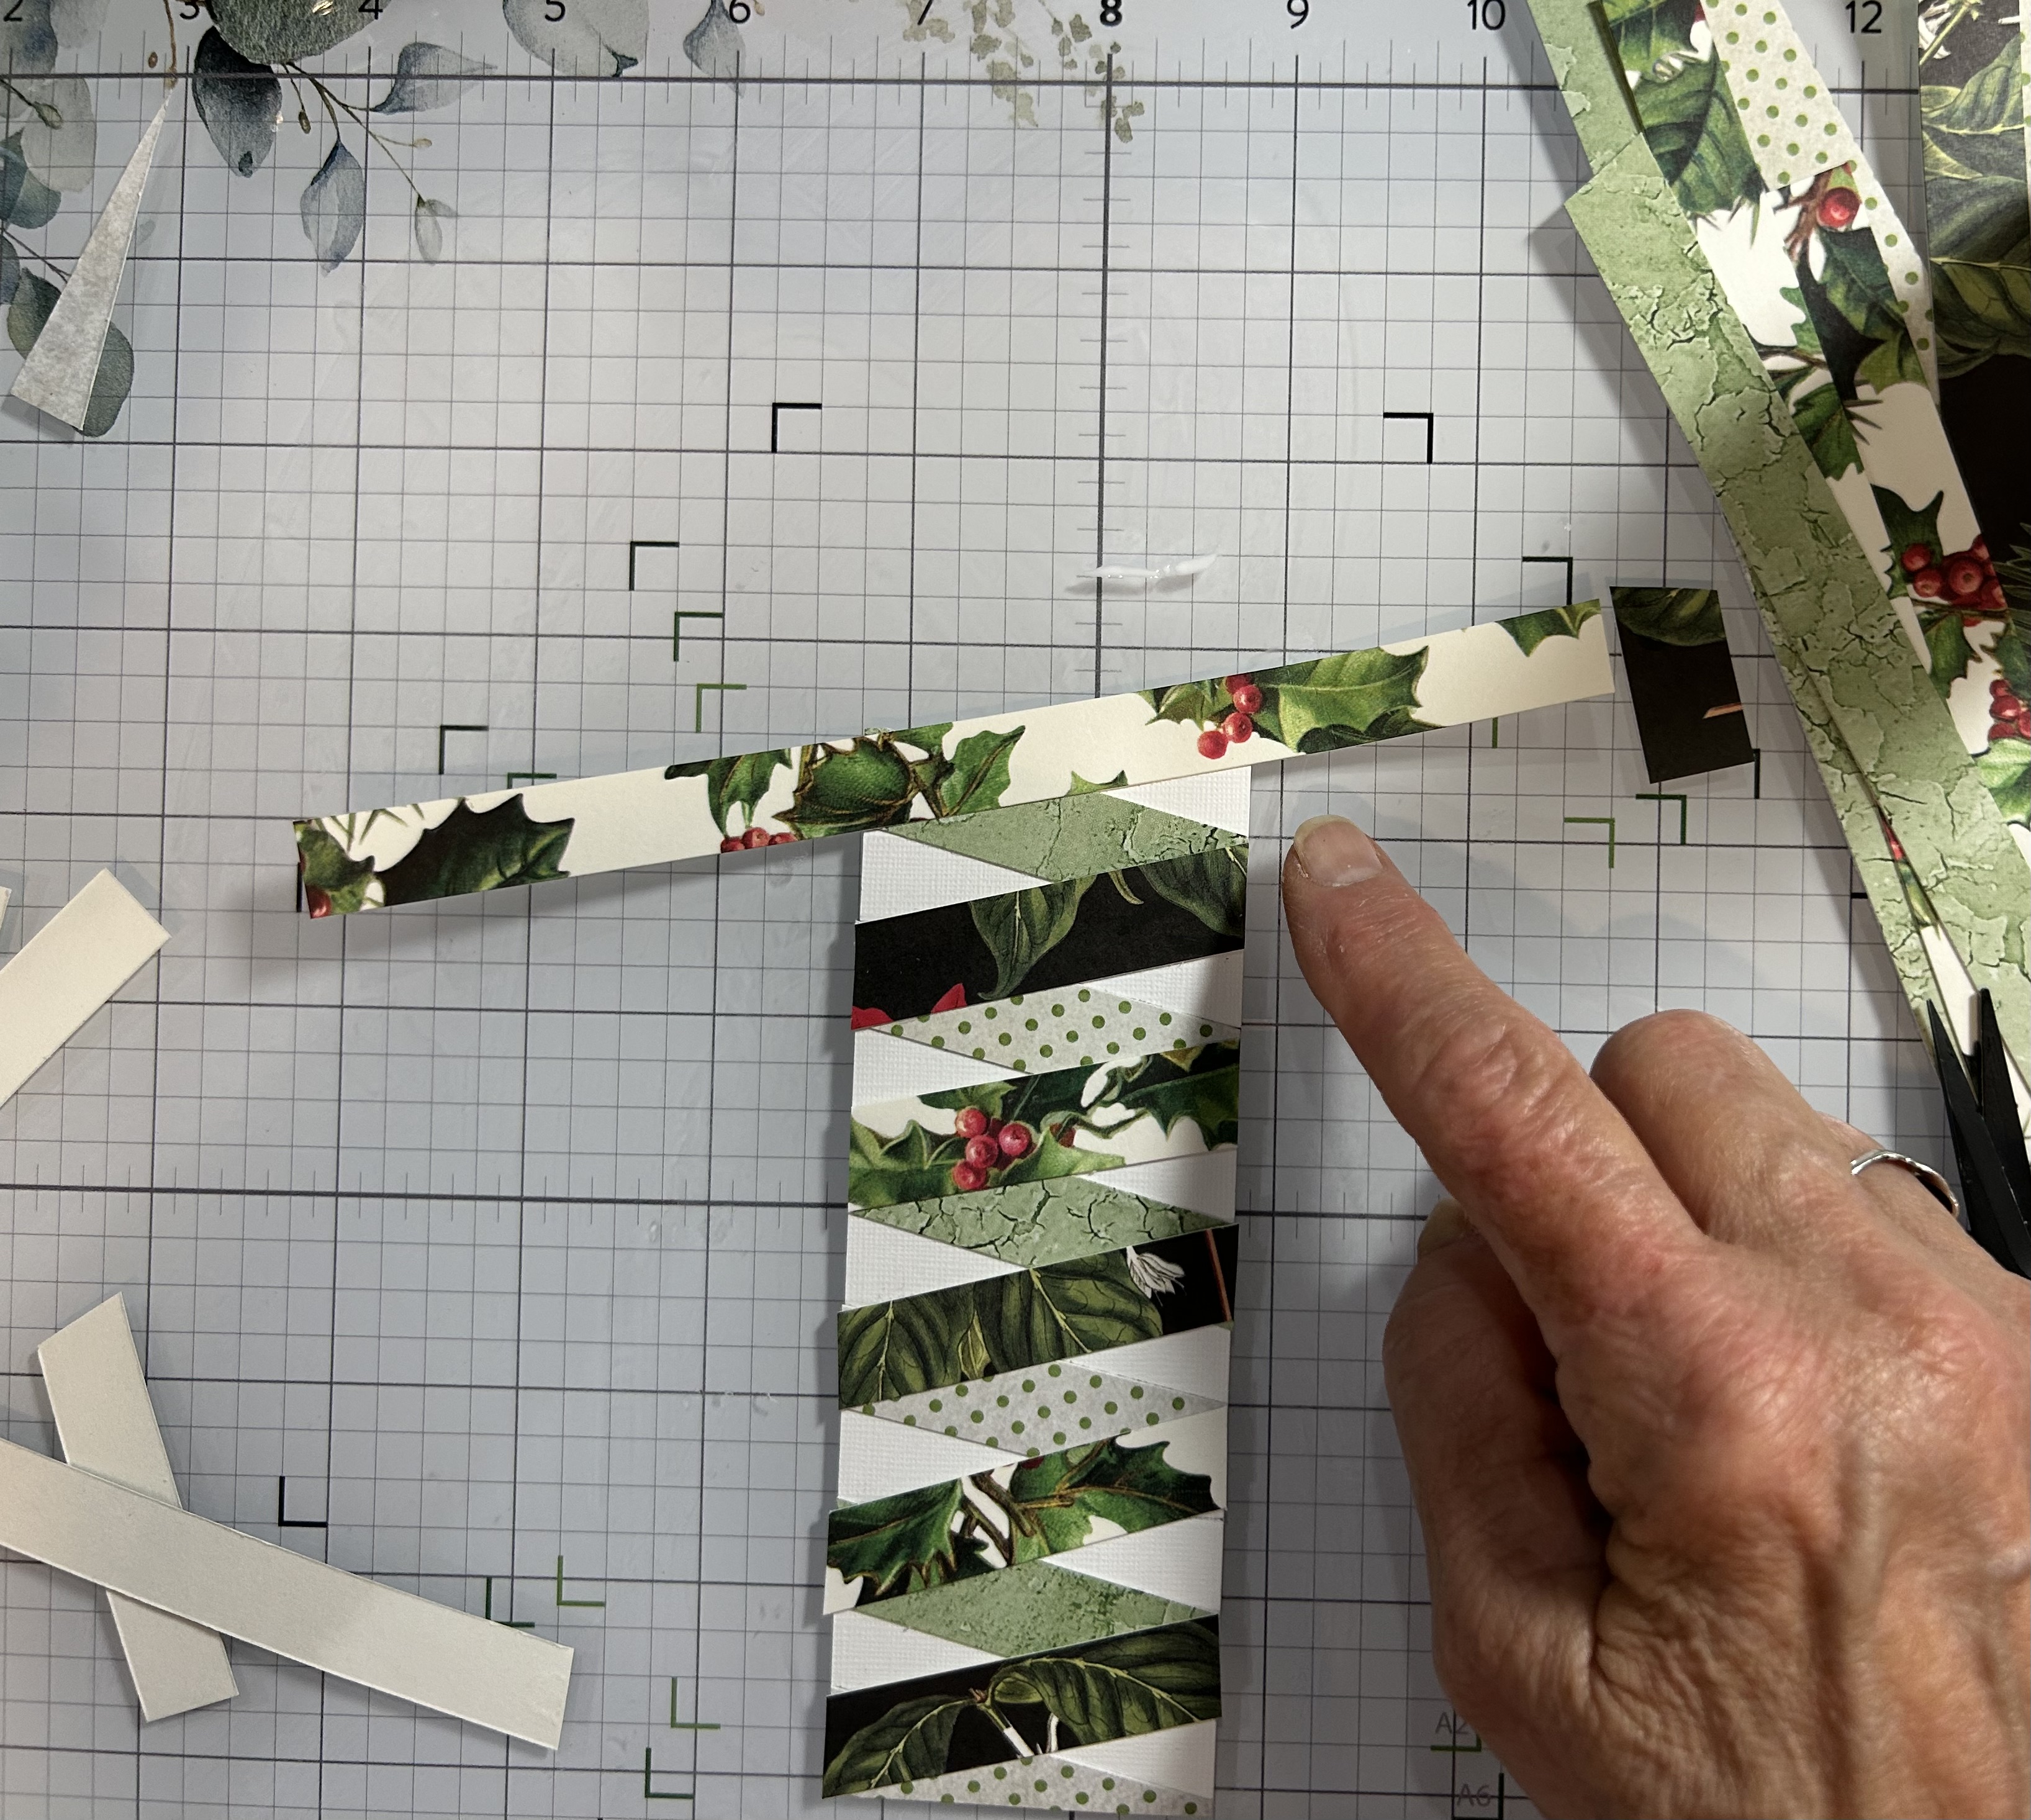
For a Double Ribbon Panel, I started with the same size for the panel (2″ x 5 1/2″) but marked off 1/2-inch spacing. You will also need two different patterned cardstock strips and two different background cardstock strips, all cut at 1/2-inch wide.
Started at the upper left corner with your first background strip, come down to the 1-inch mark, glue in place, turn over and trim. Next, alternate the second background strip.
You will go from the left-hand side and glue to the top of the 2-inch mark. Continue alternating these background pieces as shown.
Now, for the patterned cardstock strips. Match the color of the patterned piece to the background you’ve chosen.
When you’ve finished alternating your strips, go back to the top and add a small piece, keeping the spacing.
And, that’s it! Ribbon Panels to accentuate your bouquets–Single & Double!
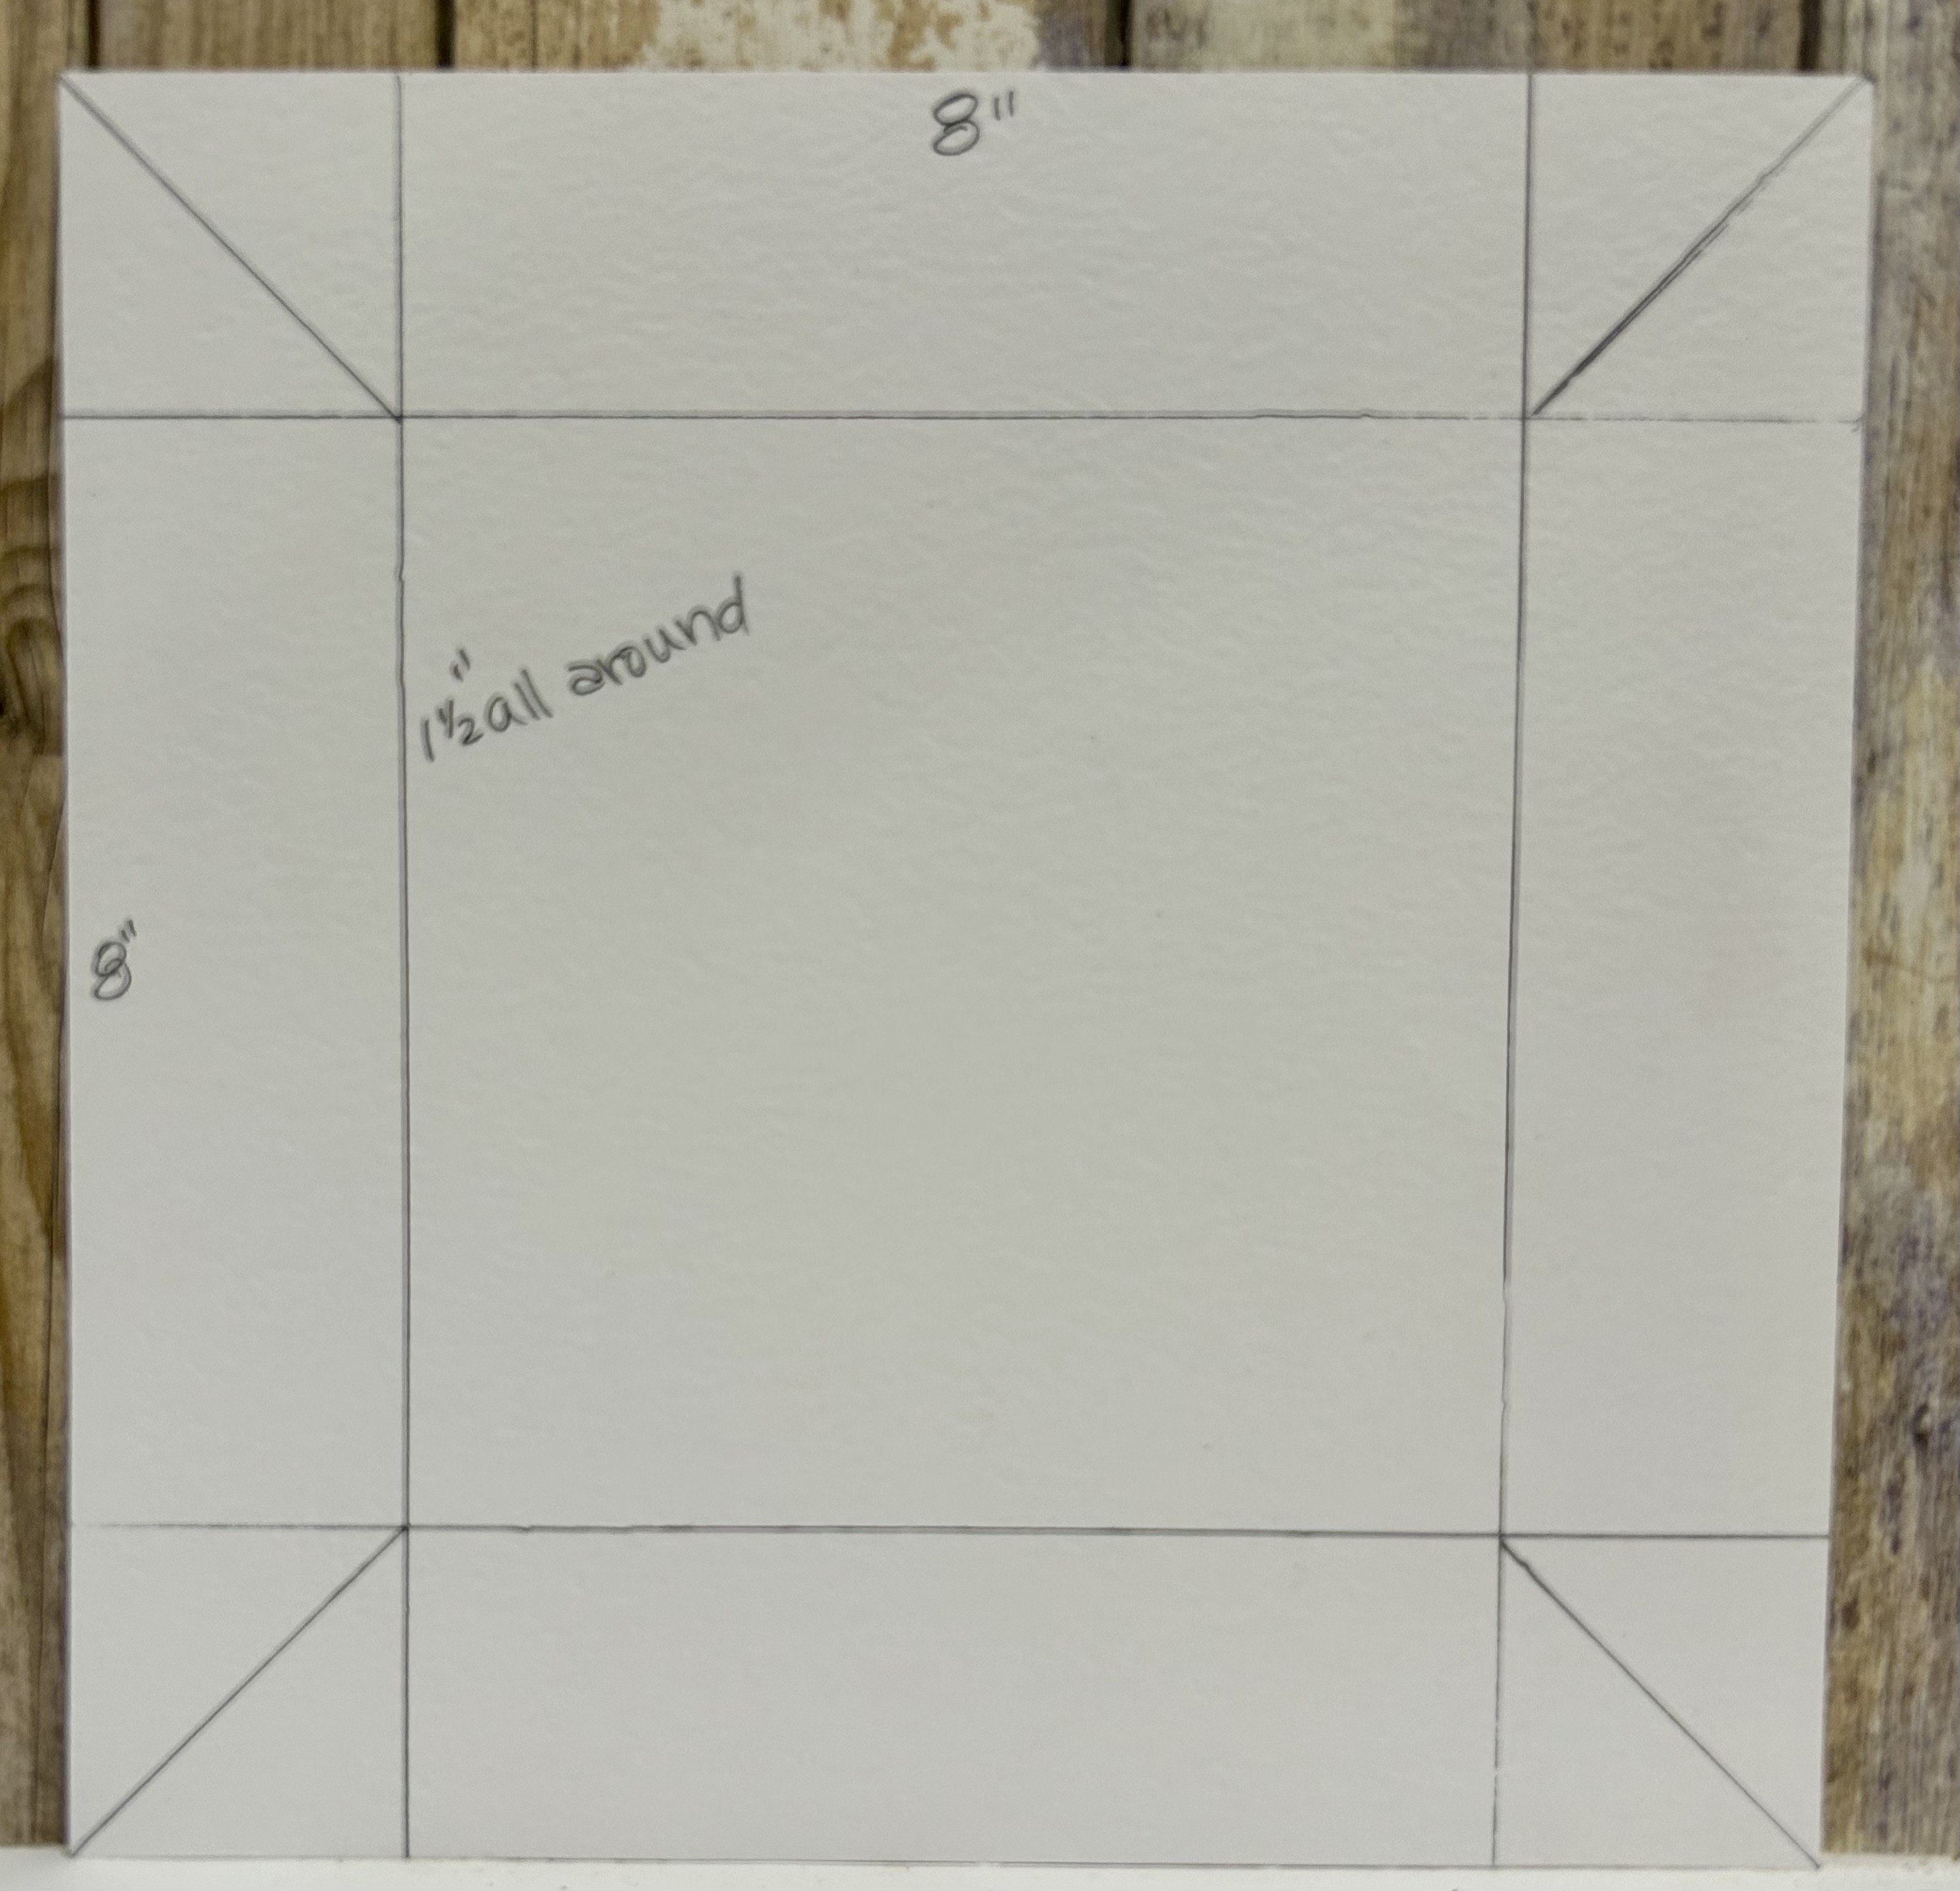
This gift box caught my “fancy” right away when I saw it on YouTube, but I wanted to be able to change the size, so I came up with a way. I will also put up the pattern for the the smaller box and there is a YouTube video on that.
Let’s Get Started
Finished Box is 5″ x 5″
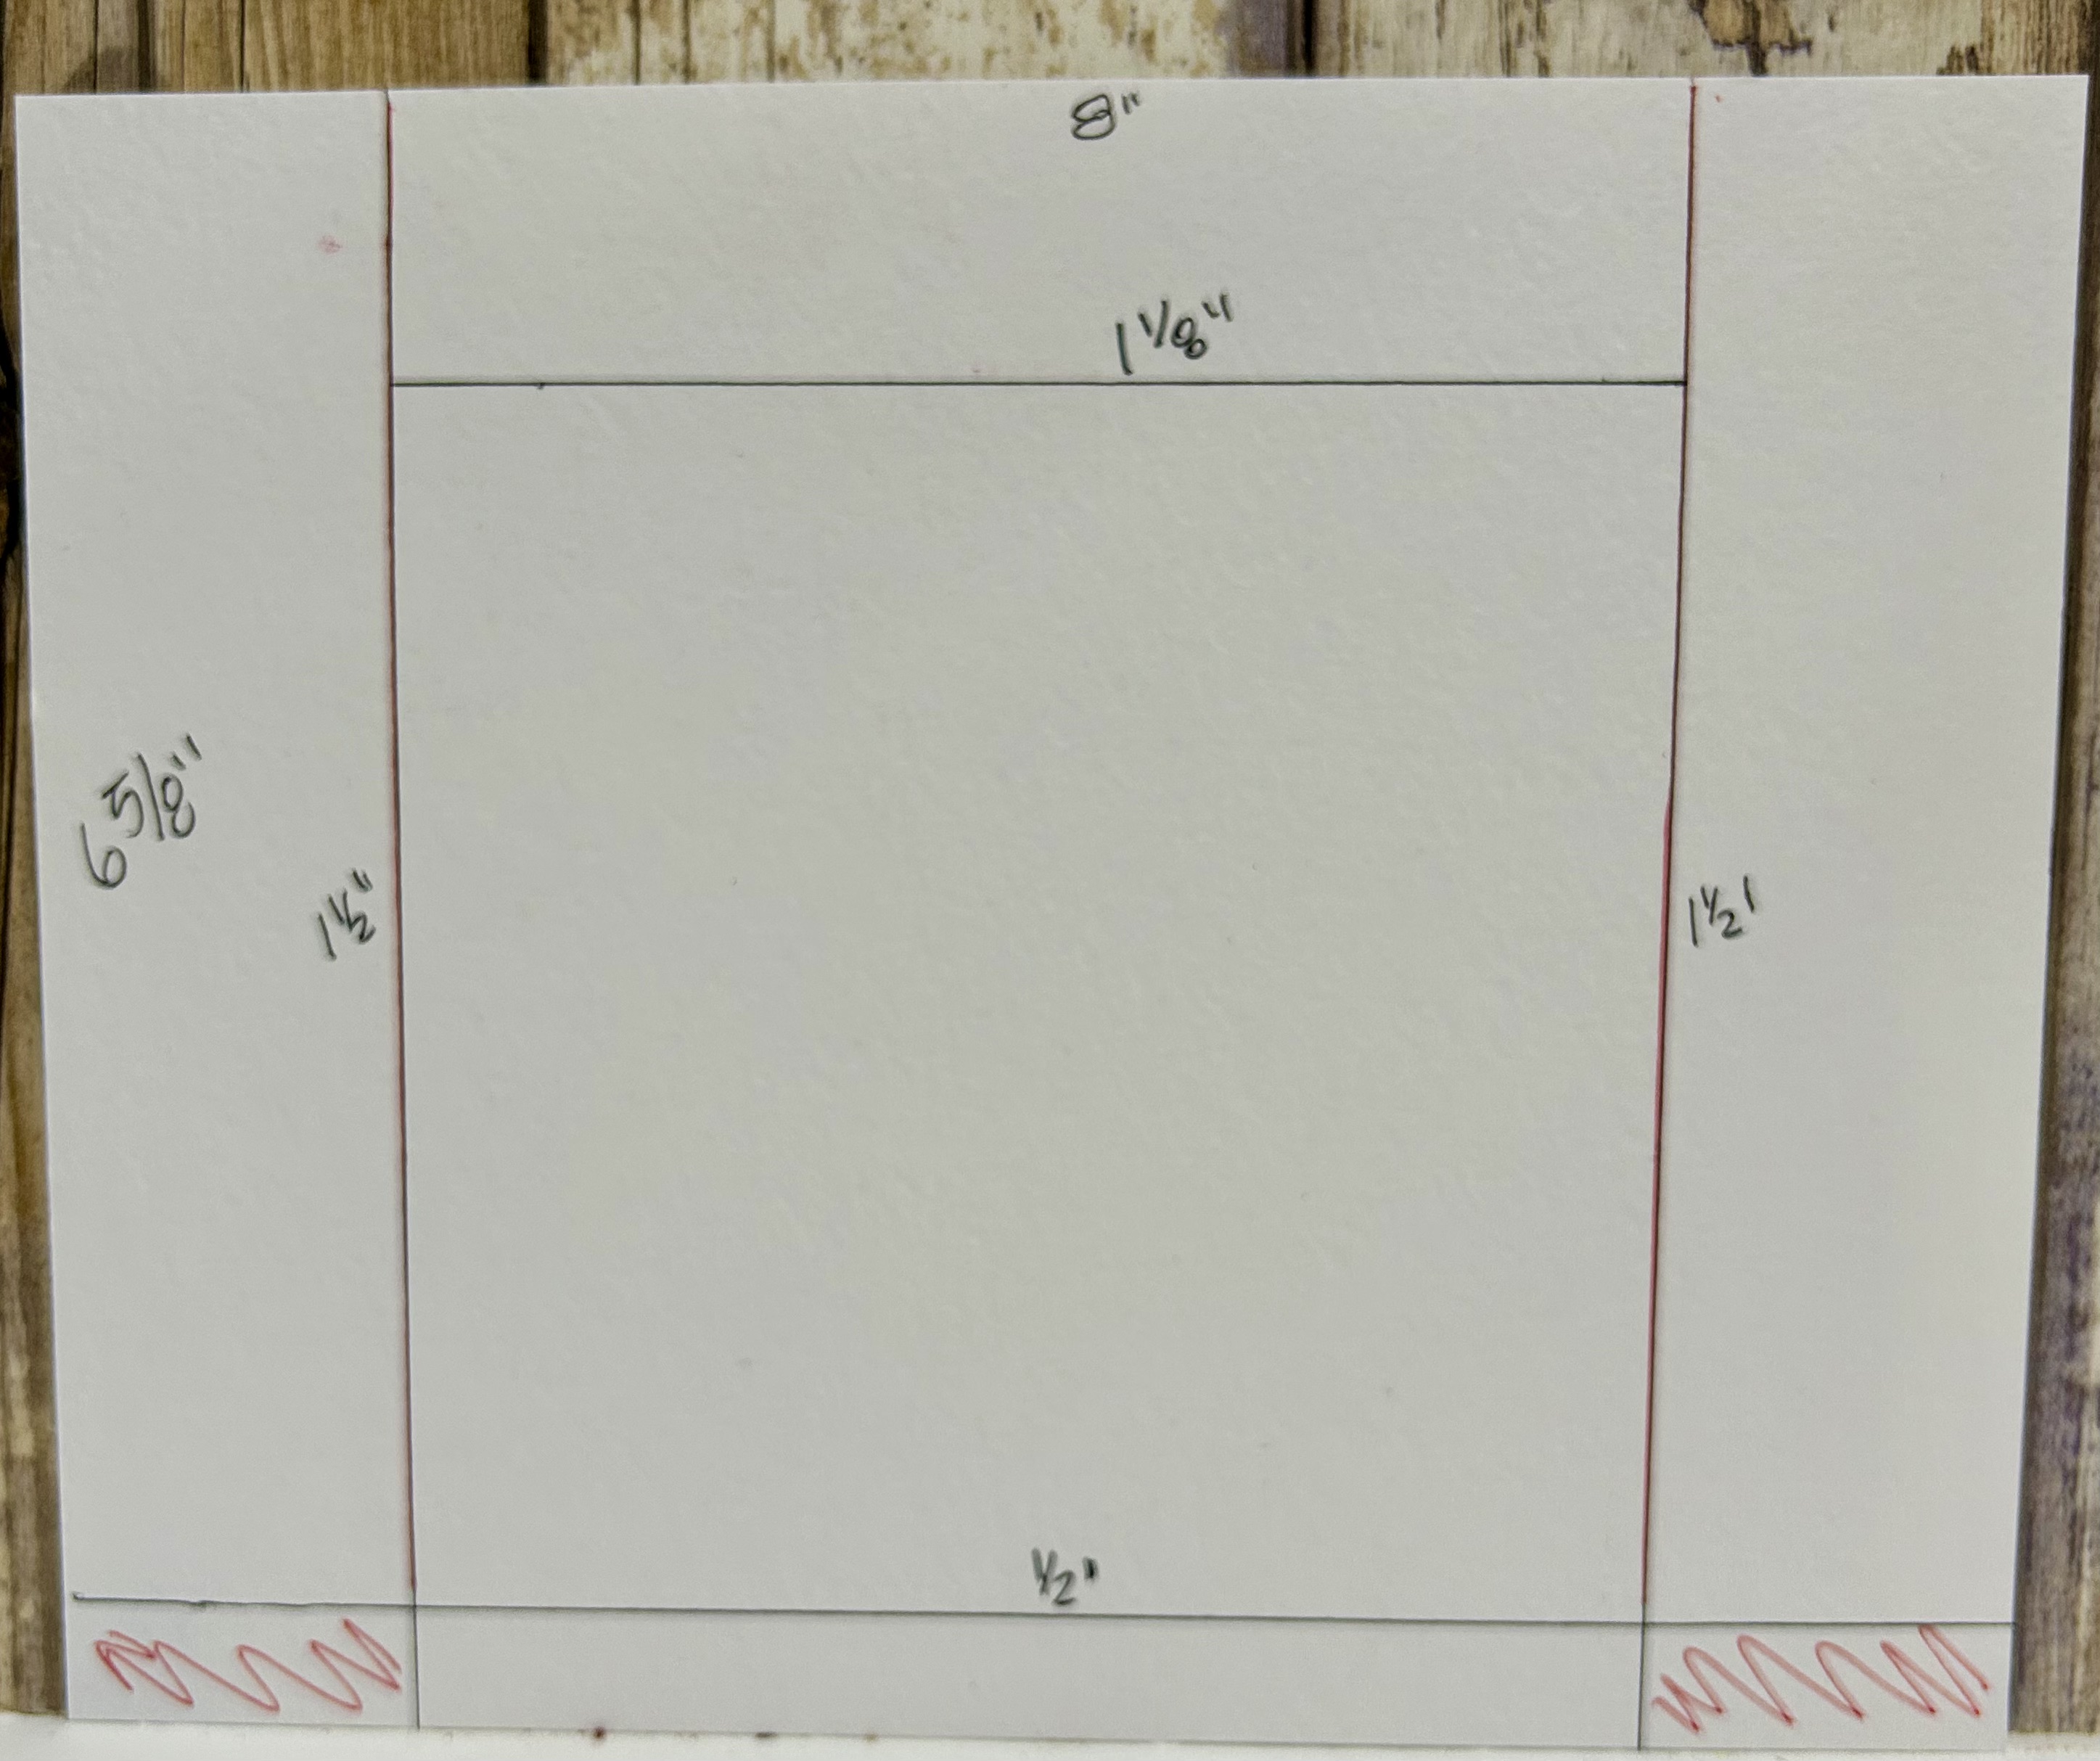
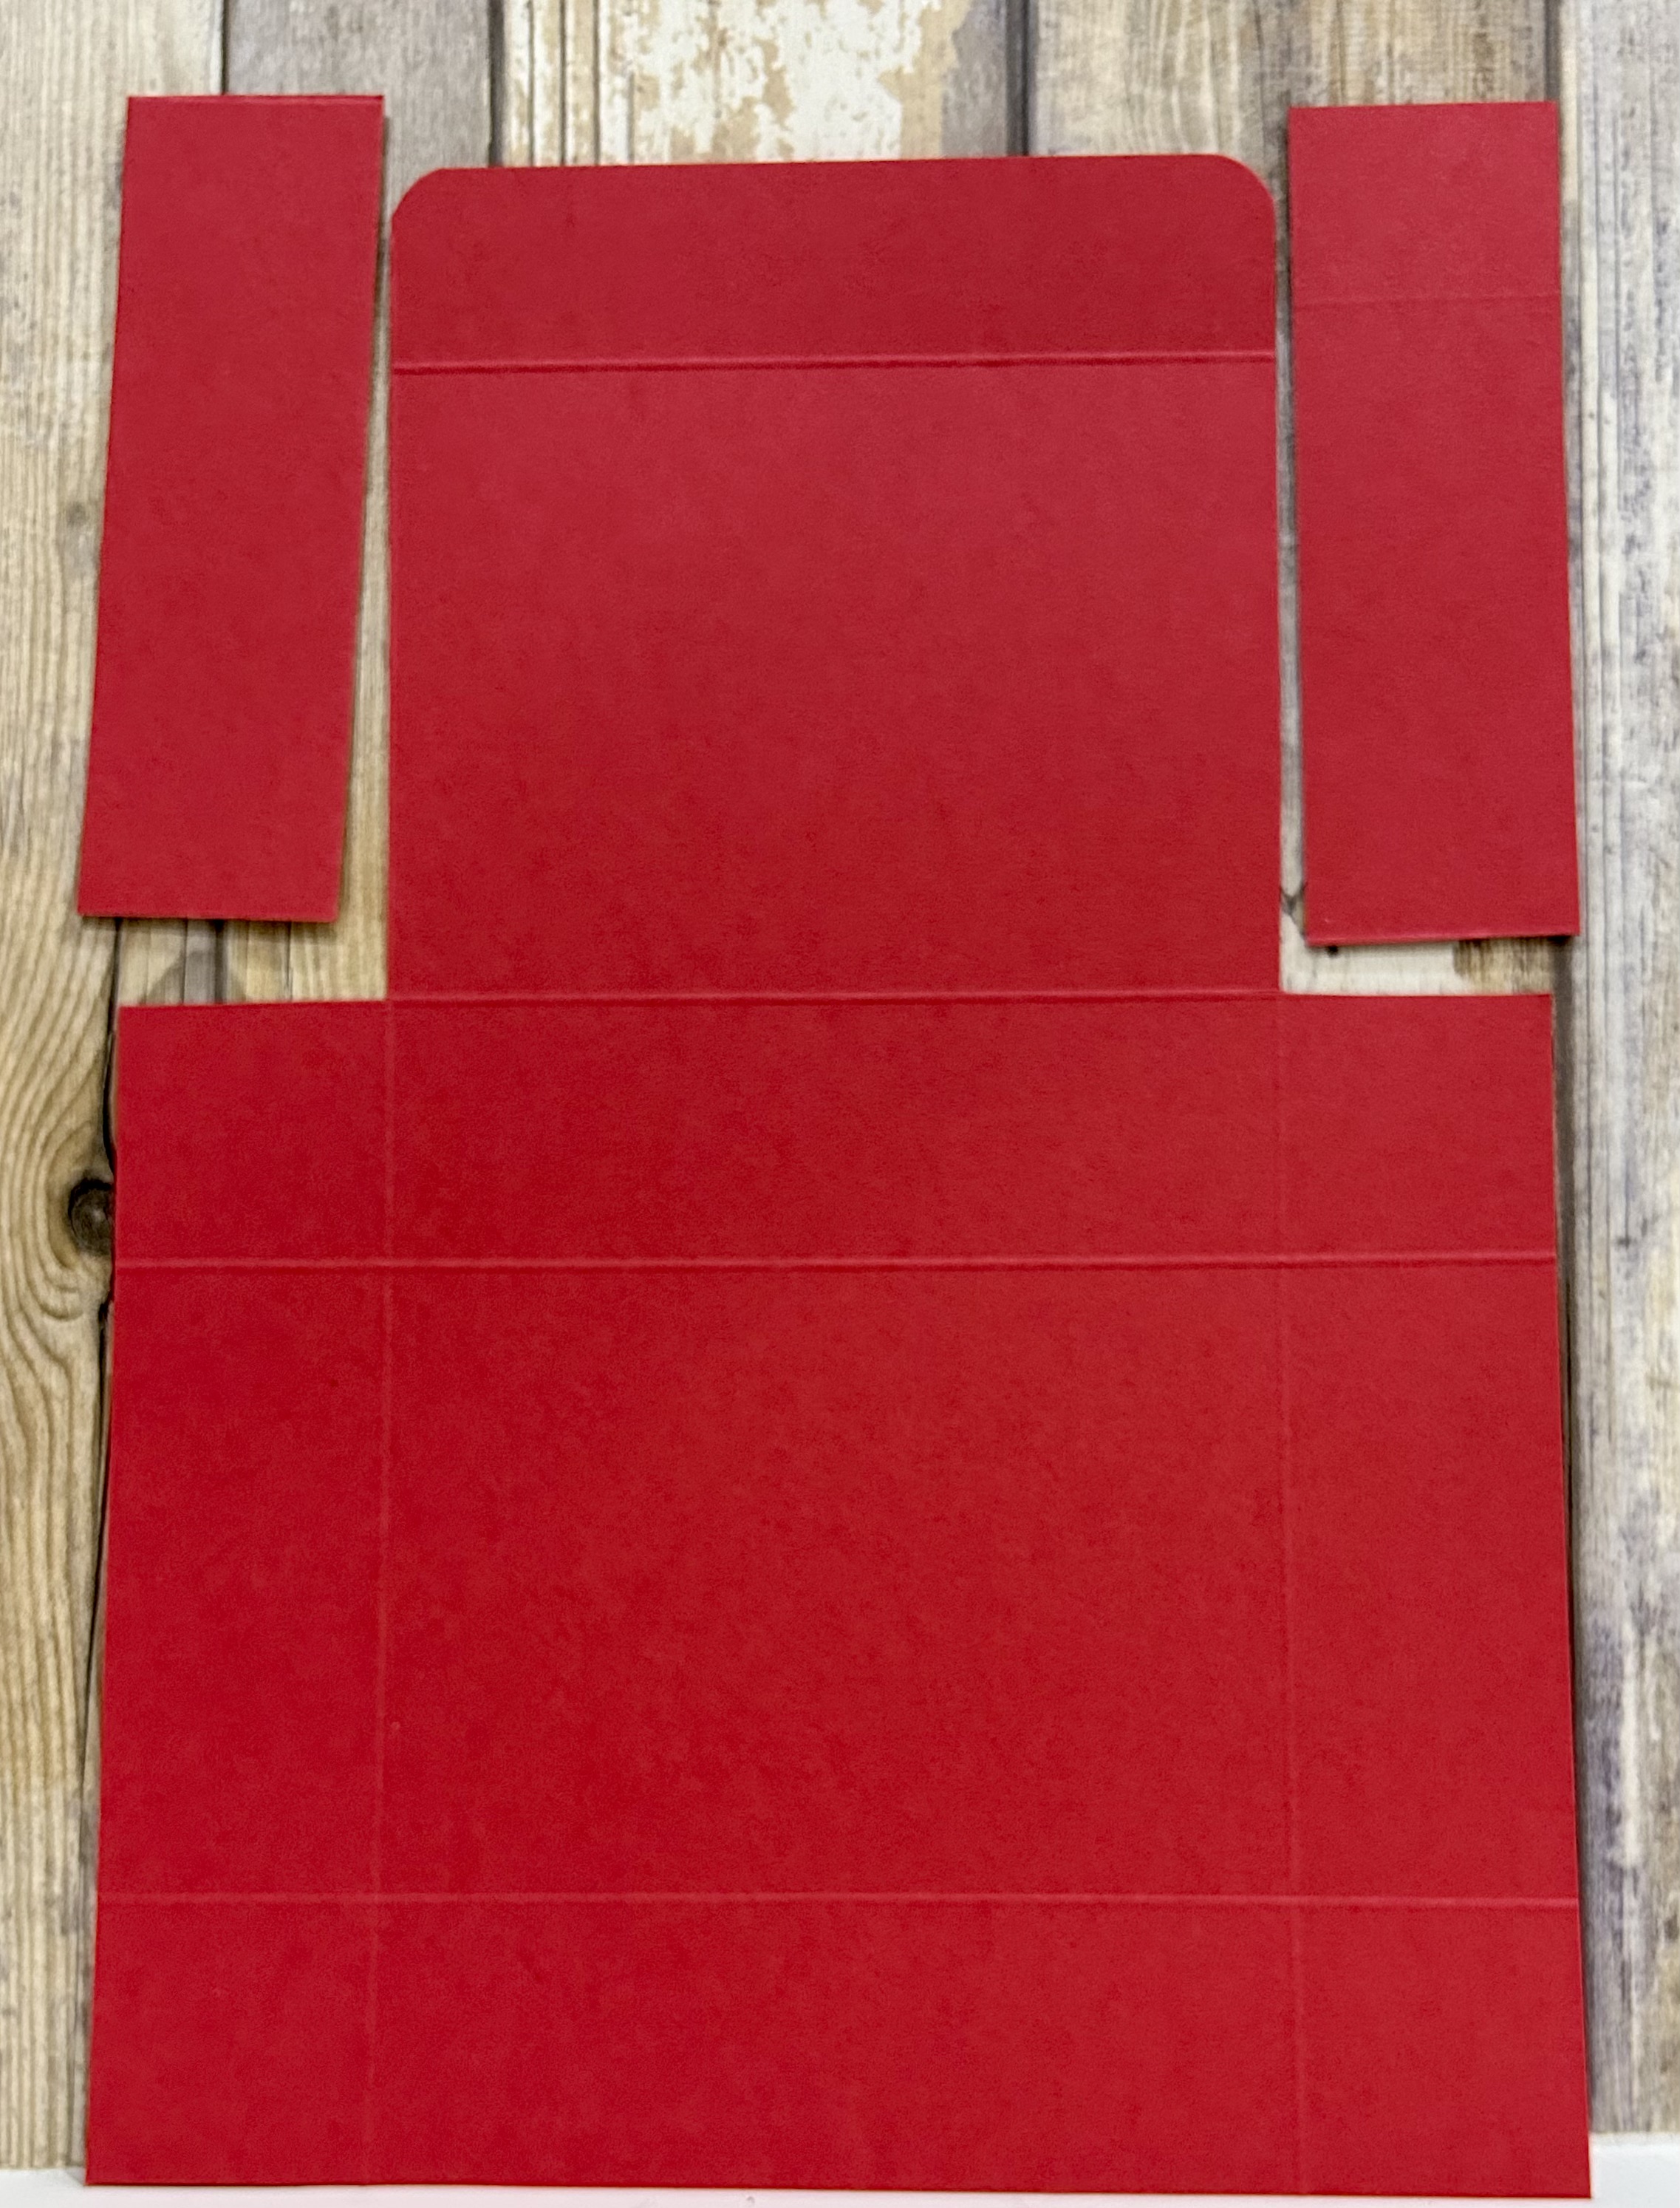
You will need to use 100 lb/300 gsm. Cut two pieces, one 8″ x 8″ and one 6 5/8″ x 8″. For the 8″ x 8″, score 1 1/2″ on all four sides. And on the 6 5/8″ x 8″ base, with the 8″ side at the top of your scoreboard, score at 1 1/2″ and 6 1/2″. Turn the base 180-degrees and score at 1/2″. With the 6 5/8″ at the top, score between the 1 1/2″ as shown below 1 1/8″.
2. Trim away the two side pieces, but save them because you will use them as flaps. Trim them to 1 3/8″ x 5″ and score them along the long side 1/4″. If you have a quarter-round punch, round the flap at the top and these two side flaps on one side.
Those cut-away pieces will form your side flaps.
3. Use 1/2-inch Red Line Tape on the bottom 1/2″ and attach to the base, making sure your connection will be on the inside of the box. Take a sliver off the sides, then attach it to the 8″ x 8″ base as I did on the video. Use 1/4-inch Red Line tape on the scored lines of the side flaps and trim a sliver off these pieces too and attach to this base.
4. Place the base on the Leaf Pad and using the Leaf Tool, score diagonal line in each corner as show above. You will want to glue down all your panels, inside and out, before adding tape to the corners!
Panels:
(4) 4 3/4″ x 4 3/4″ *
(6) 7/8″ x 4 3/4″*
(8) 1 1/4″ x 4 3/4″*
*divide these quantities in half if you are using two different papers for inside and outside of the box as I did.
5. On the Front Flap and the Front of the Base, measure in 2 1/2″ and mark with a pencil. Using a 3/8″ punch, make holes for the ribbon–see my video on Susan’s Budding Paper Gardeners Page from yesterday. You can also use a Velcro closure or Magnets.
Smaller Box 3 1/2″ x 5″:
Again, using 100 lb./300 gsm, cut a piece 8″ x 11 1/4″. Here is the pattern for scoring and trimming:
Construction is the same except you aren’t attaching two pieces.
Now, have fun creating a beautiful bouquet on the top of the box!
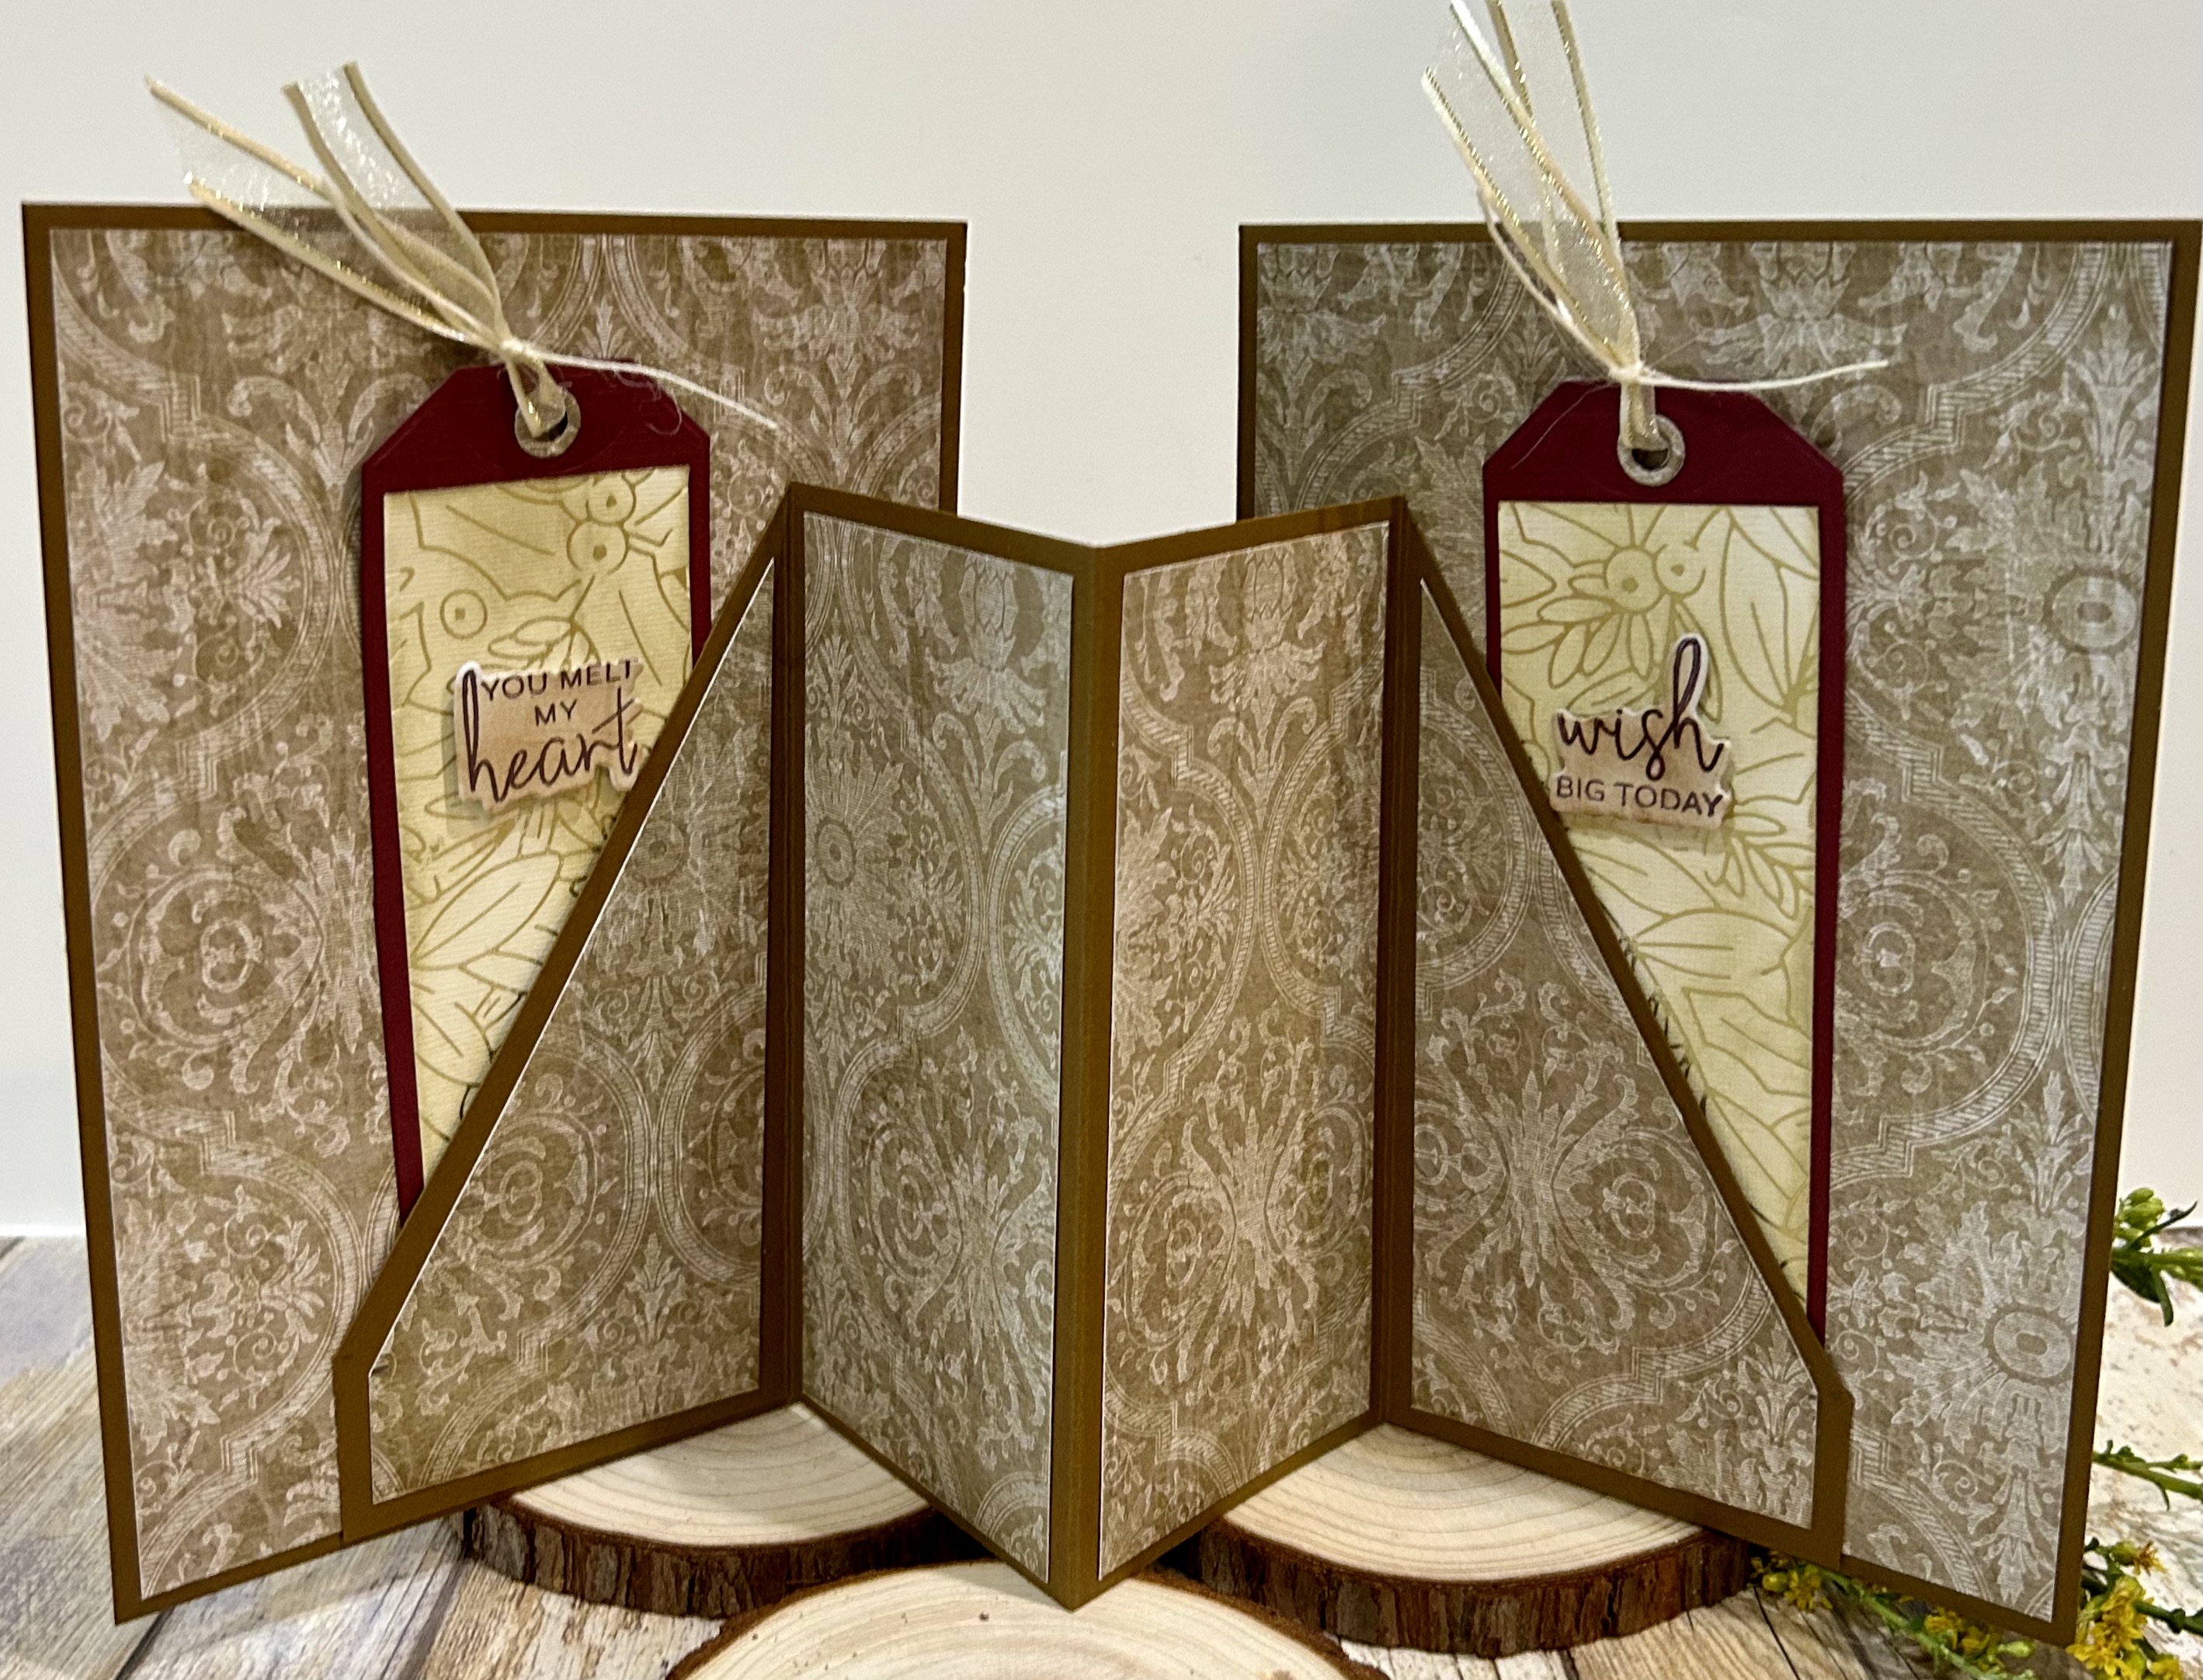
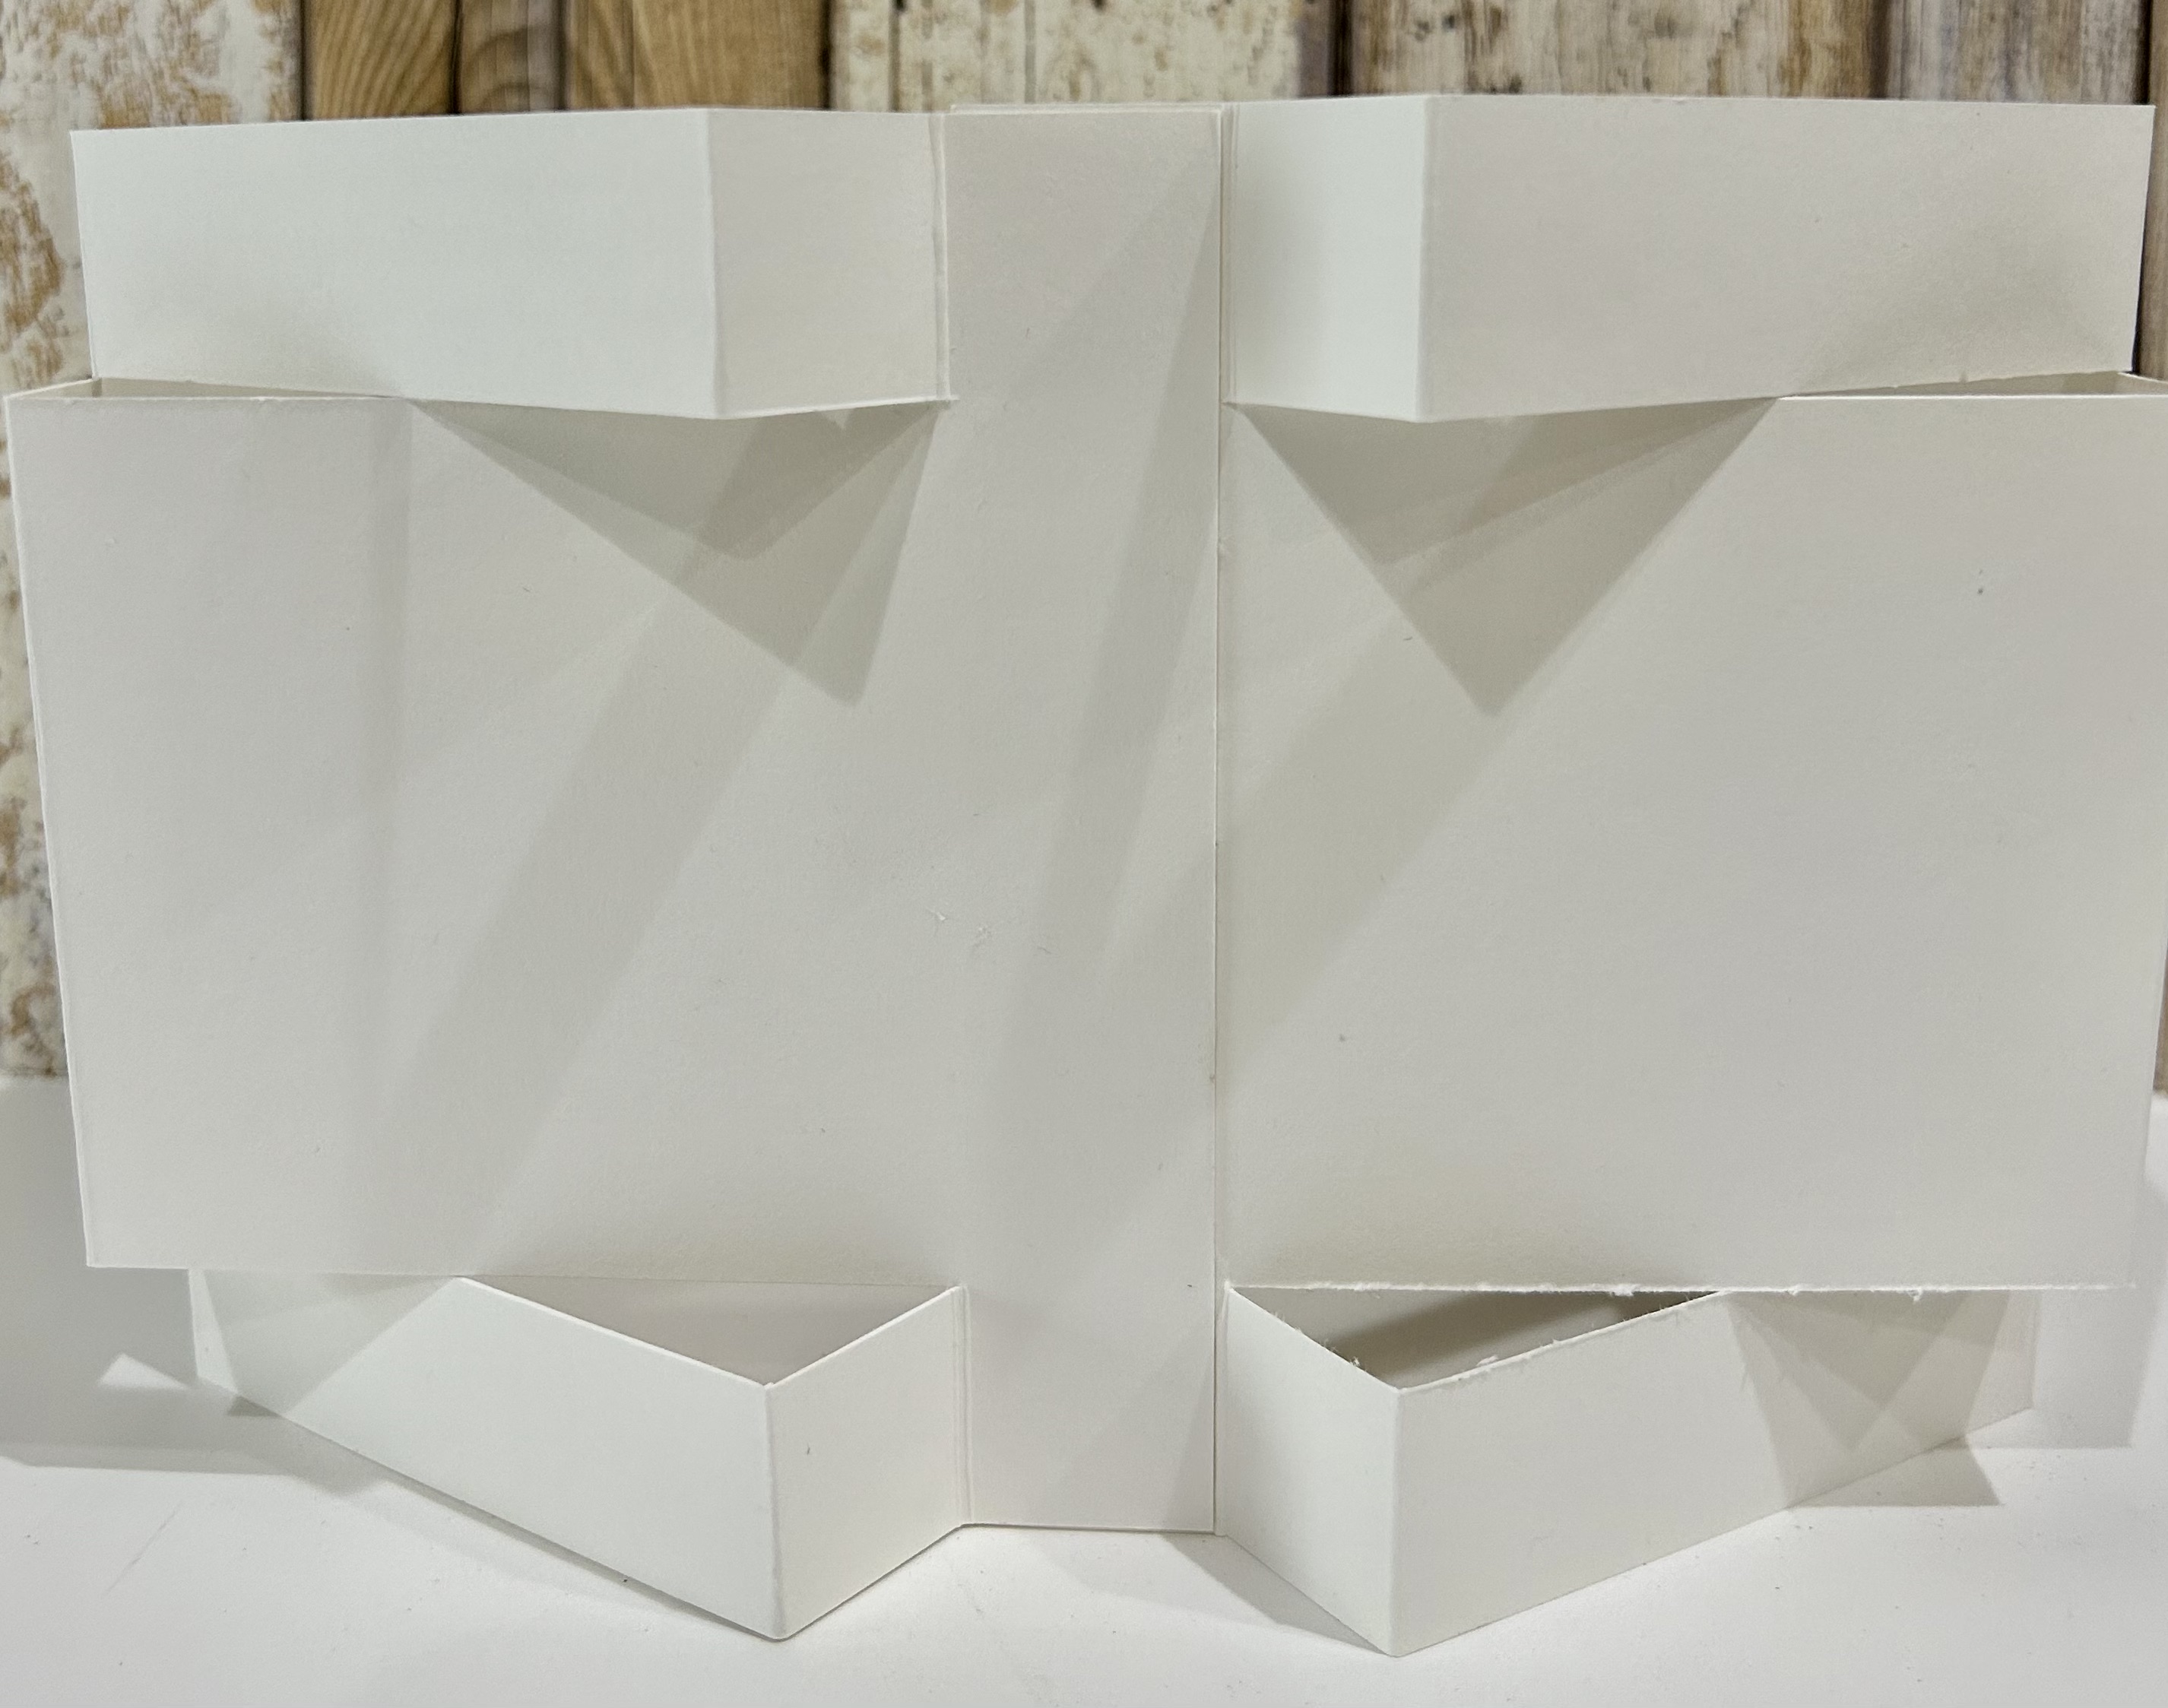
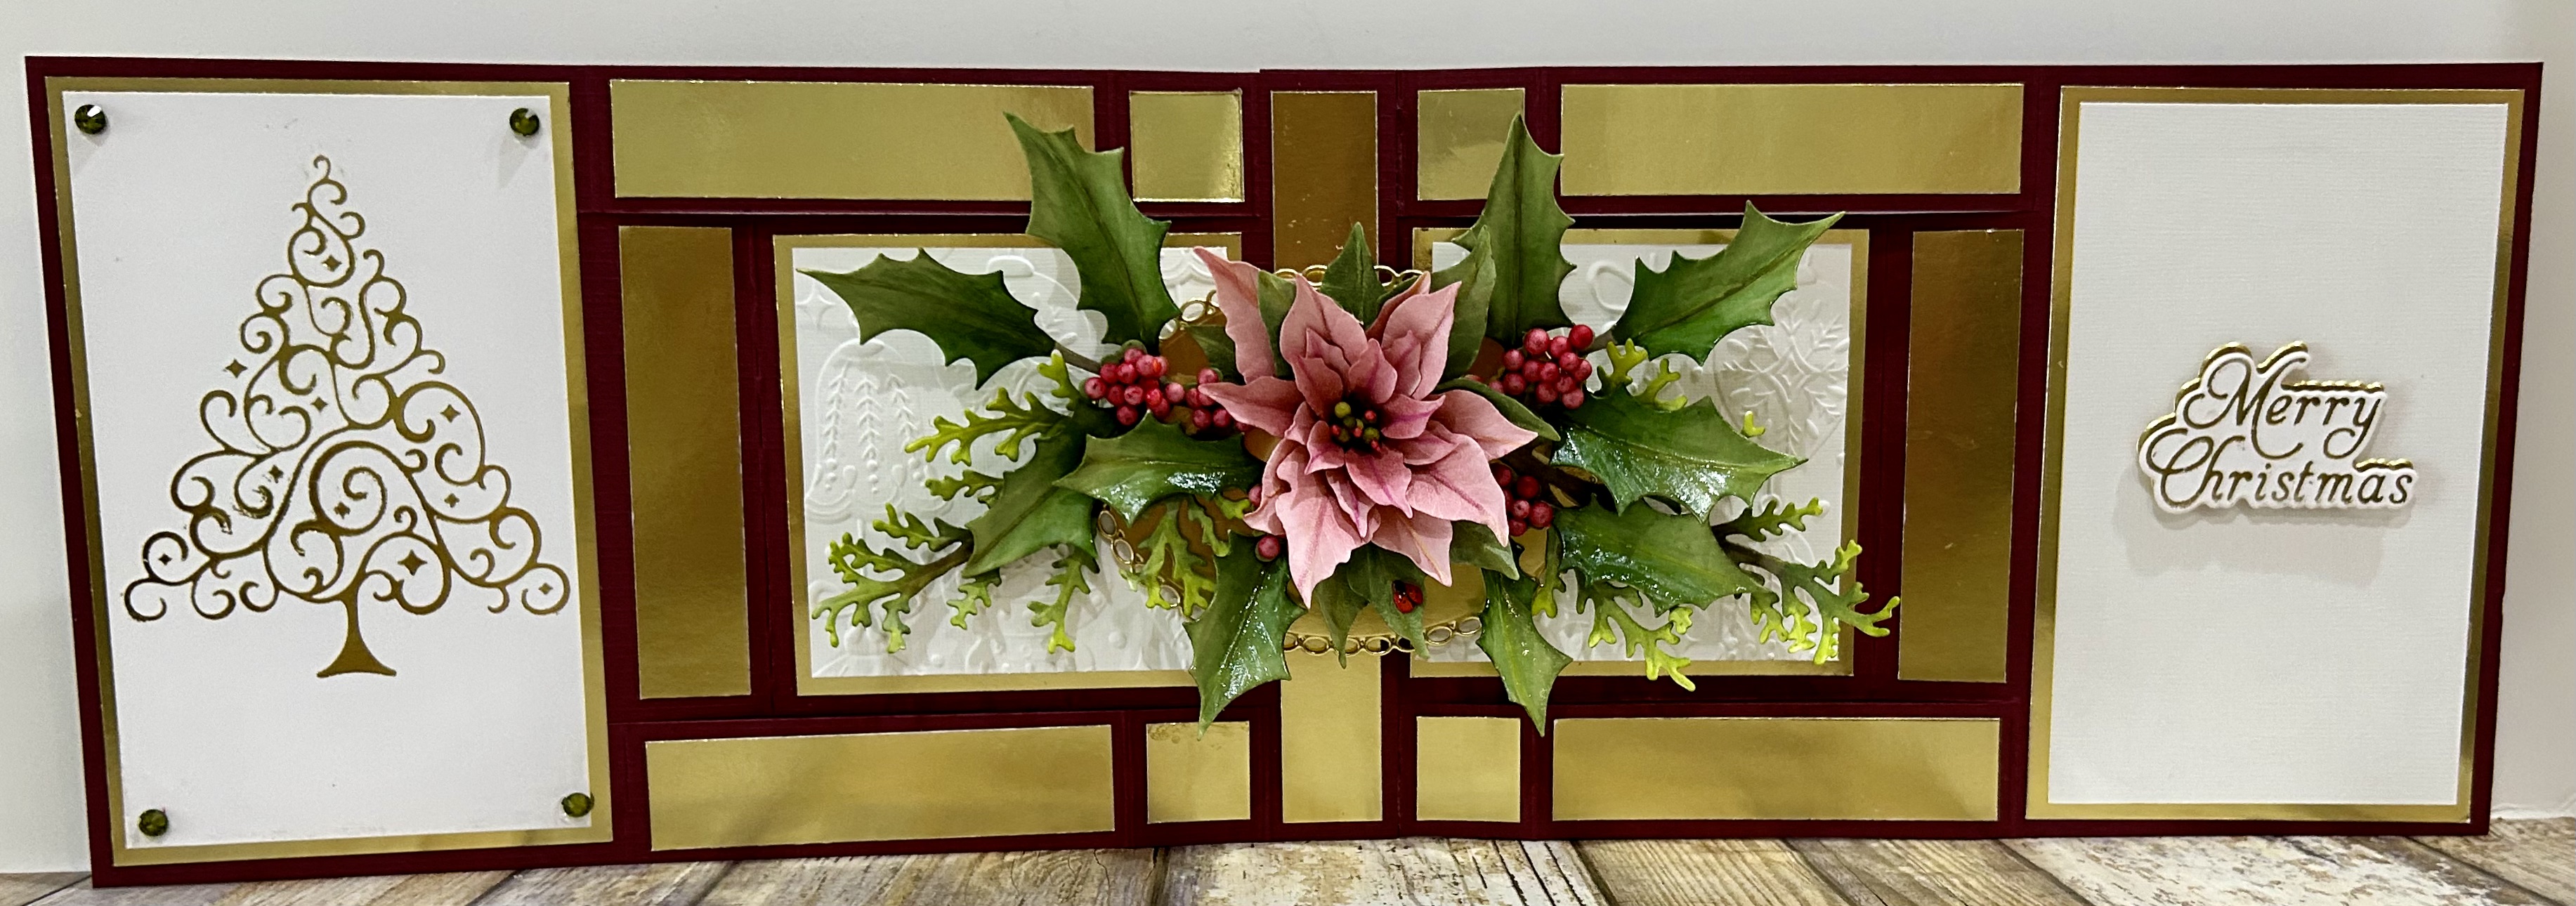
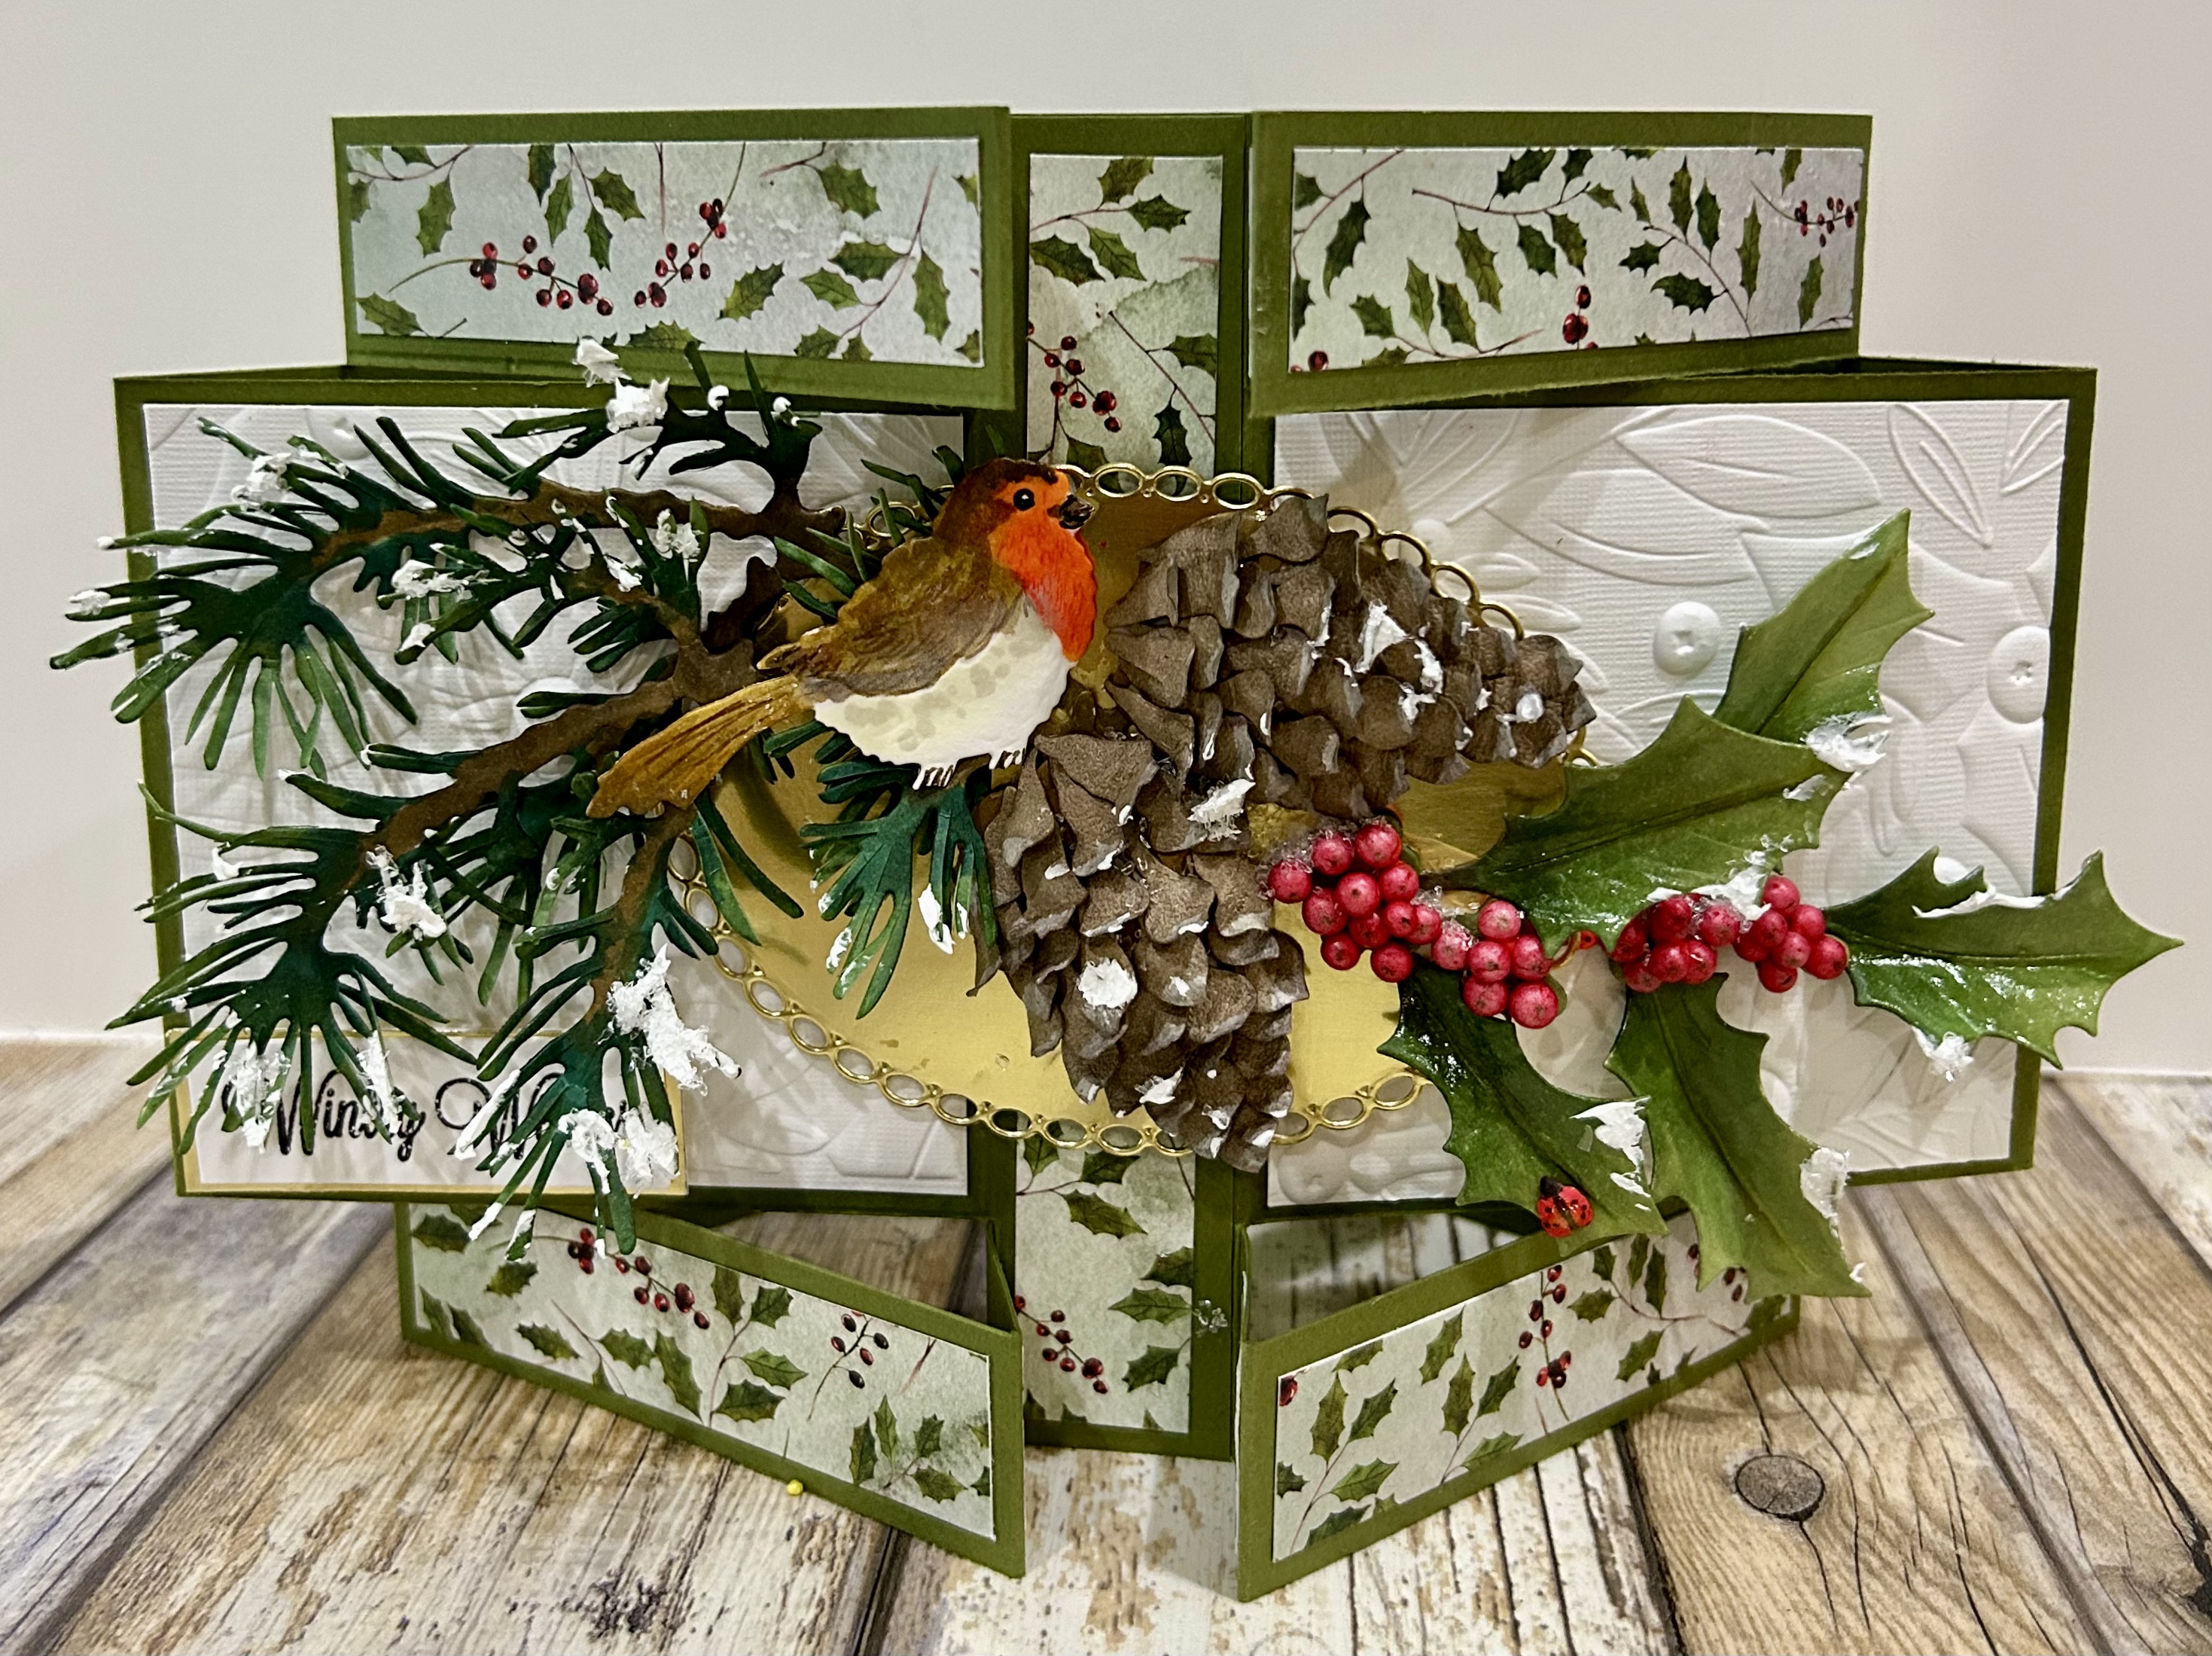
Hello everyone…as promised here are the measurements for the Inside~Out Stepper Card I demoed yesterday on Susan’s Garden Club LIVE. It’s easy to make and even more fun to decorate with a nice wide area to show off your blooms!
Let’s Get Started
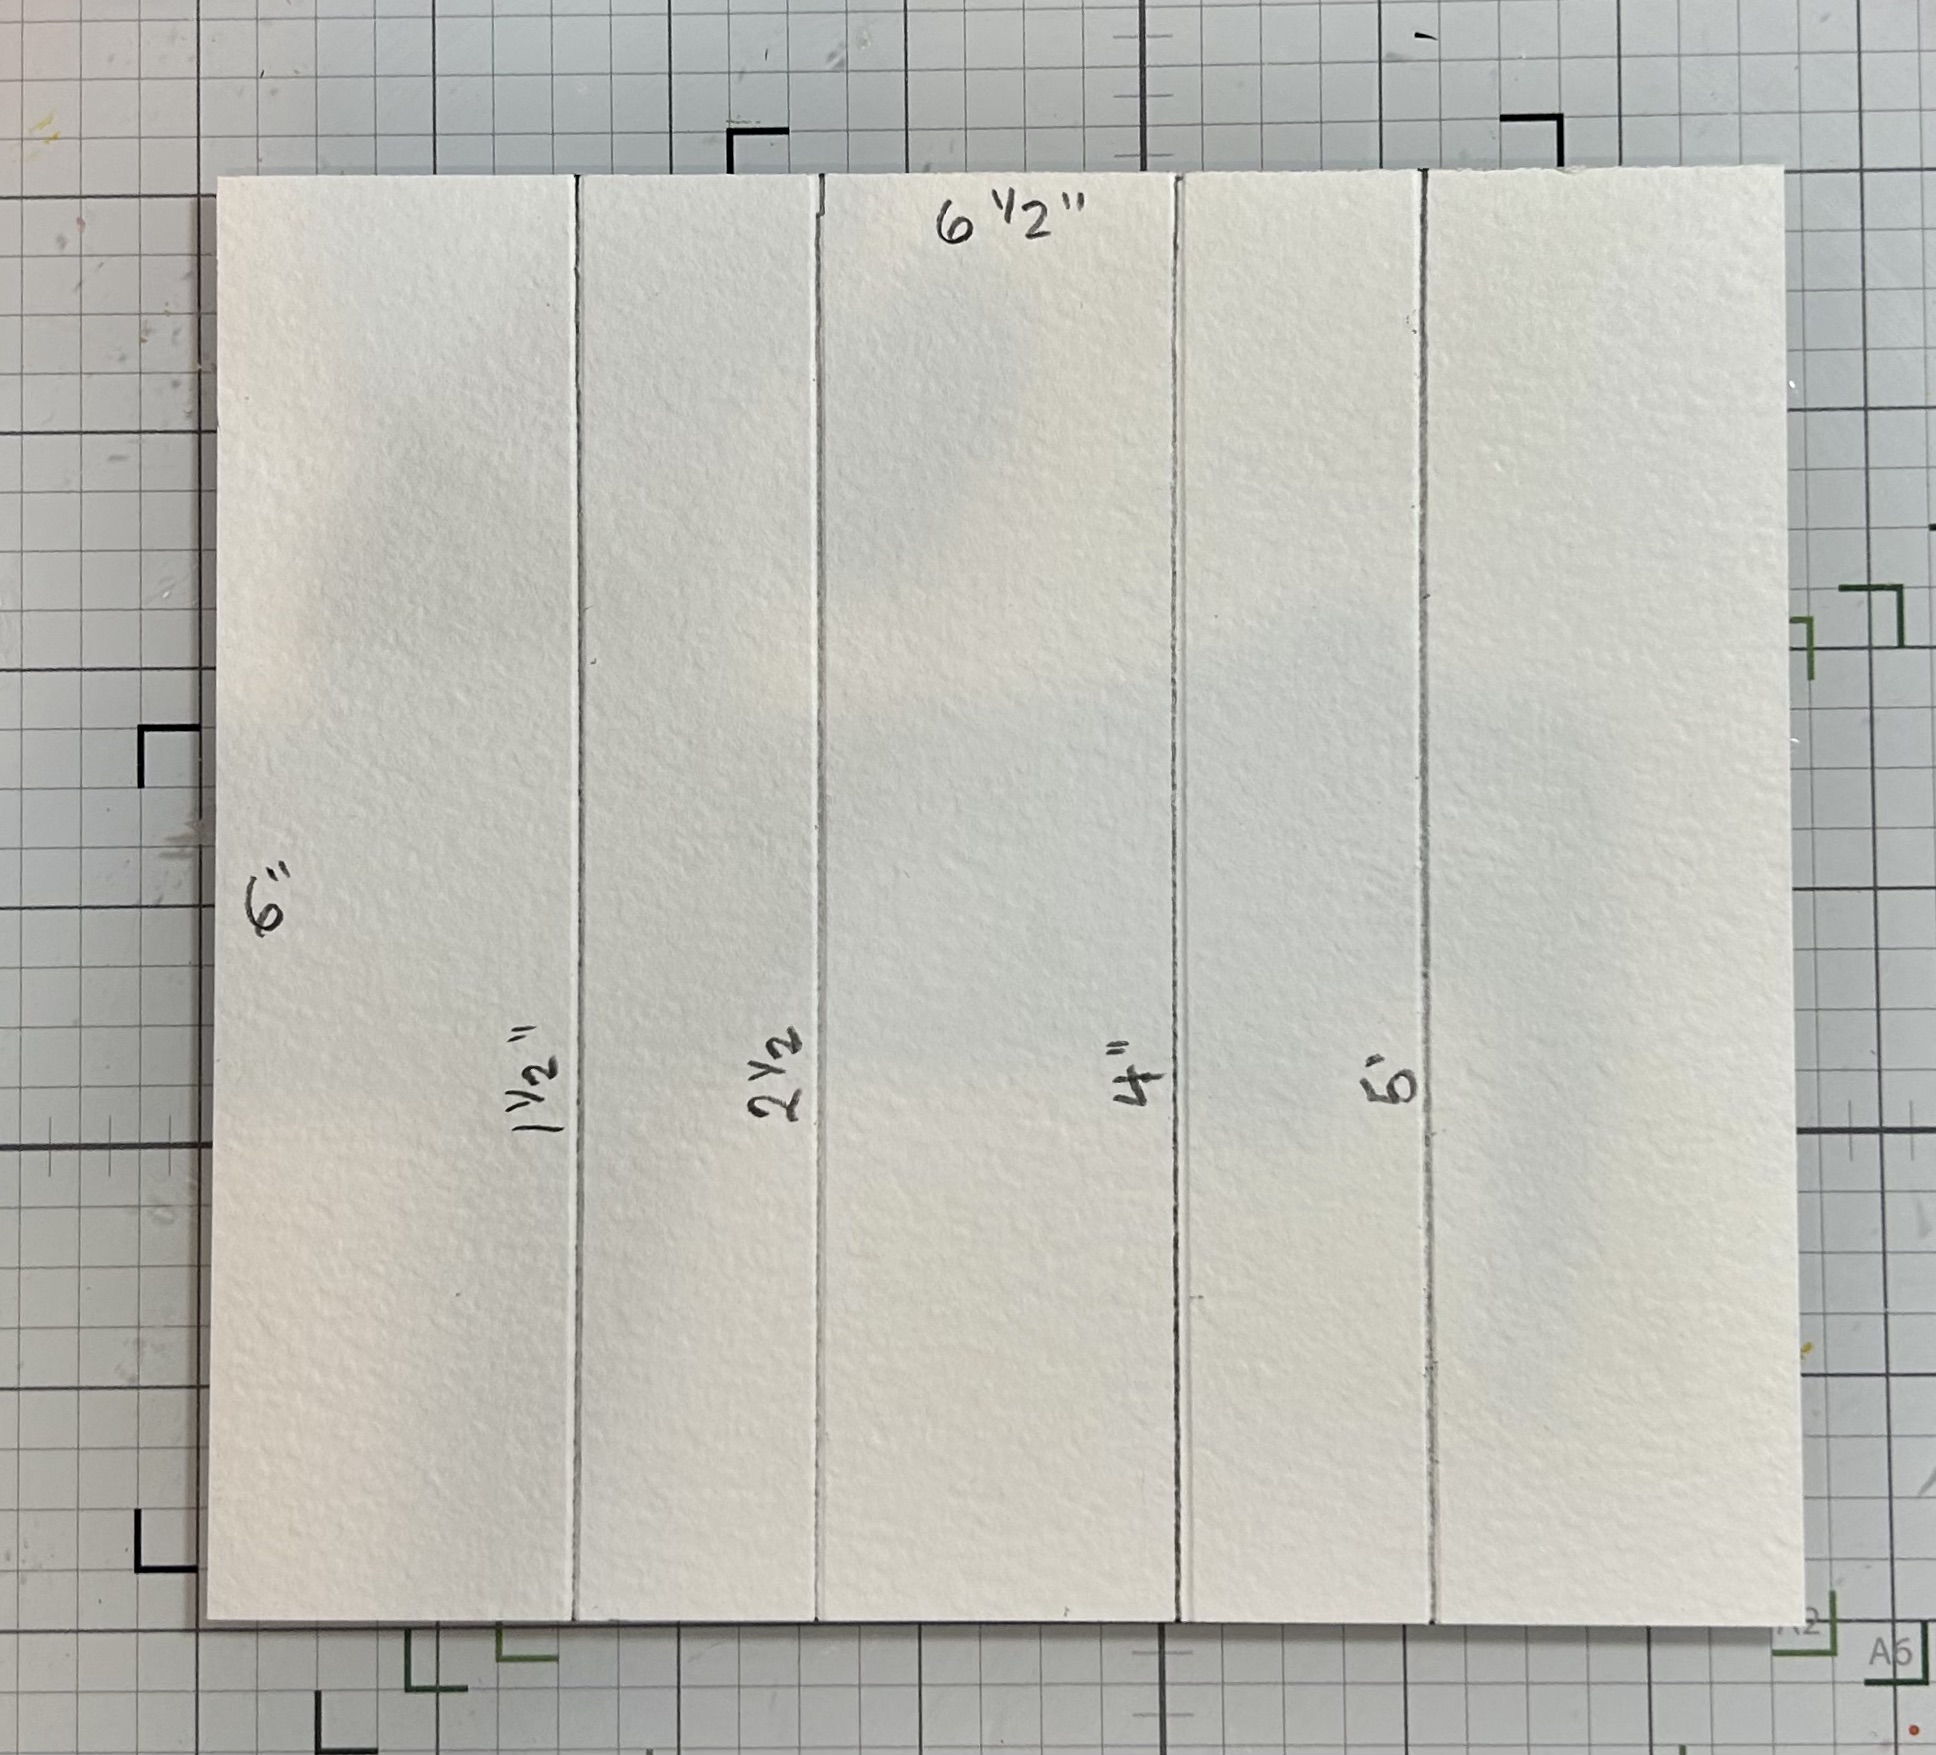
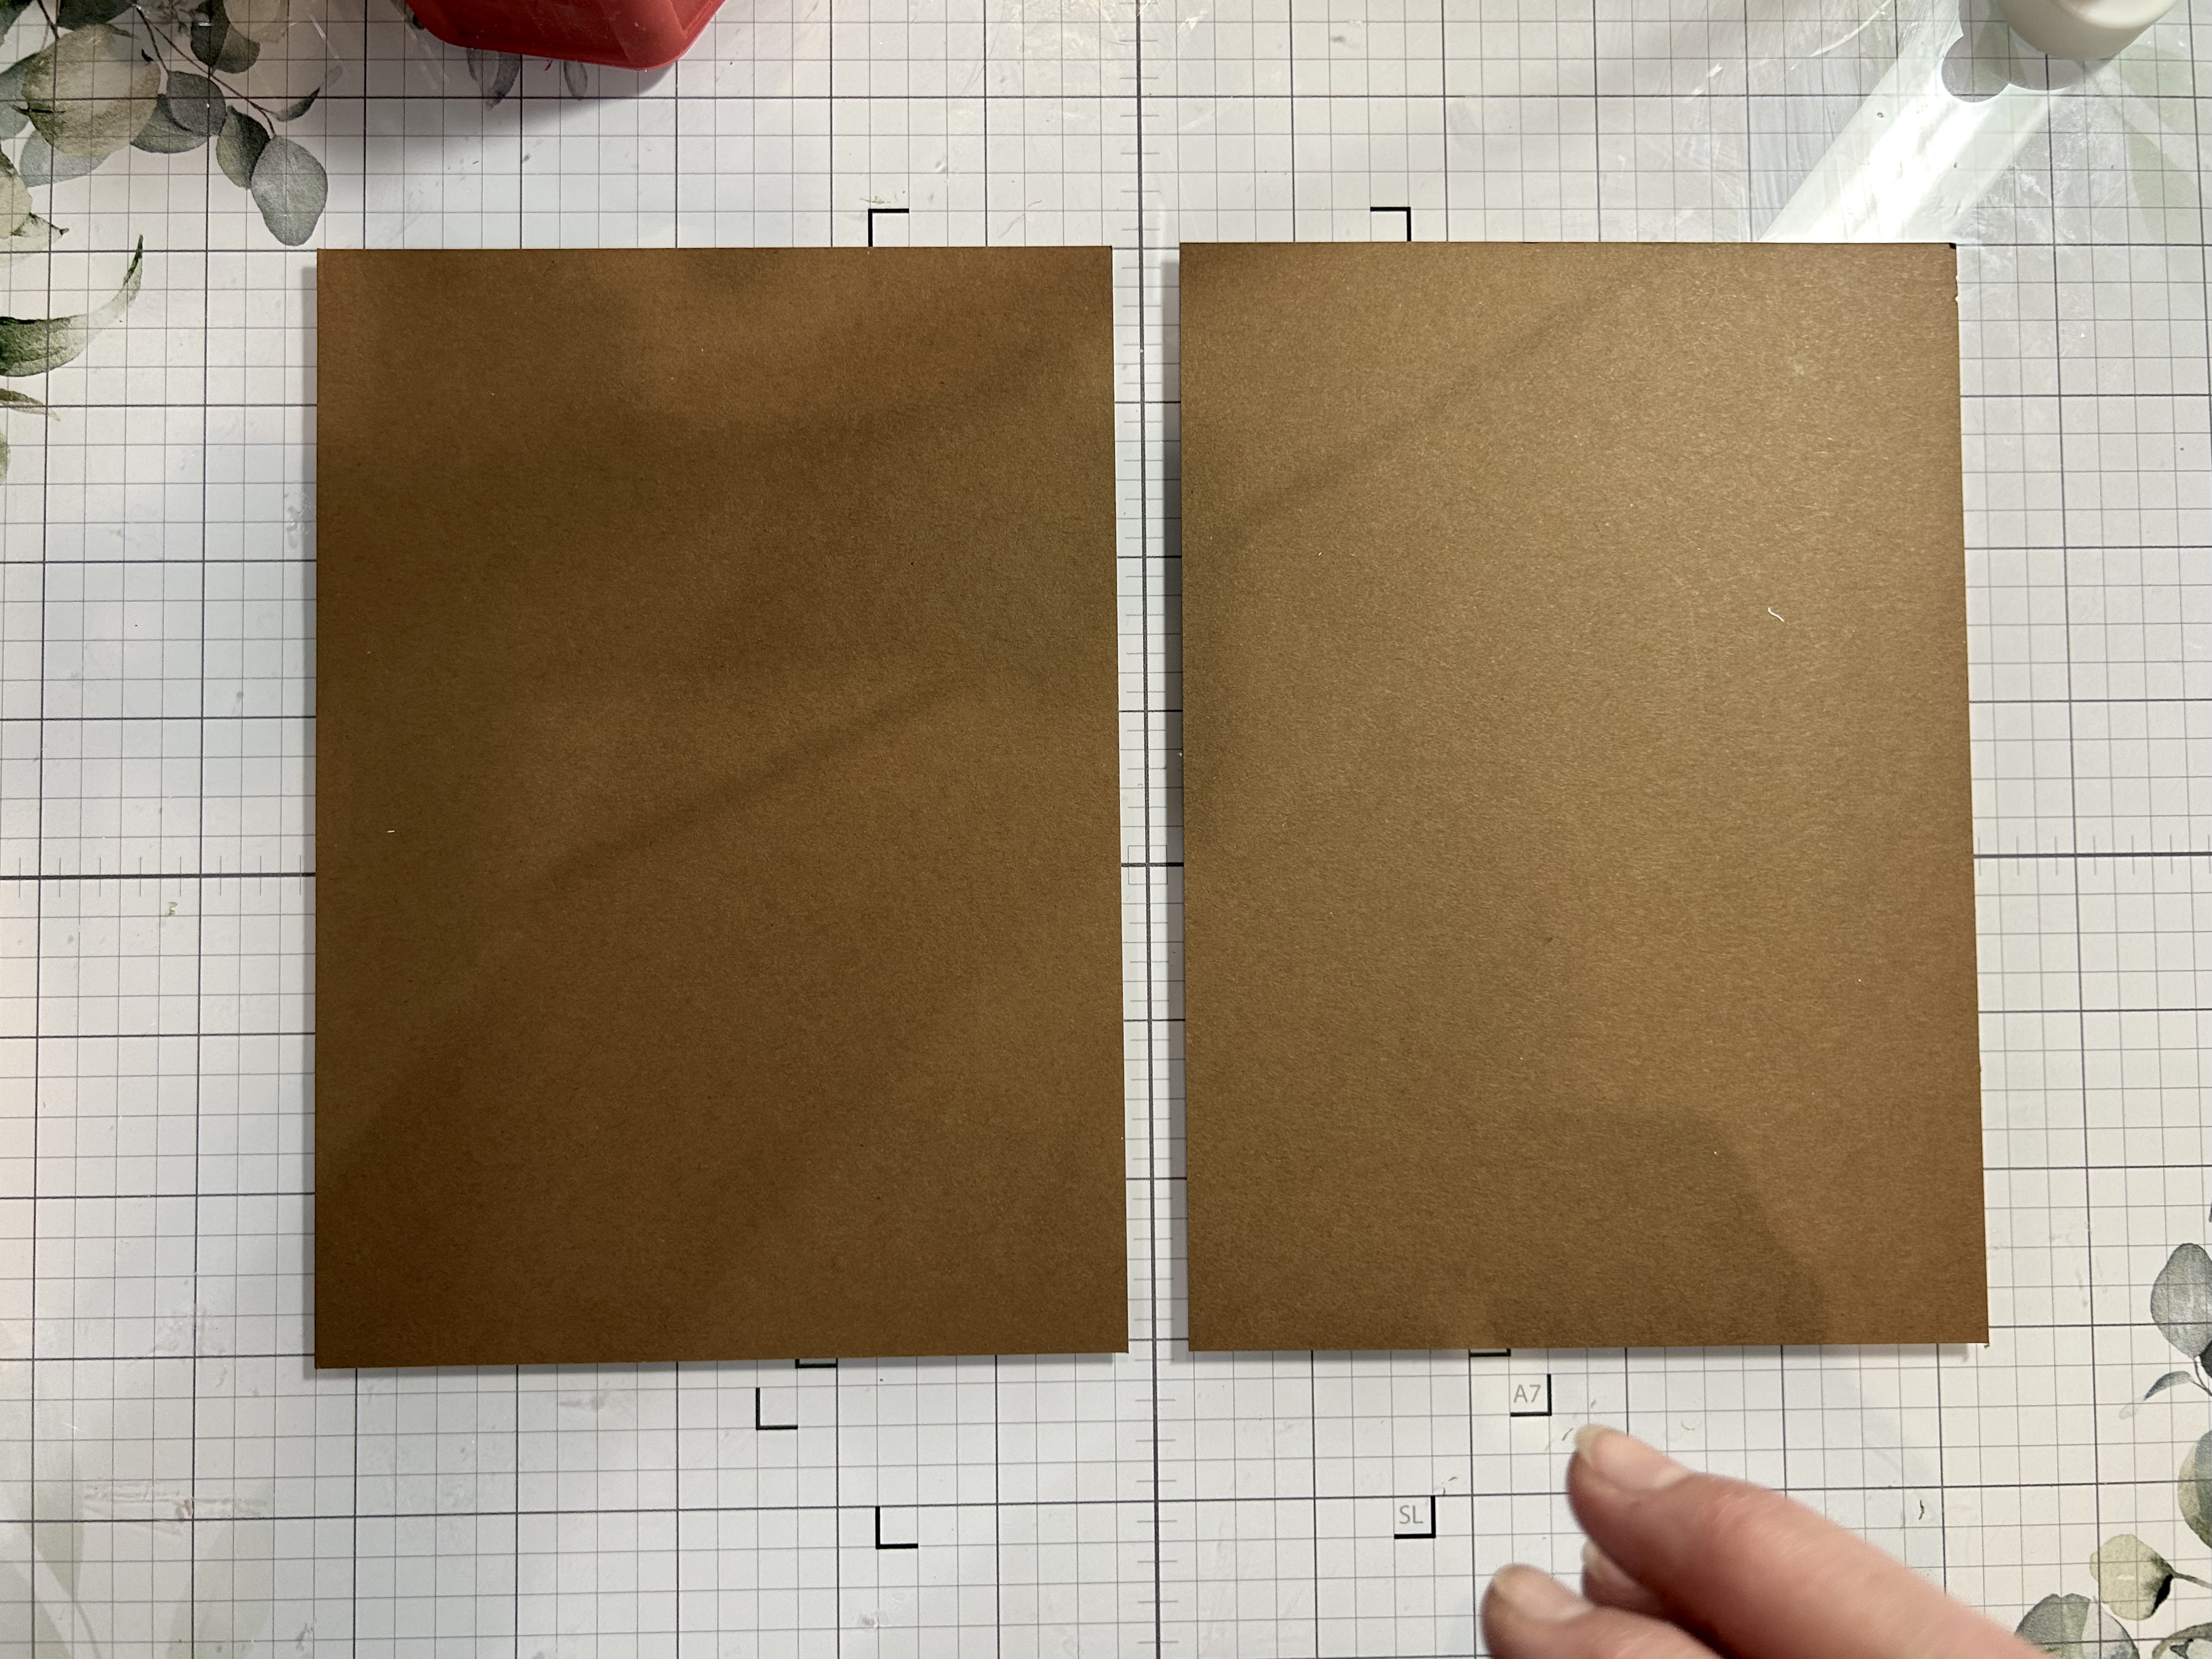
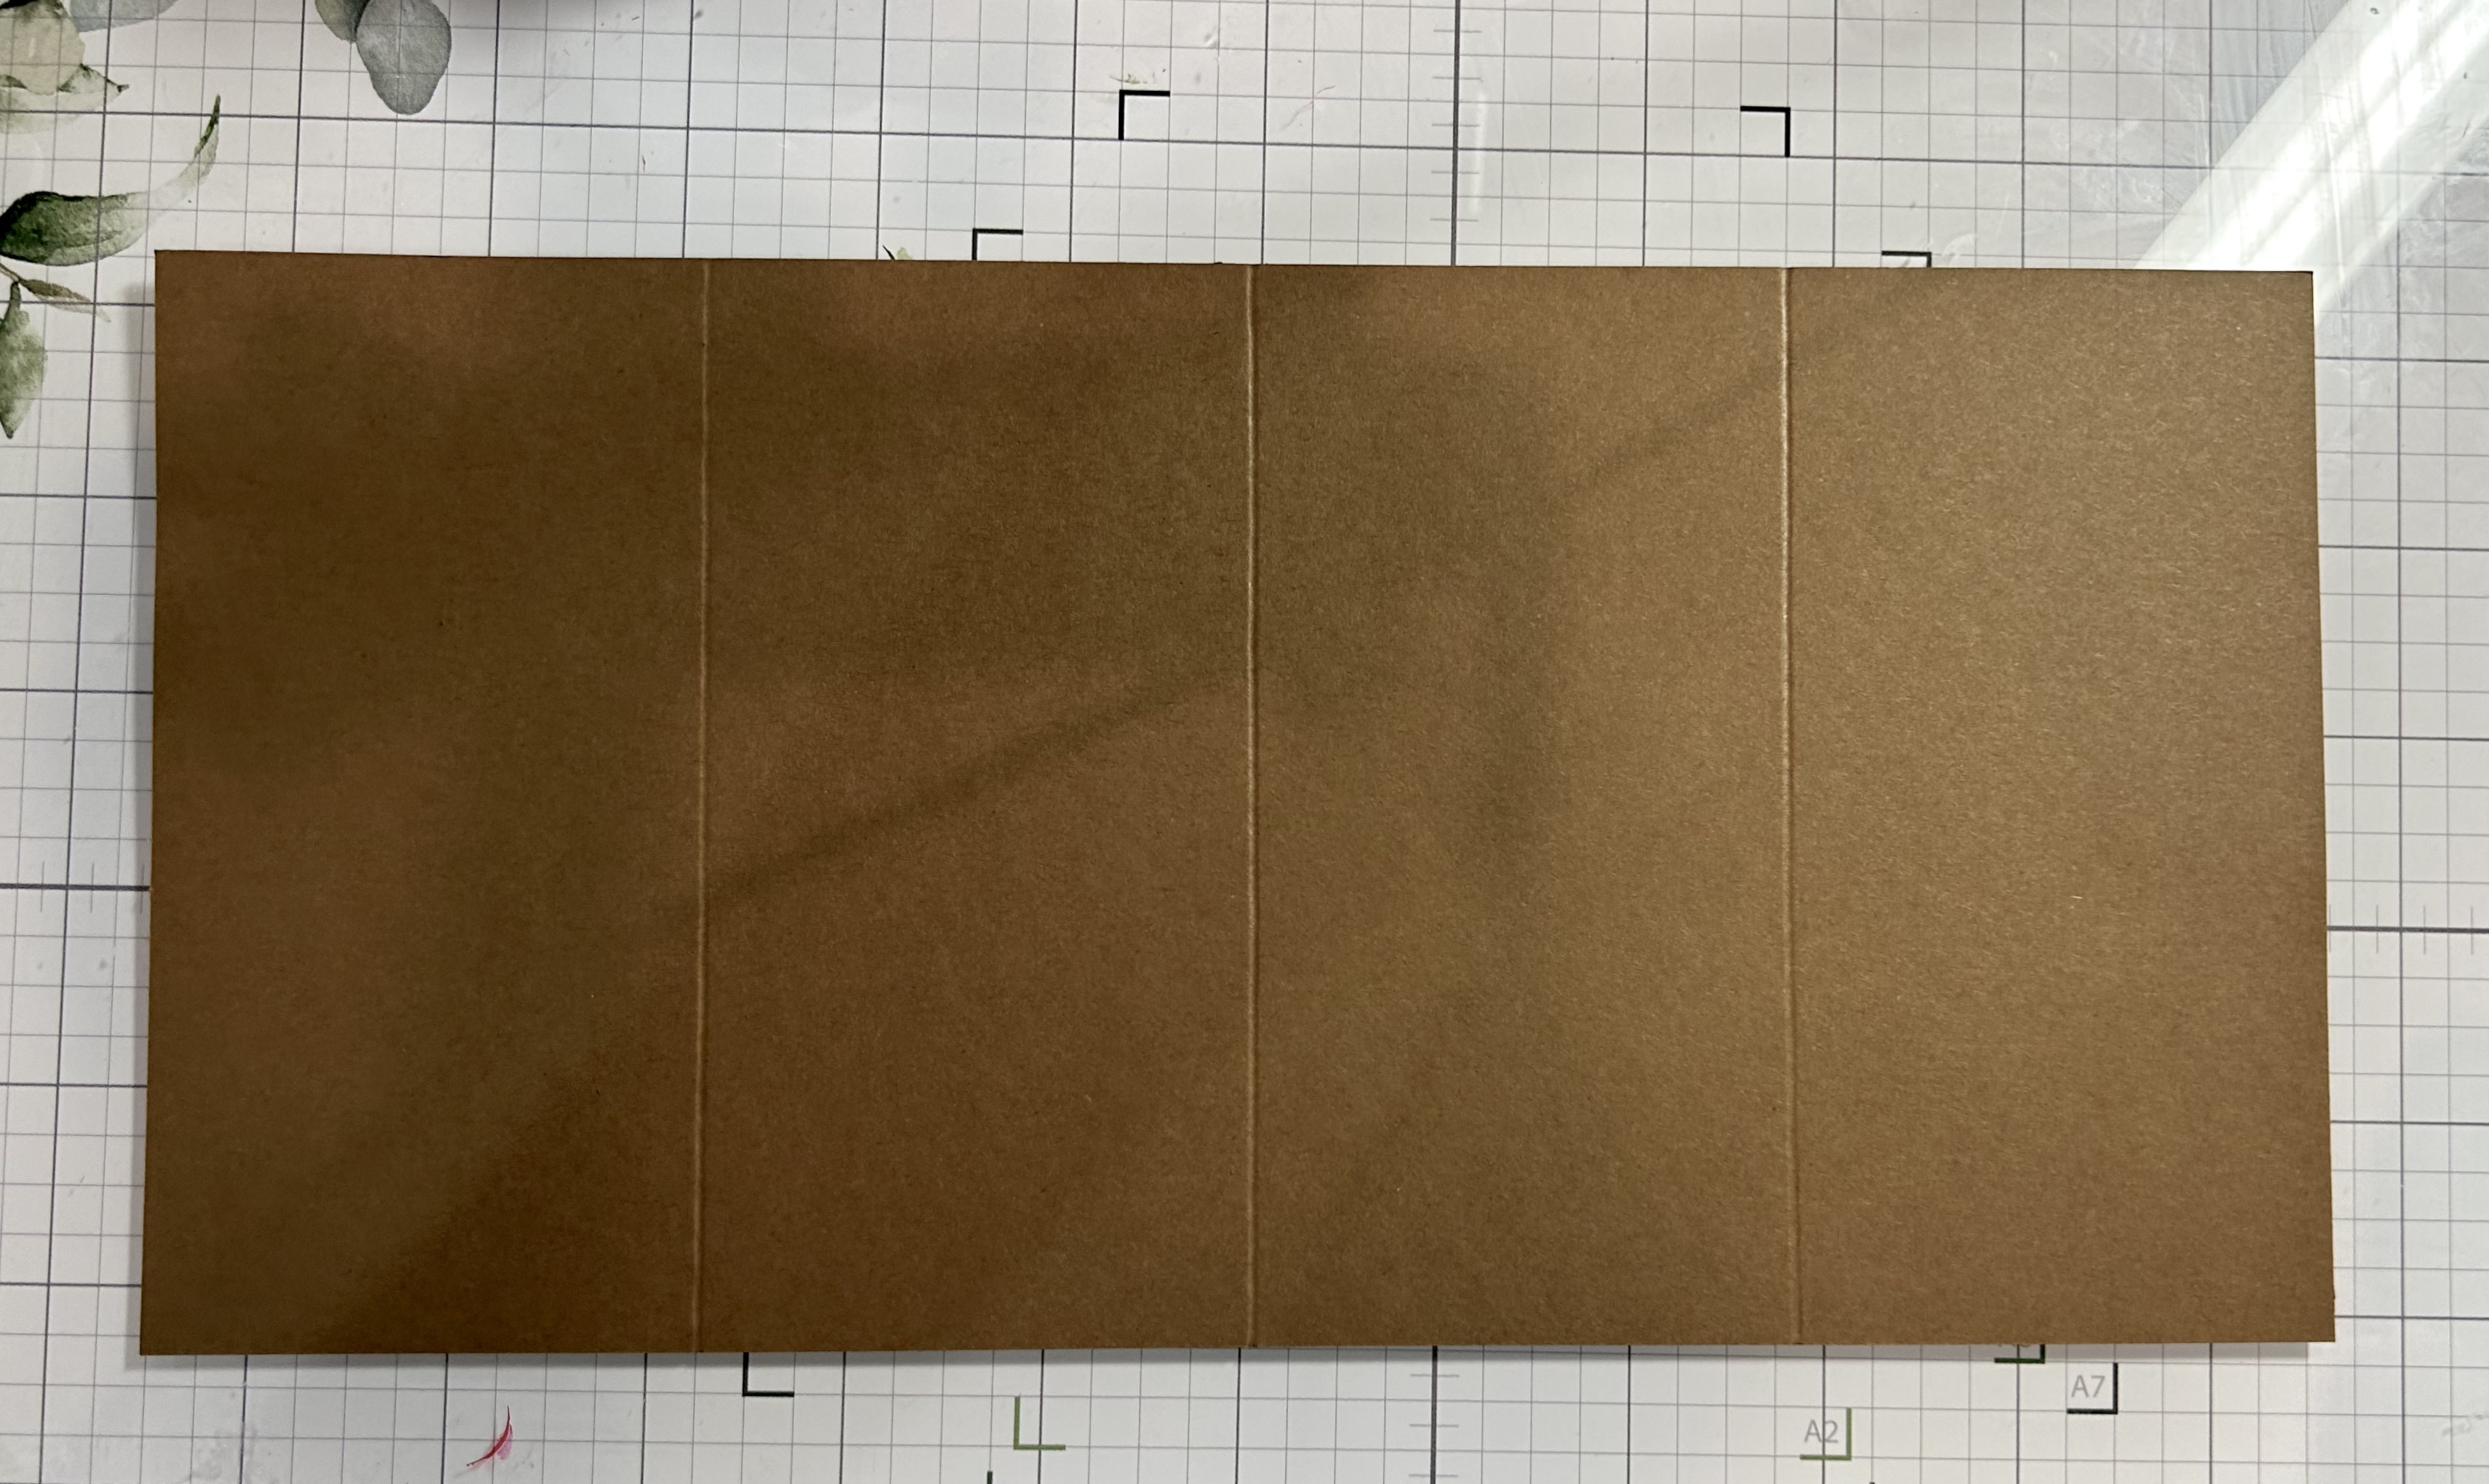
You will need to cut two (2) base pieces from 100 lb./300 gsm weight cardstock 5 1/2-inches x 9-inches.
You will cut and score them identically. First, in your paper trimmer and your cardstock with the 5 1/2″ at the top, set your paper at 1-inch down from the top and 1-inch in from the side, and cut from that point to 6 1/2″. Turn your paper over to repeat this cut on the other side as shown. You will repeat this on the other base piece.
Next, place your cardstock base, with the 9″ at the top, and score at 1-inch, 2-inch and 5 1/2″ only to the cut line. Turn your paper over and repeat those three score lines. Keeping your base in the 9″ position at the top, you will also score, between the cut lines, at 4 1/2″. See sample below.
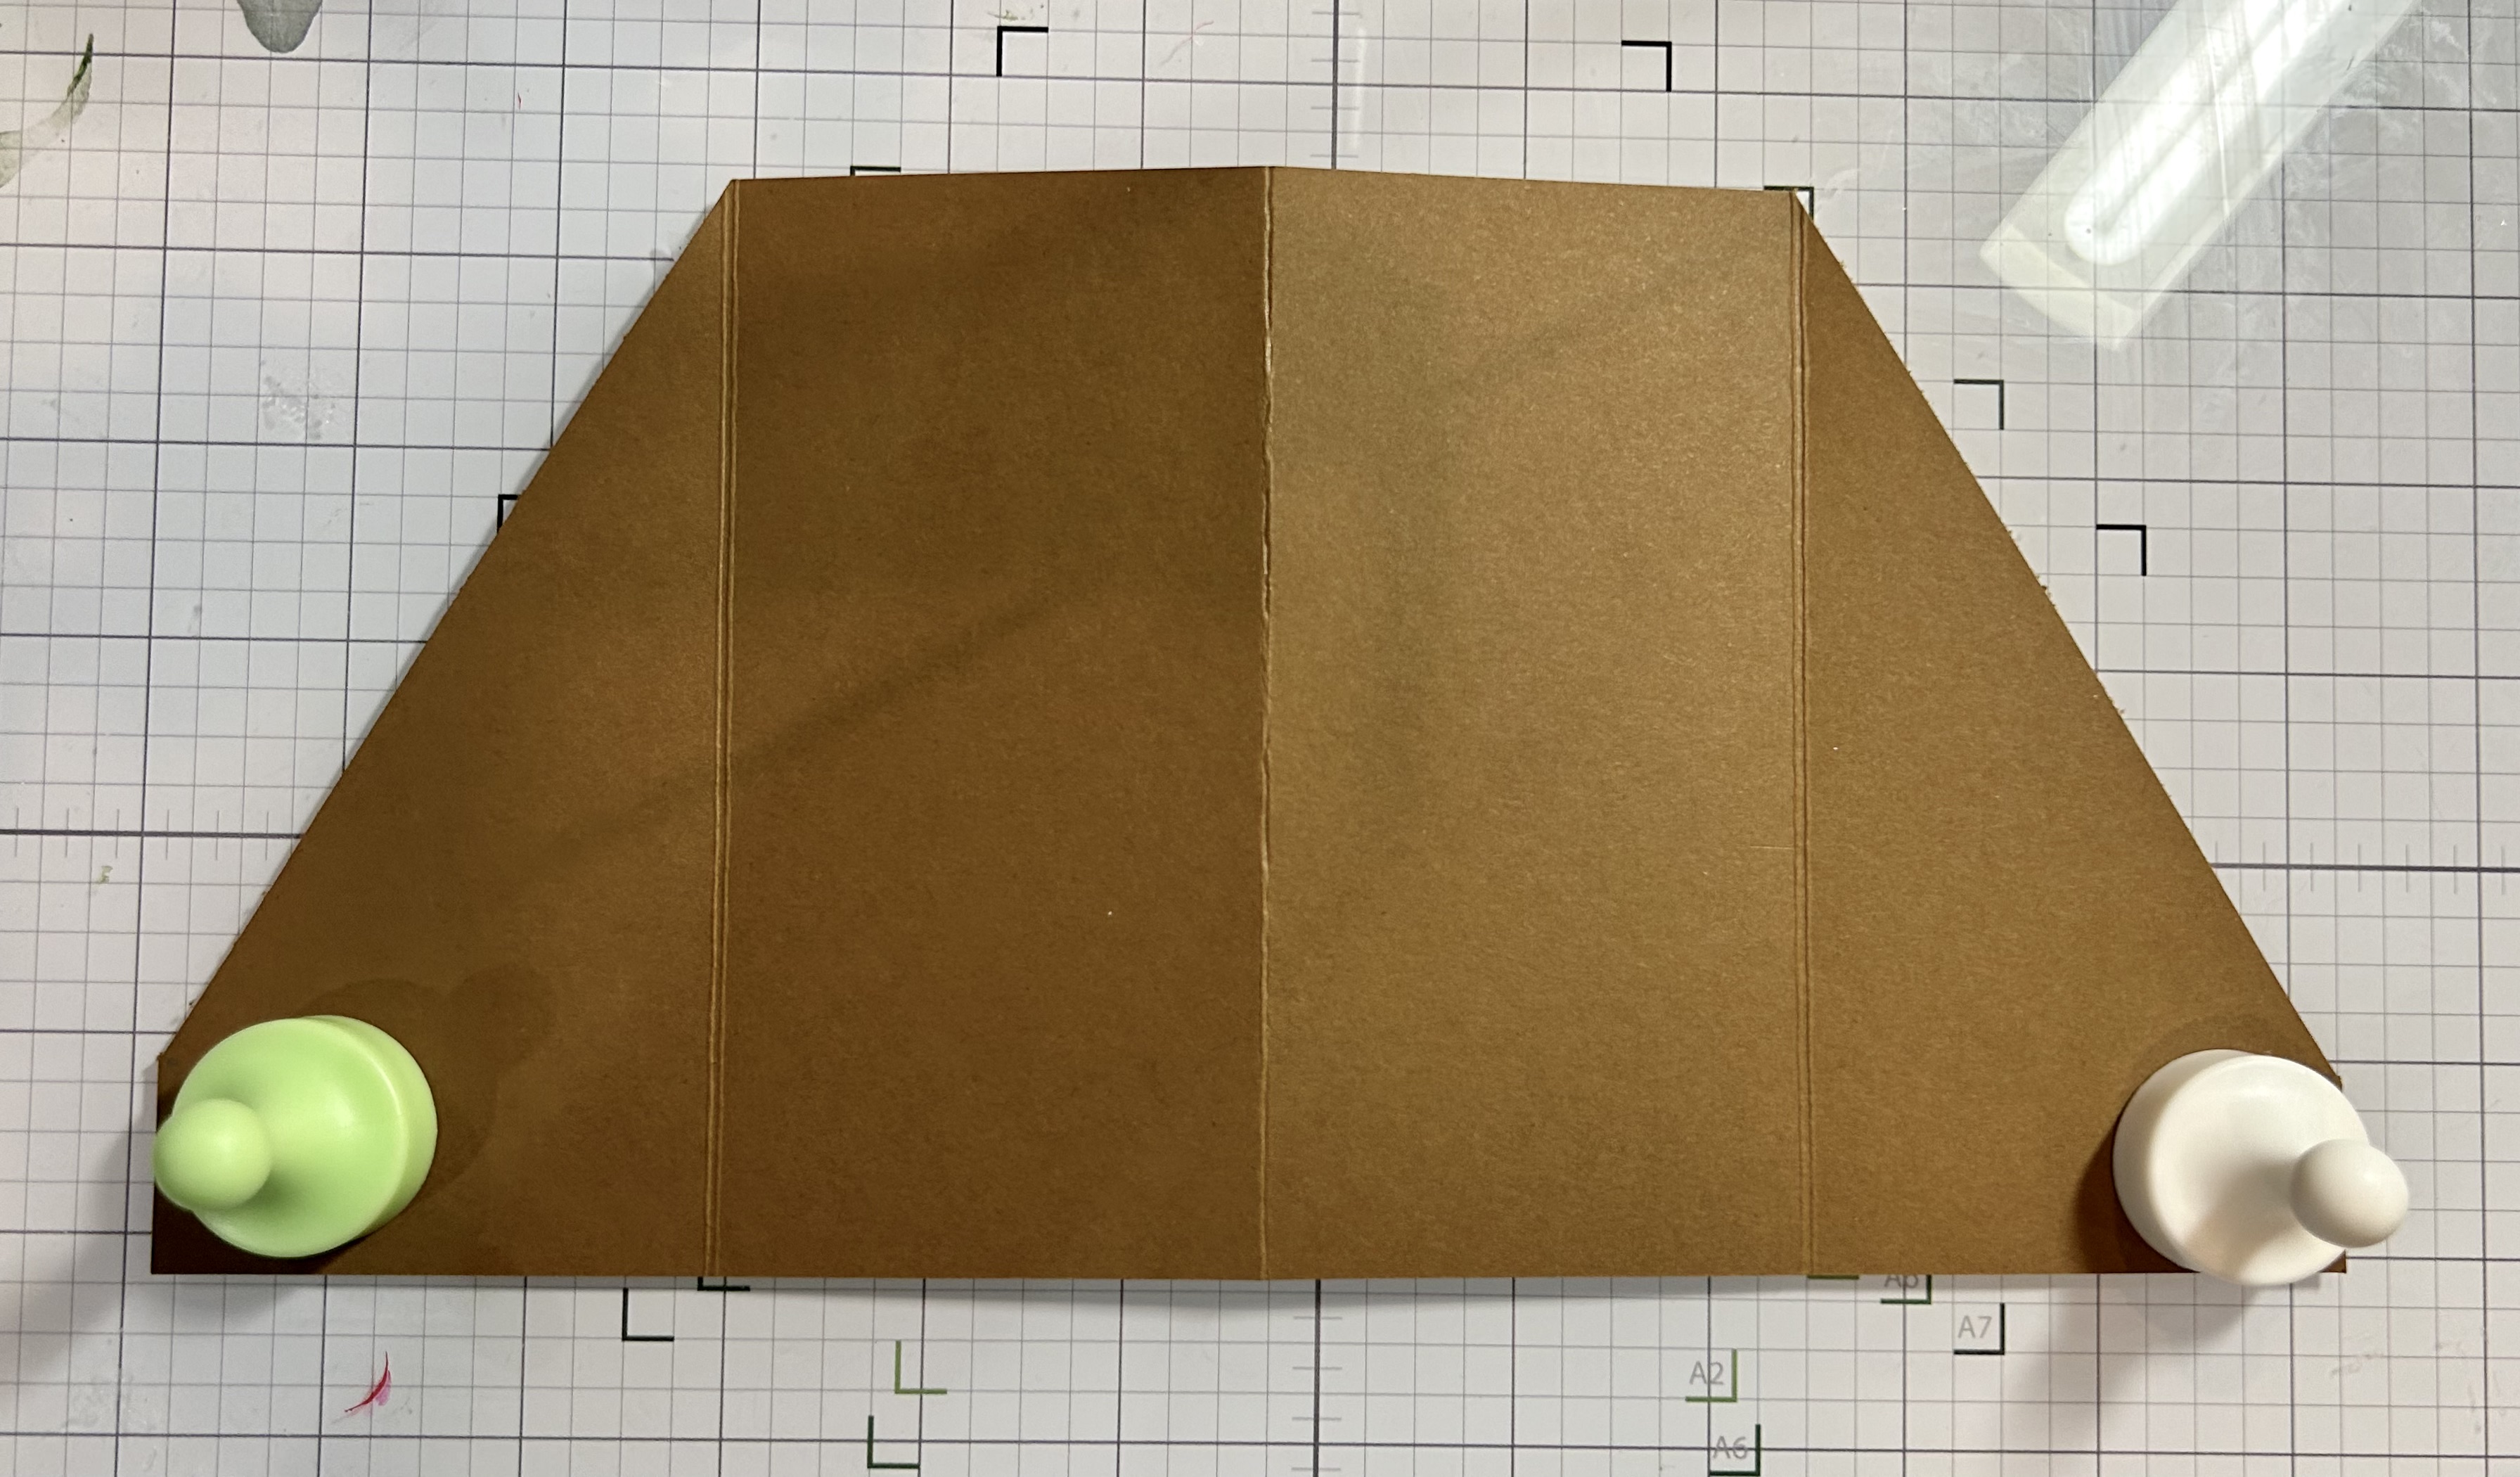
4. Once you have two bases done, you will burnish your scored lines. Starting on the sides where you have the 5 1/2″ marks, mountain fold; 4 1/2″ mark, mountain fold; 2″ marks, mountain fold, and finally 1″ marks, valley fold.
5. Glue the two bases together as shown:
Panels:
I used Mirrored Cardstock, but your card, your choice!
(1) 3/4″ x 5 1/4″
(6) 3/4″ x 3 1/4″
(4) 3/4″ x 3/4″
(2) 3 1/4″ x 5 1/4″
(2) 3 1/4″ x 3 1/4″
On the last two panel sections, I also added:
White cardstock – 3″ x 5″
Embossed white cardstock – 3″ x 3″
Additionally, I die cut an Oval, approximately 4″ x 2 1/2″ for the center.
I also created one with Double-sided Cardstock:
I know you will have fun creating this card…I sure did!